Pêşkêş
This manual provides essential information for the safe and effective operation of your Vivitar Aqua Snap Underwater Digital Camera & Camcorder. Designed for use in wet conditions, this compact device allows you to capture high-definition photos and videos during various water activities. Please read these instructions thoroughly before using the camera.
Naveroka pakêtê
Piştrast bike ku hemû tiştên ku li jêr hatine navnîş kirin di pakêta te de hene:
- Vivitar Aqua Snap Digital Camera & Camcorder
- Cable USB
- Manual Bikarhêner (ev belge)
- Nonstandard Battery (pre-installed or included separately)

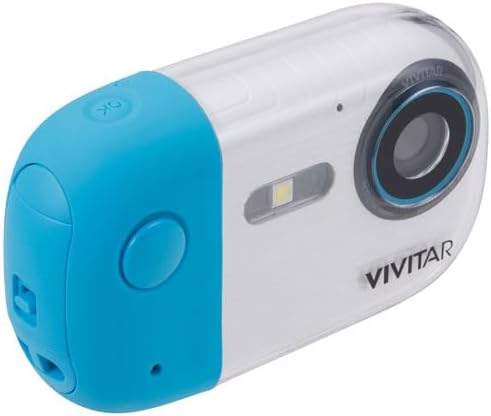
Wêne: Pêşî view of the Vivitar Aqua Snap Digital Camera, showcasing sêwirana wê ya kompakt û lens.
Kamera Serview
Familiarize yourself with the camera's physical components:
- Lensa Pêşiyê: Captures images and video.
- Ekrana Pêşî: For selfie framing and quick previews.
- Rear Screen (2.4 Inches): Bo viewing menus, framing shots, and playback.
- Bişkokên Kontrolê: Located on the top and rear for navigation, mode selection, and operation.
- Birûsk: Di şert û mercên ronahiya kêm de ronahîkirinê peyda dike.
- Mohrên Waterproof: Ensure all seals are properly closed before water immersion.
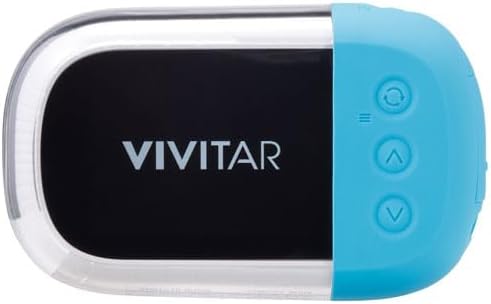
Wêne: Paş view of the Vivitar Aqua Snap Digital Camera, displaying the main screen and control buttons for navigation and settings.
Wêne: Bişkokî view of the Vivitar Aqua Snap Digital Camera, highlighting the top-mounted power and shutter buttons.
Damezirandin
1. Sazkirin û Şarjkirina Pîlê
Your camera requires one nonstandard battery, which is included. Ensure the battery is fully charged before first use.
- Cihê beşa pîlê bibînin.
- Open the compartment carefully, ensuring not to damage the waterproof seal.
- Insert the battery according to the polarity indicators.
- Close the battery compartment firmly until it clicks, ensuring the waterproof seal is intact.
- Connect the camera to a power source using the provided USB cable to charge. The charging indicator will illuminate.
2. Sazkirina Karta Bîrê
The camera uses an SD Card (Media Type: SD Card) to store photos and videos.
- Cihê karta SD-yê bibîne, bi gelemperî nêzîkî beşa bateriyê ye.
- Insert the SD card with the metal contacts facing the correct direction until it clicks into place.
- Ji bo derxistinê, kartê bi nermî bipêçin heta ku ew derkeve.
3. Vekirina Destpêkê
Press and hold the Power button (usually on the top) to turn on the camera. Follow any on-screen prompts for initial setup, such as language selection.
Kamera xebitîne
1. Wêne kişandin
To take a high-resolution photo (up to 18MP):
- Ensure the camera is in Photo mode (check the icon on the screen).
- Frame your shot using the rear screen or front screen for selfies.
- Press the Shutter button firmly to capture the image.
2. Tomarkirina Vîdyoyan
To record HD video (MP4 format):
- Switch the camera to Video mode.
- Press the Shutter button once to start recording. A timer or indicator will appear on the screen.
- Bişkojka Shutterê dîsa bikirtînin da ku tomar rawestînin.
3. Switching Between Photo and Video Modes
Use the dedicated Mode button (often labeled 'M' or with a camera/video icon) to toggle between photo and video capture modes.
4. Fonksiyona Zoomê
Use the 'W' (Wide) and 'T' (Telephoto) buttons to zoom in and out digitally.
5. Selfie Mode (Front Screen)
The camera features a front screen for convenient selfie capture. To activate the front screen for framing, press the designated button (refer to your camera's specific button layout, often a screen switch icon).

Wêne: Bişkokî view of the Vivitar Aqua Snap Digital Camera, highlighting the front screen for selfie framing and the main lens.
6. Lîstin û Jêbirin Files
Ji nû veview your captured media:
- Enter Playback mode (often via the Mode button or a dedicated playback icon).
- Bişkokên navîgasyonê bikar bînin da ku hûn di nav wêne û vîdyoyên xwe de bigerin.
- Ji bo jêbirin a file, select it and press the Delete button (often represented by a trash can icon). Confirm deletion when prompted.
7. Mîhengên
Access the camera's menu to adjust various settings:
- Çareserkirin: Adjust photo resolution (e.g., 18MP).
- Otofokus: Enable or disable autofocus.
- Modên Dîmenê: Select pre-set modes for different environments (e.g., Beach, Night).
- Li dijî hejandinê: Stabilize your shots.
- Girtina Bişirîn: Automatically take a photo when a smile is detected.
- Tûşbûn: Astên ronahiyê eyar bikin.
- Balansa Spî: Correct color temperature.
- Date St.amp: Add date/time to photos.
- Çap: Erase all data on the SD card.
- Mîhengên Default: Vegerandina mîhengên kargehê.
8. Filter Function
The camera may include various filters to enhance your photos. To switch between filters, activate the camera and tap the "OK" button. This will cycle through available filters. To return to the original picture without a filter, continue tapping "OK" until the desired setting is reached.
Video: Demonstration of how to switch between filters on the Maxmango Underwater Camera. This feature is similar to the Vivitar Aqua Snap's filter functionality.
Waterproof Usage Guidelines
The Vivitar Aqua Snap is designed for underwater use, perfect for snorkeling, diving, and swimming. It is waterproof up to 10 meters (33 feet).
- Always ensure the battery compartment and any other ports are securely closed and sealed before immersing the camera in water.
- Avoid opening the battery or memory card compartments when the camera is wet or submerged.
- After use in saltwater, rinse the camera with fresh water and dry thoroughly with a soft cloth.
Video: A demonstration of a waterproof camera being used underwater, highlighting its functionality in aquatic environments. This illustrates the Vivitar Aqua Snap's intended use.
Maintenance & Care
- Keep the lens clean using a soft, lint-free cloth.
- Dema ku neyê bikar anîn kamerayê li cîhek sar û zuwa hilînin.
- Ji bo demên dirêj kamerayê li ber germahiyên zêde an jî tîrêjên rojê yên rasterast nehêlin.
- Regularly check waterproof seals for any signs of wear or damage.
Çareserkirina pirsgirêkan
Kamera venagere:
- Piştrast bike ku pîl bi tevahî şarj bûye û bi rêkûpêk hatiye danîn.
- Kontrol bikin ka beşa pîlê bi ewlehî girtî ye.
Kalîteya Wêne/Vîdyoyê Nebaş:
- Lensa kamerayê paqij bikin.
- Adjust resolution settings to a higher quality.
- Ensure adequate lighting for your shots.
Leaksiyona avê:
- Immediately remove the camera from water.
- Open all compartments and allow the camera to dry completely in a well-ventilated area.
- Inspect all waterproof seals for damage or debris. Do not use underwater again if seals are compromised.
Specifications
| Nîşan: | Vivitar |
| Cins: | Aqua Snap |
| Kûrahiya avê: | Heta 10 metre (33 ling) |
| Çareserkirina Girtina Vîdyoyê: | HD (18MP for photos) |
| Forma Girtina Vîdyoyê: | MP4 |
| Tîpa medyayê: | Karta SD |
| Mezinahiya ekranê: | 2.4 Inches (Rear) |
| Giraniya Babetê: | 12 onsan |
| Mezinahiya pakêtê: | 6 x 4 x 2 inches |
| Pîl: | 1 Bataryaya Nestandard (tê de ye) |
Garantî û Piştgirî
Information regarding product warranty and customer support was not provided in the available data. Please refer to the product packaging or the manufacturer's official webji bo hûrguliyên li ser garantiyê û çawaniya têkiliyê bi piştgiriya xerîdaran re, serdana malperê bikin.


