1. Destpêk
This manual provides detailed instructions for the installation, operation, and maintenance of your ANNKE Dual-Lens Outdoor Security Camera System. Please read this manual thoroughly before using the product to ensure proper setup and functionality. Keep this manual for future reference.
2. Çi di Qutîkê de ye
Piştrast bike ku hemî pêkhate di pakêta te de hene:
- 1 x 8CH 6MP NVR (Network Video Recorder)
- 1 x 6TB Hard Drive (pre-installed in NVR)
- 1 x 6MP PoE Dual-Lens Panoramic Camera
- 1 x 30m Ethernet Cable
- 1 x Mişk USB
- 1 x Adaptera Hêzê ji bo NVR
- 1 x 1.8m Cable HDMI
- 1 x Manual Bikarhêner
- 1 x Çîtikê Dîwar
- Screws and Wall Plugs for camera installation

Figure 2.1: Package Contents. This image displays the NVR, dual-lens camera, power adapter, USB mouse, 30m network cable, HDMI cable, wall sticker, user manual, screws, and a 6TB surveillance HDD.
3. Hilbera Serîview û Taybetmendiyên sereke
The ANNKE Dual-Lens Outdoor Security Camera System offers advanced surveillance capabilities with its innovative design and smart features.
3.1. Dual-Lens Panoramic Camera
- 180° Wider View: The camera integrates two 1/2.5" BSI sensors to provide a single, stitched 180° panoramic view without distortion, covering a significantly wider area than standard cameras.
- 6MP Clarity: Delivers high-resolution 6-megapixel video for clear and detailed imaging.
- Dîtina Şevê ya Rengîn a Tevahî: Equipped with two spotlights, the camera provides vivid, full-color video even in low-light conditions, extending visibility up to 100 ft.
- AI Smart Motion Detection: Features intelligent detection for human and vehicle motion, reducing false alarms. Customizable detection zones and lines are supported.
- Dengê Du Rê: Built-in microphone and speaker allow for real-time communication through the camera.
- PoE (Hêza li ser Ethernet): Simplifies installation by providing power and data through a single Ethernet cable.
- Berxwedêra hewayê: IP66 rated for outdoor use, capable of withstanding various weather conditions.
- Hilberîna Herêmî: Supports a built-in micro SD/SDHC/SDXC slot up to 256 GB (card not included) for local recording.

Figure 3.1: 180° Stitched Panoramic View. This image illustrates the wider field of view provided by the dual-lens camera compared to traditional cameras, showing a seamless 180-degree image.
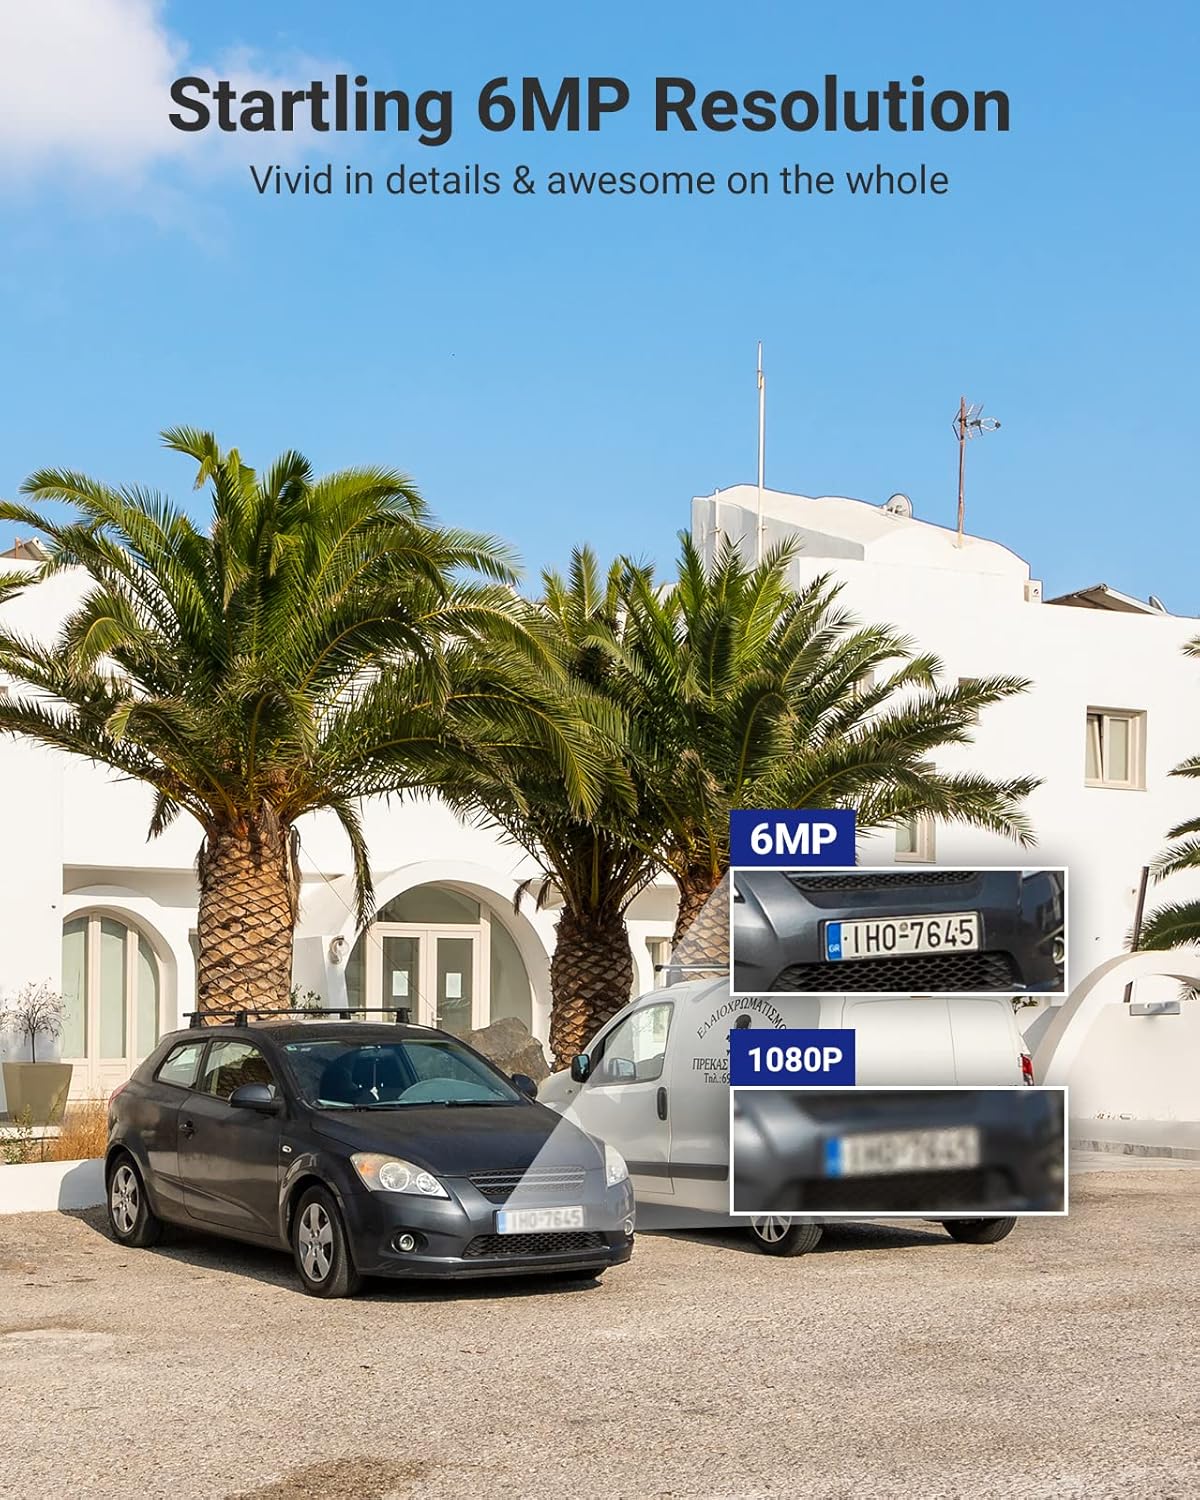
Figure 3.2: 6MP Resolution Clarity. This image demonstrates the enhanced detail of 6MP resolution, showing clearer license plate numbers compared to 1080p resolution.

Figure 3.3: Full-Color Night Vision. This image shows the camera mounted on a building, illuminating a wide outdoor area with its spotlights, providing a full-color view bi şev.
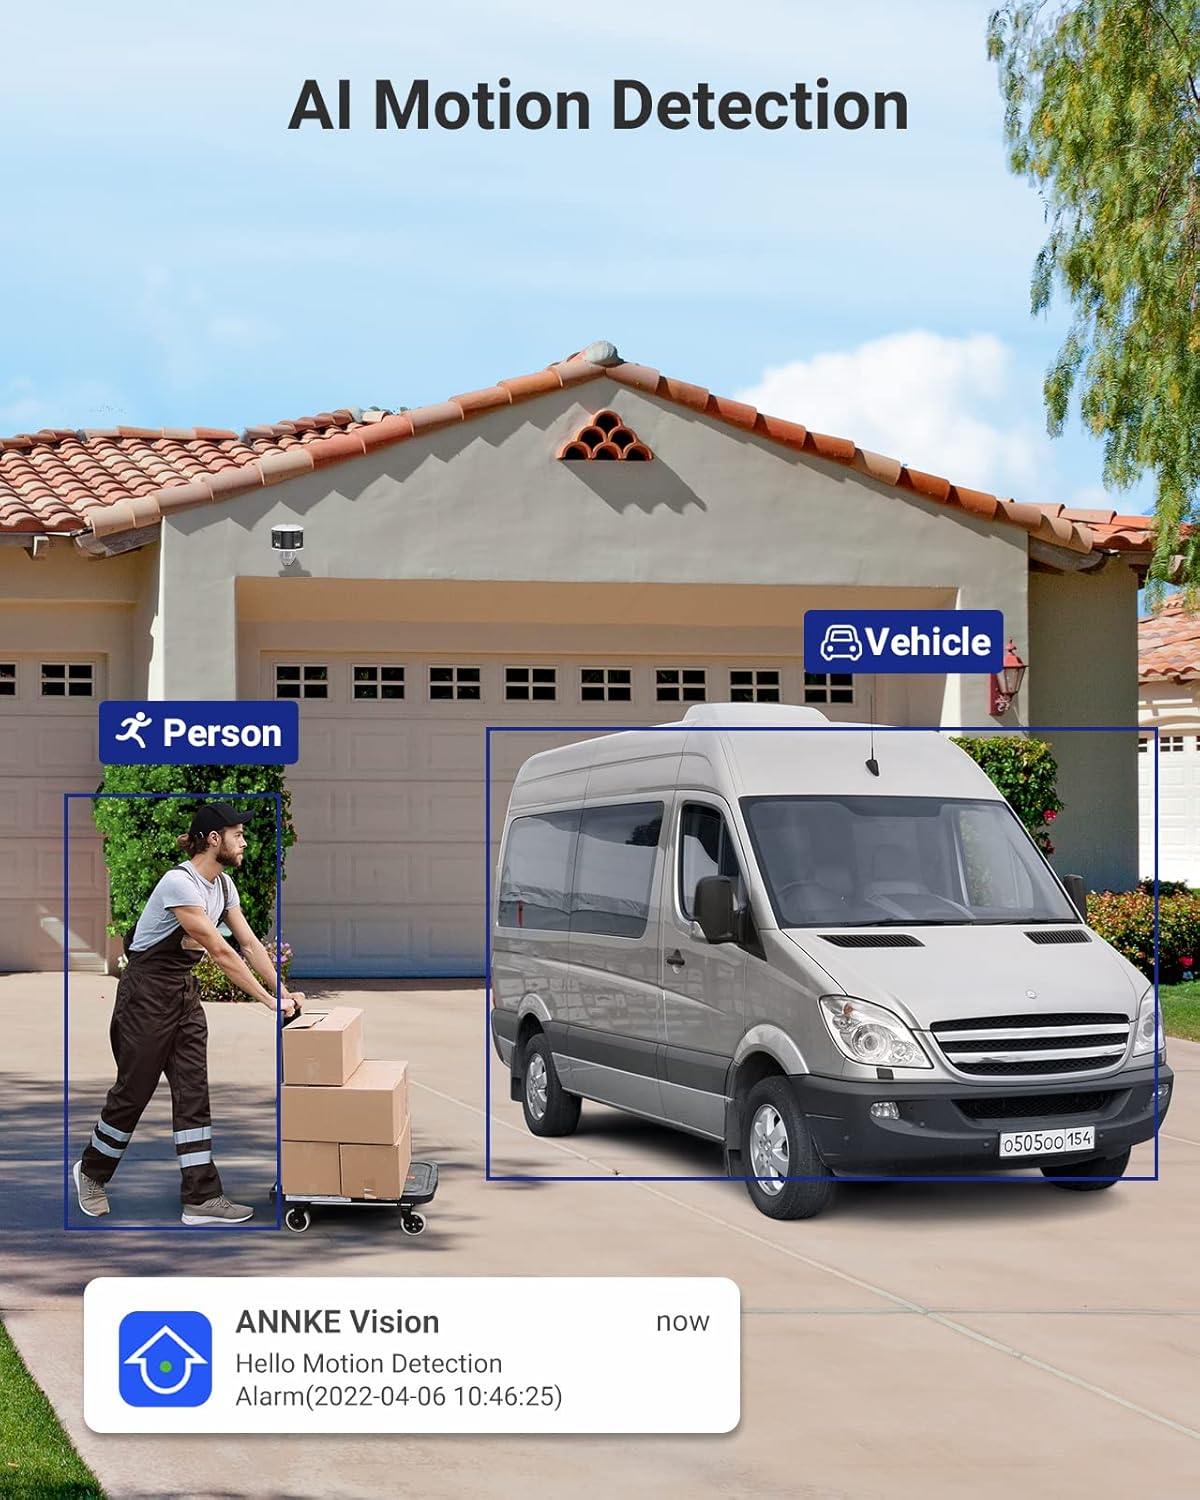
Figure 3.4: AI Motion Detection. This image depicts the camera's ability to distinguish between a person and a vehicle, highlighting detected objects with bounding boxes and showing a notification alert.

Figure 3.5: Two-Way Audio. This image illustrates a user communicating with a delivery person via the camera's two-way audio feature, with speech bubbles indicating the conversation.

Figure 3.6: Single Camera, Dual Functionality. This diagram visually explains how one dual-lens camera provides the coverage equivalent to two traditional single-lens cameras, simplifying installation.

Figure 3.7: Micro SD Card Slot. A close-up view of the camera's micro SD card slot, indicating support for up to 256GB of local storage.
3.2. 8-Channel NVR (Network Video Recorder)
- 8-Channel PoE Input: Connects up to 8 PoE IP cameras, providing power and data.
- 6MP Max Recording Resolution: Supports recording resolutions up to 6 megapixels.
- Kompresyona Vîdyoyê ya H.265+: Advanced compression technology for efficient storage and bandwidth usage.
- 6TB HDD Included: Comes with a pre-installed 6TB hard disk drive for extensive video storage.
- HDMI & VGA Output: Connects to monitors for local viewing up to 1080P.
- Onvif Protocols: Supports Onvif for compatibility with various IP cameras.

Figure 3.8: ANNKE Security System Components. This image displays the ANNKE NVR unit and the dual-lens panoramic PoE camera, along with a visual representation of the 6TB hard drive.
4. Specifications
4.1. NVR Specifications
| Taybetî | Specification |
|---|---|
| IP Vekirina Vîdyoyê | 8 Channels PoE |
| Resolution Max Recording | Heta 6 MP |
| Derketina Vîdyoyê | HDMI & VGA Up to 1080P |
| Compression Video | H.265+/H.265/ H.264+/H.264 |
| Kapasîteya HDD | Up to 6TB capacity (6TB HDD Included) |
| poe | Ji bo yek portê herî zêde 25.5W |
| Têkiliya torê | RJ45 x 1 (10/100 M) |
| USB | 2x USB 2.0 |
| Hêza xebitandinê | DC48V |
| Germahiya xebitandinê | 14 °F ~ 131 °F (-10 °C ~ +55 °C) |
| Pîvan (L x W x H) | 10.43 x 8.86 x 1.89 inches |
4.2. Taybetmendiyên Kamerayê
| Taybetî | Specification |
|---|---|
| Sensorê Wêne | 2x 1/2.5" Progressive Scan CMOS |
| Nîsk | Dual lens: 2.8 mm |
| Qada ji View (FoV) | 180° Panoramîk |
| Rêjeya Bit Bit Video | 32 Kbps ber 16 Mbps |
| Audio | Built-in Microphone (with environment noise filtering), Two-Way Audio |
| Zêdekirina Wêne | BLC, HLC, 3D DNR |
| Rêzeya Dînamîkî ya Berfireh | 120dB WDR |
| Hêza xebitandinê | PoE (802.3af), 12 VDC ± 25% |
| Embarkirinî | Built-in micro SD/SDHC/SDXC slot, up to 256 GB (card not included), support NAS, NVR |
| Alarm Audio | Support (Parameters adjustable, custom audio, triggered from APP) |
| Rêjeya Jîngehê | Navxweyî / Derveyî (IP66) |
5. Guide Setup
Follow these steps to set up your ANNKE Security Camera System.
5.1. NVR Installation
- Cihkirin: Place the NVR in a secure, dry, and well-ventilated area, away from direct sunlight and heat sources. Ensure it is easily accessible for connections.
- Monîtorê Girêdanê Bike: Connect a monitor to the NVR's HDMI or VGA port using the provided HDMI cable or a VGA cable (not included).
- Mouse Girêdan: Plug the USB mouse into one of the NVR's USB ports.
- Connect to Network (Optional but Recommended): For remote access and firmware updates, connect the NVR's RJ45 network port to your router/switch using an Ethernet cable.
- Hêzdarkirin: Connect the NVR to the power adapter and plug it into a power outlet. The NVR will start automatically.
5.2. Sazkirina Kamera
- Cih hilbijêrin: Select a suitable outdoor location for the camera, ensuring it covers the desired area and has a clear line of sight. Consider mounting height for optimal detection and view.
- Çêkirin: Use the provided screws and wall plugs to securely mount the camera to a wall or ceiling. Ensure the mounting surface is strong enough to support the camera's weight.
- Connect Camera to NVR: Connect the camera to one of the NVR's PoE ports using the provided 30m Ethernet cable. The camera will receive both power and data through this single cable.
- Angle Eyar bikin: Loosen the camera's adjustment screws to position the camera for the desired 180° panoramic view. Tighten the screws once the angle is set.
5.3. Initial NVR Configuration
- Sêrbazê Sazkirina Cara Yekem: Upon first boot, the NVR will guide you through a setup wizard. Follow the on-screen prompts to set language, date/time, password, and network settings.
- Destpêkirina Hard Drive: The pre-installed 6TB HDD may need to be initialized or formatted by the NVR. Follow the prompts to ensure it's ready for recording.
- Tespîtkirina kamerayê: The NVR should automatically detect and add the connected PoE camera. If not, refer to the NVR's specific user manual for manual camera addition.
- Veavakirina Torê: If you connected the NVR to your network, ensure DHCP is enabled or configure a static IP address. This is crucial for remote access.
6. Telîmatên Operating
This section covers basic operation of your ANNKE Security Camera System.
6.1. Bijî View
- After successful setup, the NVR will display the live feed from the connected camera(s) on the monitor.
- Use the USB mouse to navigate the NVR interface. Double-click a camera view to enlarge it, or right-click to access the main menu.
6.2. Recording û Playback
- Girtinî: The NVR is configured for continuous recording by default. You can adjust recording schedules (e.g., motion-triggered, scheduled) via the NVR's menu (typically under "Record" or "Storage").
- Playback: Access the "Playback" menu on the NVR. Select the desired camera and date/time to review foo tomar kirtage. Use the timeline to navigate through recordings.
6.3. Tesbîtkirina Tevgerê û Hişyarî
- Veavakirin: Navigate to the "Event" or "Alarm" settings in the NVR menu. Here you can enable and configure Human/Vehicle Detection for your camera.
- Detection Zones/Lines: Draw specific areas or lines on the camera's view where motion detection should be active. This helps to minimize false alarms.
- Alerts: Configure how you receive alerts (e.g., push notifications to your mobile app, email alerts, audible siren from the camera).
6.4. Dengê Du-Alî
- To use two-way audio, access the camera's live view through the NVR interface or the mobile application.
- Look for a microphone icon to speak and a speaker icon to listen. Ensure your mobile device's microphone is enabled for the app.
6.5. Remote Access (Mobile App)
- Dakêşanê Dakêşînin: Download the official ANNKE mobile application from your smartphone's app store (e.g., "ANNKE Vision" or similar, refer to NVR manual for exact app name).
- Hesabê qeyd bike: Hesabek çêbikin û têkevinê.
- Amûrek zêde bikin: Use the app to scan the QR code on your NVR or manually enter its serial number to add the device.
- Jîyan View & Lîstin: Piştî ku hat zêdekirin, hûn dikarin view live feeds, play back recordings, receive alerts, and use two-way audio remotely.
7. Maintenance
- Paqijî: Lensa kamerayê bi rêkûpêk bi nermikek paqij bikinamp cloth to ensure clear image quality. Do not use harsh chemicals.
- Nûvekirinên Firmware: Check the ANNKE website or your mobile app periodically for firmware updates. Keeping your system updated ensures optimal performance and security.
- Kontrola kabloyê: Periodically inspect all cables for wear and tear, especially outdoor Ethernet cables, to prevent connection issues.
- Tenduristiya Hard Drive: The NVR may have a feature to check the health of the hard drive. Monitor this to prevent data loss.
8. Destpêkirin
8.1. No Video Display
- Hêza kontrol bikin: Ensure the NVR is powered on and the power adapter is securely connected.
- Têkiliya Çavdêr: Verify the HDMI/VGA cable is securely connected to both the NVR and the monitor. Try a different cable or monitor if possible.
- Girêdana Kamerayê: Ensure the Ethernet cable from the camera is securely plugged into a PoE port on the NVR. Check if the PoE port indicator light is on.
- NVR Settings: Access the NVR menu (if display works) and check camera management settings to ensure the camera is added and enabled.
8.2. No Remote Access
- Têkiliya torê: Verify the NVR is connected to your router/network and has internet access. Check the network status in the NVR settings.
- Têketina Serlêdanê: Ensure you are logged into the correct account on the mobile app.
- Amûrê lê zêdekirî: Confirm the NVR is correctly added to your account in the mobile app.
- Firewall/Router: Check your router's firewall settings. Ensure necessary ports are open if manual port forwarding is required (though P2P usually bypasses this).
8.3. Motion Detection Not Working
- Enable Detection: Ensure Human/Vehicle Detection is enabled for the specific camera in the NVR's event settings.
- Hisê nazik: Adjust the detection sensitivity. Too low may miss events, too high may cause false alarms.
- Qada Tespîtkirinê: Verify the detection zones/lines are correctly configured and cover the desired areas.
- Pîlan: Check if the motion detection schedule is active for the current time.
9. Garantî û Piştgirî
ANNKE products typically come with a limited warranty. For specific warranty terms and conditions, please refer to the warranty card included in your package or visit the official ANNKE website.
For technical support, product inquiries, or service requests, please contact ANNKE customer support through their official website or the contact information provided in your NVR's user manual.
Official ANNKE Webmalper: www.annke.com


