1. Destpêk
This manual provides detailed instructions for the installation, operation, and maintenance of your LC-Power LC-DOCK-U3-4B 4-Bay HDD/SSD Docking Station. Please read this manual thoroughly before using the device to ensure proper functionality and to prevent damage.
The LC-DOCK-U3-4B is designed to provide convenient access to up to four 2.5-inch or 3.5-inch SATA hard disk drives (HDDs) or solid-state drives (SSDs) via USB 3.0 or eSATA connections. It also features an offline cloning function.
2. Naveroka pakêtê
Piştrast bike ku hemî tişt di pakêtê de hene:
- LC-Power LC-DOCK-U3-4B Docking Station
- Power Adapter
- Cable USB 3.0
- eSATA Cable (optional, may vary by region)
- Manual Bikarhêner (ev belge)
3. Hilbera Serîview
3.1 Pêş View

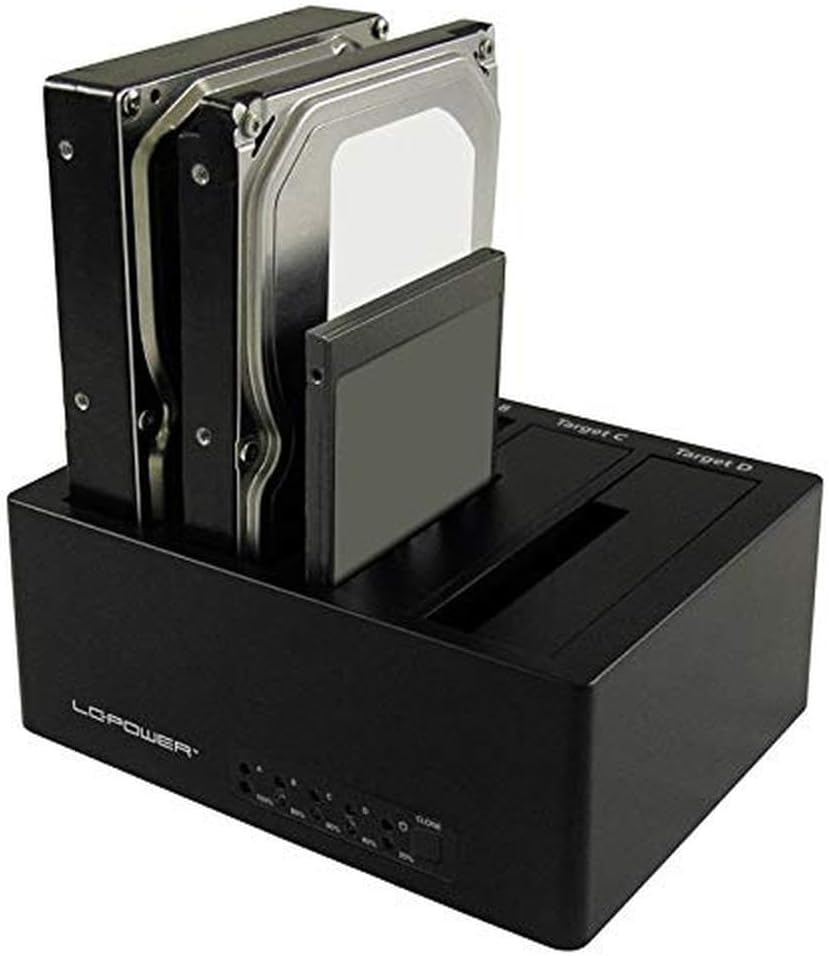
This image displays the front of the docking station, showing the four top-loading bays for hard drives or SSDs. Each bay is labeled (Source A, Target B, Target C, Target D) and there are LED indicators for power and drive activity, along with a 'CLONE' button.
- Drive Bays (Source A, Target B, C, D): Slots for inserting 2.5-inch or 3.5-inch SATA HDDs/SSDs.
- Hêza LED: Nîşan dide ku cîhaz pêvekirî ye.
- Activity LEDs (A, B, C, D): Indicate drive activity for each bay.
- Clone Progress LEDs: Indicate the progress of the offline cloning function (25%, 50%, 75%, 100%).
- CLONE Button: Pêvajoya klonkirina negirêdayî dide destpêkirin.
3.2 Paş View

This image shows the rear panel of the docking station, featuring the power input, power switch, and data connection ports.
- Veguheztina ON/OFF: Powers the docking station on or off.
- DC IN: Power input port for the included power adapter.
- Porta eSATA: For connecting to a host computer via eSATA cable.
- Porta USB 3.0: For connecting to a host computer via USB 3.0 cable.
4. Sazkirin û Sazkirin
4.1 Inserting Hard Drives/SSDs
This image demonstrates how to insert both 3.5-inch hard drives and 2.5-inch solid-state drives into the docking station bays.
- Ensure the docking station is powered off.
- Gently slide your 2.5-inch or 3.5-inch SATA HDD/SSD into an available drive bay until it is firmly seated. Ensure the SATA connector aligns correctly.
- Repeat for additional drives as needed.
4.2 Girêdana bi Komputerê
- Connect the included power adapter to the DC IN port on the back of the docking station and then to a power outlet.
- Connect the USB 3.0 cable from the USB 3.0 port on the docking station to an available USB 3.0 port on your computer. Alternatively, if your computer has an eSATA port, connect the eSATA cable from the docking station to your computer's eSATA port. Note: Do not connect both USB and eSATA simultaneously.
- Flip the ON/OFF switch on the back of the docking station to the 'ON' position. The power LED on the front will illuminate.
- Your operating system should automatically detect the connected drives. New drives may require initialization and formatting before use.
5. Operasyon
5.1 Veguheztina daneyan
Once connected to your computer and recognized by the operating system, the inserted drives will appear as removable storage devices. You can drag and drop files, copy, paste, and manage data as you would with any internal or external drive.
- For optimal performance, use a USB 3.0 port on your computer.
- Always safely eject or unmount drives from your operating system before removing them from the docking station or powering off the device to prevent data corruption.
5.2 Offline Cloning Function
The LC-DOCK-U3-4B supports offline cloning, allowing you to duplicate a source drive to up to three target drives without a computer connection.
Important: All data on the target drives will be overwritten during the cloning process. Ensure you have backed up any critical data from the target drives before proceeding.
- Ensure the docking station is disconnected from the computer (both USB and eSATA cables).
- Têxe nav Çavkanî Drive (the drive you want to clone FROM) into Bay A.
- Insert one or more Target Drives (the drives you want to clone TO) into Bays B, C, and/or D. The capacity of each target drive must be equal to or greater than the capacity of the source drive.
- Hêza li ser qereqola docking.
- Bişkojk û bigire CLONE button for approximately 3-5 seconds until the cloning progress LEDs (25%, 50%, 75%, 100%) begin to flash.
- Release the CLONE button, then quickly press it again to confirm and start the cloning process.
- The progress LEDs will illuminate sequentially to indicate the cloning status. When all LEDs are solid, the cloning process is complete.
- Berî ku ajokaran derxînin, stasyona dockingê vemirînin.
6. Maintenance
- Keep the docking station clean and free from dust. Use a soft, dry cloth for cleaning. Do not use liquid cleaners.
- Dûr nehêlin amûrê ji germahiyên pir zêde, nembûn, an tîrêja tavê ya rasterast.
- Do not attempt to disassemble or repair the device yourself. This will void the warranty and may cause damage.
7. Destpêkirin
7.1 Ajokar Nehatin Tesbîtkirin
- Piştrast bike ku adaptora hêzê bi ewlehî ve girêdayî ye û stasyona dockingê vekiriye.
- Verify that the USB 3.0 or eSATA cable is properly connected to both the docking station and the computer.
- Try connecting to a different USB or eSATA port on your computer.
- Ensure the hard drives/SSDs are correctly seated in their bays.
- Check if the drives are new and require initialization and formatting in your operating system's Disk Management (Windows) or Disk Utility (macOS).
- Test with a different known-good hard drive/SSD.
7.2 Leza Veguhestina Hêdî
- Piştrast bike ku tu bi porta USB 3.0 ya li ser komputerê ve girêdayî yî. Porta USB 2.0 dê bibe sedema leza pir hêdîtir.
- Check the condition of your USB or eSATA cable. A faulty cable can affect performance.
- The speed of the hard drive itself can be a limiting factor.
7.3 Cloning Fails or Does Not Start
- Ensure the docking station is disconnected from the computer (no USB or eSATA cables connected).
- Verify that the target drive(s) capacity is equal to or greater than the source drive capacity.
- Ensure drives are properly seated.
- Follow the cloning procedure precisely, especially the timing for pressing and holding the CLONE button.
8. Specifications
| Navê Model | LC-DOCK-U3-4B |
| Nîşan | LC-Power |
| Drive Bays | 4 (for 2.5" or 3.5" SATA I/II/III HDDs/SSDs) |
| Navbera Derveyî | USB 3.0, eSATA |
| Rêjeya Veguheztina Daneyên | Up to 5 Gbps (USB 3.0), Up to 3 Gbps (eSATA) |
| Fonksiyona Klonkirinê | Offline 1:3 Cloning |
| Mal | Pîlastîk |
| Pîvan (LxWxH) | 6.54 x 5 x 2.56 înç (16.6 x 12.7 x 6.5 cm) |
| Pîvan | 2.2 pound (1 kg) |
| Navê min | External Power Adapter (DC 12V) |
9. Garantî û Piştgirî
LC-Power products are covered by a limited warranty. For detailed warranty information, please refer to the warranty card included with your product or visit the official LC-Power website. For technical support or customer service, please contact your local retailer or LC-Power support channels.
Hûn dikarin bêtir agahdarî û çavkaniyên piştgiriyê li ser bibînin LC-Power official website.


