1. Destpêk
Thank you for choosing the Black+Decker KW712 650W Electric Planer. This manual provides essential information for the safe and efficient operation, maintenance, and troubleshooting of your new tool. Please read these instructions carefully before use and keep them for future reference. This planer is designed for planing wood and wood-like materials.
Hişyariyên Ewlekariya Giştî
- Her tim alavên parastina kesane yên guncaw li xwe bikin, di nav de çavikên ewlehiyê, parastina bihîstinê û maskek tozê.
- Piştrast bike ku cihê xebatê paqij, baş ronîkirî û bê asteng e.
- Dema ku amûrê xebitandin zarok û temaşevanan dûr bixin.
- Disconnect the planer from the power source before making any adjustments, changing accessories, or performing maintenance.
- Secure the workpiece firmly to prevent movement during planing.
- Do not operate the planer in damp an şert û mercên şil.
2. Hilbera Serîview
Familiarize yourself with the components of your Black+Decker KW712 Electric Planer before operation.

Wêne 1: Bi giştî view of the Black+Decker KW712 Electric Planer. The image shows the orange and black body of the planer with its cord, front handle, and rear handle, along with the planing base and dust port.
Pêkhateyên sereke:
- Bişkoka Rêkxistina Kûrahiyê: Ji bo destnîşankirina kûrahiya plankirina xwestî tê bikar anîn.
- Destê Pêşî: Provides control and stability during operation.
- Rear Handle (with Trigger): Main grip for operating the tool, includes the power trigger and lock-off button.
- Bingeha plansazkirinê: Rûyê dûz ê ku li ser perçeyê kar diherike.
- Porta Derxistina Tozê: Connects to a dust bag or vacuum cleaner for chip removal.
- V-Groove: Located on the front shoe for chamfering edges.
- Blades: Reversible TCT (Tungsten Carbide Tipped) blades for efficient material removal.
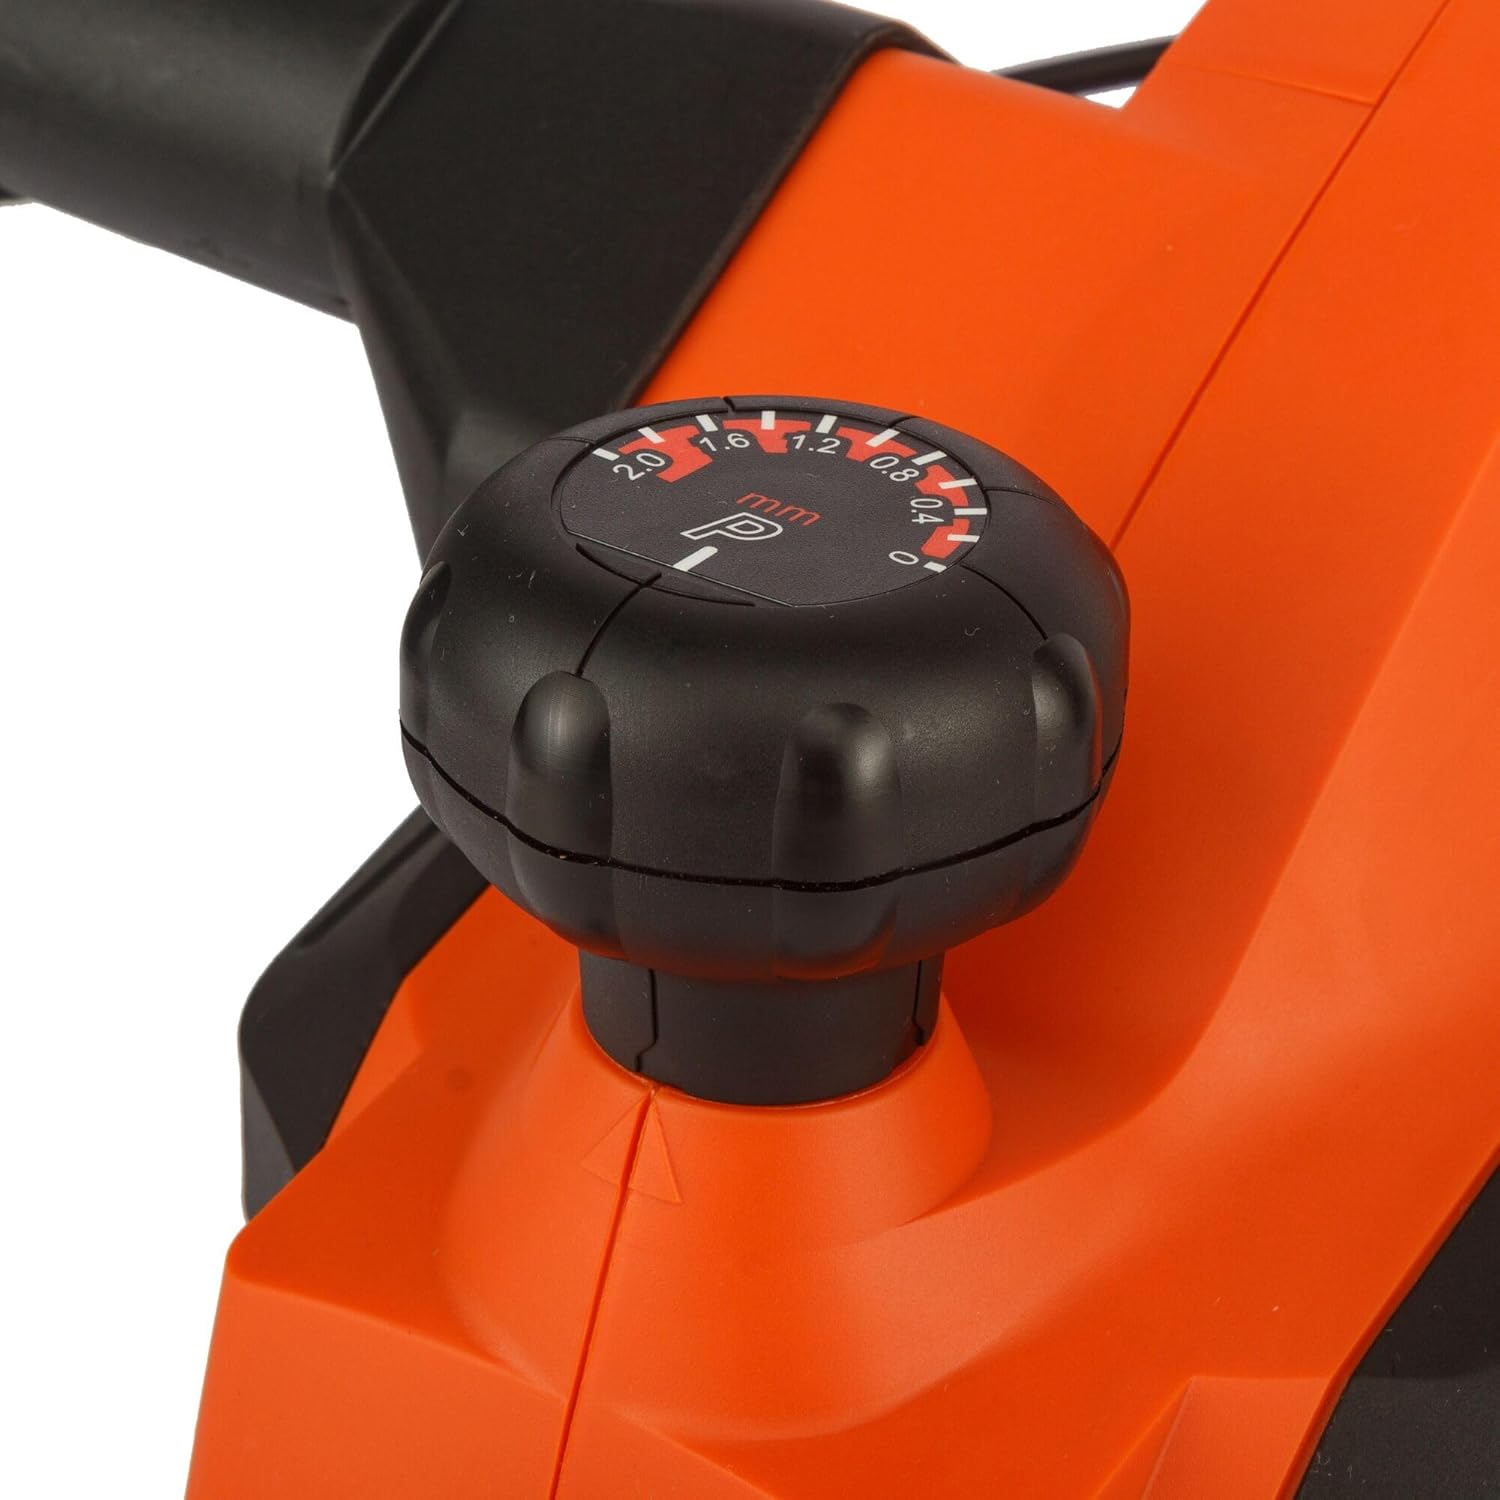
Wêne 2: Ji nêzîk ve view of the depth adjustment knob. The knob is black with white markings indicating planing depths from 0 to 2.0 mm.

Wêne 3: Ji nêzîk ve view of the dust extraction port. This shows the circular opening on the side of the planer where a dust bag or vacuum hose can be attached.

Wêne 4: Ji nêzîk ve view of the power trigger and the safety lock-off button located on the handle of the planer.
3. Sazkirin
Têkiliya Hêzê
- Ensure the power switch is in the 'OFF' position before plugging the tool into a power outlet.
- Connect the planer to a grounded power outlet with the correct voltage (230V).
Dust Extraction
The KW712 planer is equipped with a dust extraction port to maintain a clean work environment.
- Attach a suitable dust bag or connect a vacuum cleaner hose to the dust extraction port.
- Ensure the connection is secure to prevent dust leakage.
Teftîşa Blade
The planer uses TCT double-sided blades designed for long life. Before each use, inspect the blades.
- Check blades for sharpness, chips, or damage. Damaged blades can affect planing quality and safety.
- If blades are dull or damaged, refer to the Maintenance section for replacement instructions.
4. Telîmatên Operating
Holding the Planer
- Hold the planer firmly with both hands, one on the front handle and one on the rear handle.
- Maintain a balanced stance to ensure control over the tool.
Rêkxistina Kûrahiya Plankirinê
- Rotate the depth adjustment knob at the front of the planer to select the desired cutting depth. The planer allows for precise adjustments, including a 0.2mm depth setting for fine work.
- The maximum cutting depth is 2mm for quick material removal.
- Start with a shallow depth and gradually increase if needed.
Destpêk û Rawestandin
- To start the planer, press the safety lock-off button and then squeeze the trigger switch.
- To stop the planer, release the trigger switch.
Planing Technique
- Place the front shoe of the planer flat on the workpiece, ensuring the blades are not touching the surface.
- Start the planer and allow it to reach full speed before moving it forward.
- Zextek wekhev bidin û plankerê bi nermî û bi awayekî domdar li seranserê parçeya kar bigerînin.
- Maintain control and avoid tilting the planer.
- For chamfering edges, align the V-groove on the front shoe with the edge of the workpiece and guide the planer along.

Figure 5: A user demonstrating the operation of the Black+Decker KW712 planer on a wooden plank, with a dust extraction hose connected to the tool.
5. Maintenance
Parastina birêkûpêk temenê dirêj û performansa çêtirîn a plankera we garantî dike.
Paqijî
- Always disconnect the planer from the power supply before cleaning.
- Use a soft brush or compressed air to remove dust and wood chips from the tool, especially around the motor vents and blade area.
- Derve bi reklamê paqij bikinamp çît. Kîmyewî û paqijkerên hişk bikar neynin.
Blade Replacement (TCT Double-Sided Blades)
The KW712 uses durable TCT double-sided blades. When one side becomes dull, the blade can be reversed. When both sides are dull, the blades must be replaced.
- Emniyet yekem: Disconnect the planer from the power supply.
- Cihê kêrê cl bibîneamping screws on the cutter head.
- Using the appropriate wrench (usually supplied with the tool), loosen the clamping screws.
- Carefully remove the dull blade. Blades are extremely sharp; handle with caution.
- Clean the blade seating area.
- Insert a new or reversed blade, ensuring it is correctly seated and aligned.
- cl teng bikinamping screws bi ewle.
- Repeat for the other blade if necessary.
- Ensure both blades are at the same height before operating the planer.
Embarkirinî
- Store the planer in a dry, secure location, out of reach of children.
- Protect the blades from damage during storage.
6. Destpêkirin
Ev beş pirsgirêkên hevpar ên ku hûn dikarin bi gerîneya xweya nexşeyê re rû bi rû bimînin, çareser dike.
| Pirsegirêk | Sedema gengaz | Çare |
|---|---|---|
| Planker dest pê nake | No power supply; Faulty switch; Safety lock-off not engaged correctly. | Check power connection and outlet; Ensure safety lock-off button is pressed before trigger; If problem persists, contact service. |
| Poor planing finish (rough surface, chatter marks) | Dull or damaged blades; Incorrect planing depth; Uneven pressure; Blades not set at equal height. | Replace or reverse blades; Reduce planing depth; Apply even pressure; Check and adjust blade height. |
| Lerizîn an dengek zêde | Loose components; Damaged blades; Unbalanced cutter head. | Check all screws and tighten if necessary; Inspect and replace damaged blades; If vibration continues, seek professional service. |
| Derxistina tozê bêbandor e | Dust port clogged; Dust bag full or improperly attached; Vacuum cleaner not powerful enough. | Clear dust port; Empty or reattach dust bag; Use a more powerful vacuum cleaner. |
7. Specifications
| Taybetî | Specification |
|---|---|
| Hejmara Model | KW712 |
| Input Power | 650W |
| Voltage | 230V |
| Plankirina Firehiya | 82mm |
| Max. Planing Depth | 2mm |
| Depth Adjustment | 0.2mm zêdekirin |
| Pîvan | 2 kg (2000 Gram) |
| Pîvan (L x W x H) | 10 x 10 x 10 cm |
| Mal | Elemyûn |
| Çavkaniya Hêzê | Corded Electric |
8. Garantî û Piştgirî
For warranty information, please refer to the warranty card included with your product or contact your local Black+Decker dealer or authorized service center. Keep your purchase receipt as proof of purchase.
Ji bo piştgiriya teknîkî an lêpirsînên xizmetê, ji kerema xwe serdana malpera fermî ya Black+Decker bikin. webmalperê an bi beşa karûbarê xerîdar a wan re têkilî daynin.


