
1. Destpêk
This manual provides detailed instructions for the installation, operation, and maintenance of your Zebronics DMS200 Monitor Desk Stand. Please read this manual thoroughly before installation and use to ensure proper function and safety. The DMS200 is designed to support monitors from 17 to 32 inches, with a maximum load capacity of 7 kg, offering ergonomic adjustments for an optimized viewtecrubeya.

Image 1.1: Zebronics DMS200 Monitor Desk Stand overview.
2. Agahiyên Ewlekariyê
Ji bo rêgirtina li zirar an zirara li hilberê, ji kerema xwe tedbîrên ewlehiyê yên jêrîn bişopînin:
- Ji kapasîteya giraniya herî zêde ya 7 kg (15.4 lbs) derbas nebe.
- Ensure the desk surface is stable and strong enough to support the combined weight of the stand and monitor.
- Always follow the installation instructions carefully. Improper installation can lead to equipment damage or personal injury.
- Keep children and pets away during installation. Small parts may be a choking hazard.
- Do not overtighten screws, as this may cause damage.
- Regularly check all connections to ensure they remain secure.
3. Naveroka pakêtê
Berî destpêkirina sazkirinê, piştrast bikin ku hemî pêkhate li wir in:
- Kombûna Milê Monîtorê
- Desk Clamp (C-clamp)
- Grommet Mount Base
- Plate VESA
- Hardware Kit (screws, washers, Allen keys)
- Manual Instruction
4. Sazkirin û Sazkirin
The Zebronics DMS200 offers two installation methods: C-clamp û mountkirina Grommet. Rêbaza ku ji bo maseya we herî guncaw e hilbijêrin.
4.1. Hilbijartina Rêbaza Montajkirinê
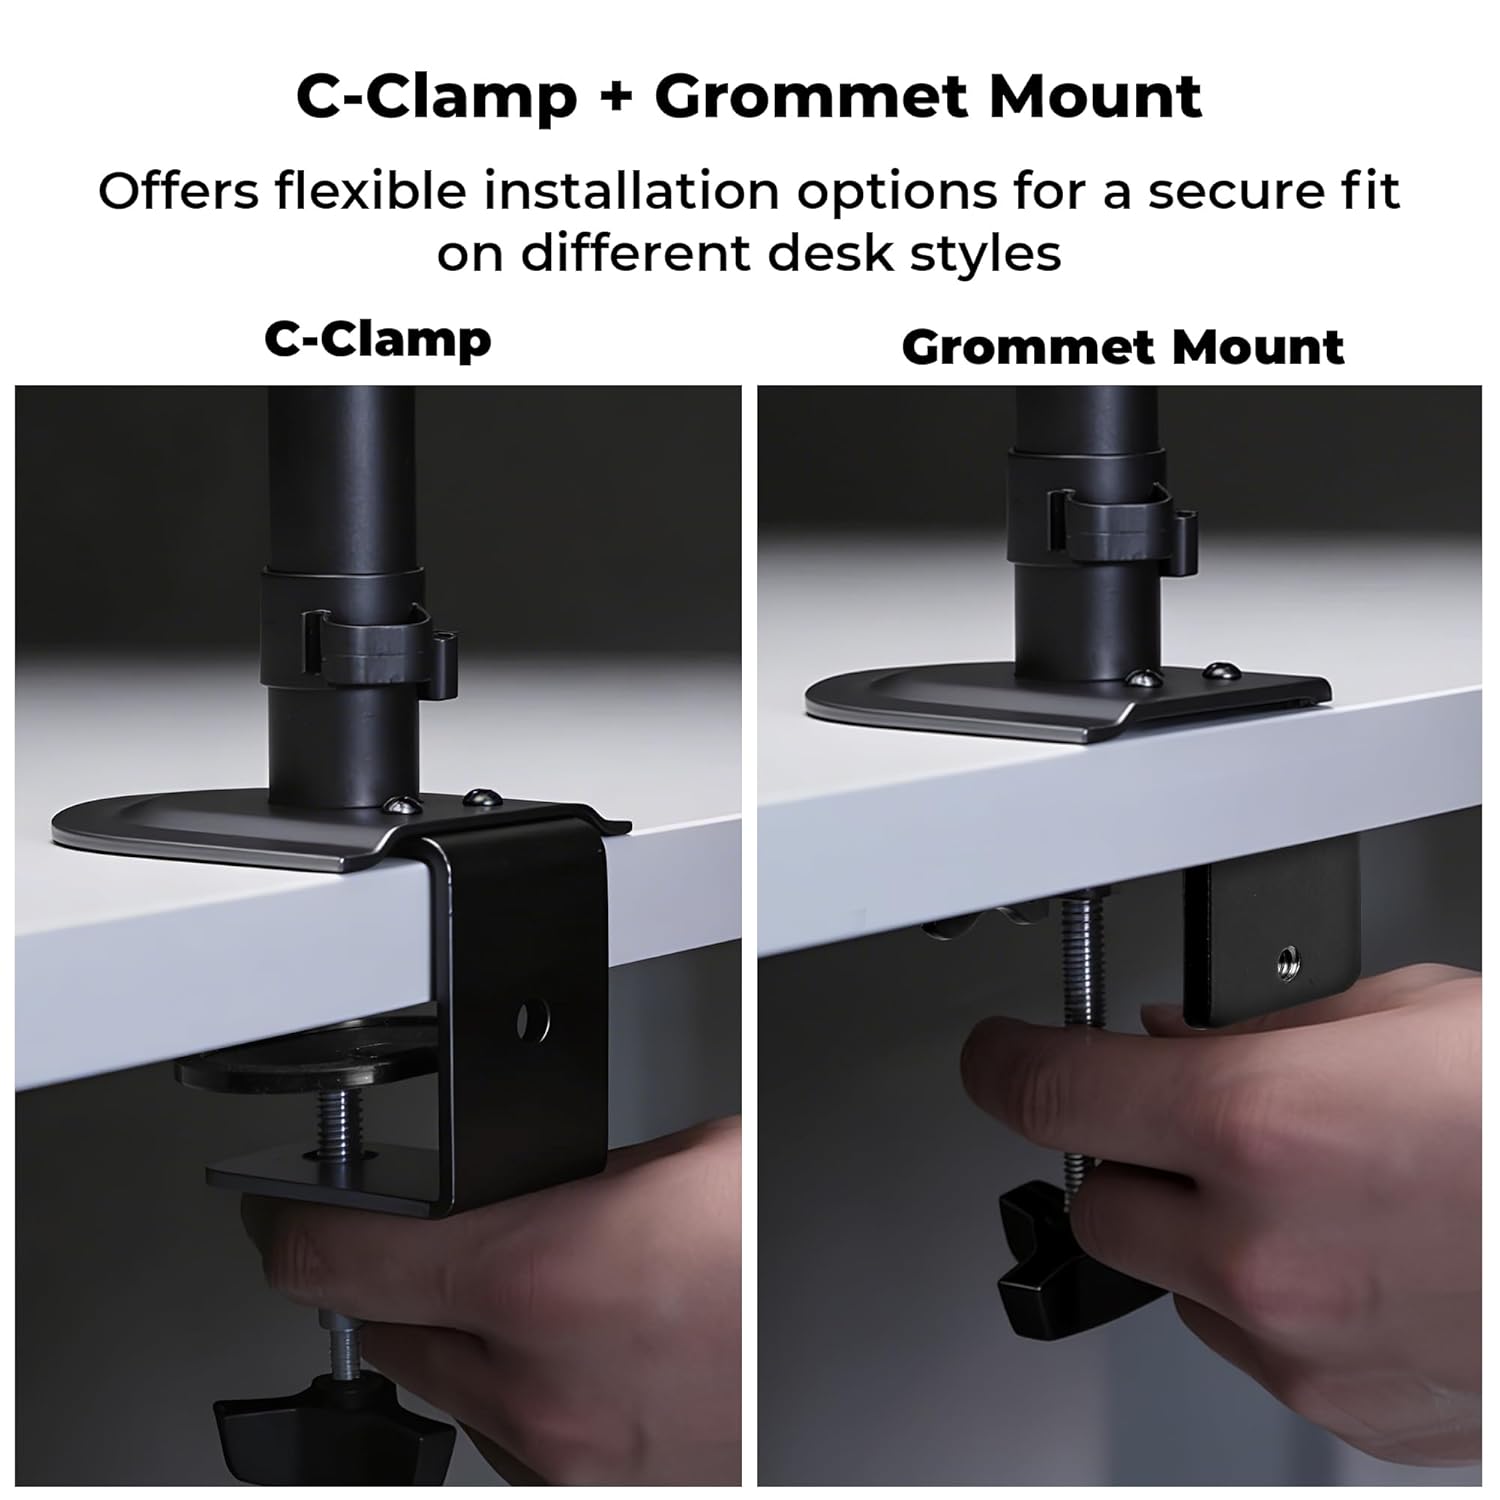
Image 4.1: C-Clamp and Grommet Mount options.
- C-Clamp: Ideal for desks without pre-drilled holes. Clamps to the edge of the desk.
- Çiyayê Grommetê: Requires a pre-drilled hole (or drilling one) in the desk. Provides a more flush installation.
4.2. C-Clamp Lêkirinî
- C-cl girêdinamp to the bottom of the main pole.
- Position the stand on the edge of your desk.
- C-cl teng bikinamp screw until the stand is securely fastened to the desk. Ensure it is stable and does not wobble.
4.3. Grommet Mount Installation
- Disassemble the C-clamp from the main pole if it was pre-attached.
- Insert the main pole through the grommet hole in your desk.
- Secure the grommet base plate and tighten the nut from underneath the desk until the stand is firm.
4.4. Ensuring Stability
After mounting the stand, verify its stability on the desk. The anti-slip base and robust construction ensure reliable support for monitors up to 7 kg.

Image 4.4: Stand stability and maximum load capacity.
4.5. Attaching the Monitor
The DMS200 supports VESA patterns of 75x75mm and 100x100mm.

Image 4.5: VESA mount plate for monitor attachment.
- Attach the VESA plate to the back of your monitor using the appropriate screws from the hardware kit. Ensure the screws are not overtightened.
- Carefully slide the monitor (with the VESA plate attached) onto the monitor arm's mounting head.
- Secure the monitor to the arm by tightening the locking screw or mechanism on the mounting head.
4.6. Birêvebirina kabloyê
Utilize the integrated cable management clips to keep your workspace tidy.

Image 4.6: Integrated cable management.
- Route your monitor's power and display cables through the clips located along the arm and pole.
- Ensure cables have enough slack for full range of motion without being strained.
5. Telîmatên Operating
The DMS200 monitor arm provides various adjustments for optimal ergonomic positioning.

Image 5.1: Monitor arm adjustment capabilities.
- Rêzkirina Bilindî: Loosen the collar on the main pole, adjust the arm to the desired height, and then re-tighten the collar.
- Veguheztina Tilt: The monitor can be tilted up to ±5°. Adjust the tilt angle by gently pushing or pulling the top or bottom of the monitor. If the monitor does not hold its position, tighten the tilt mechanism screw with an Allen key.
- Veguheztina zivirî: The arm allows for ±90° swivel. Gently rotate the monitor left or right to achieve the desired viewAngle.
- Zivirandin: The VESA plate allows for 360° rotation, enabling portrait or landscape orientation. Rotate the monitor gently to switch orientations.
- Arm Extension: The mechanical arm can extend up to 42 cm. Adjust the arm's position by gently pulling or pushing it to bring the monitor closer or further away.
6. Maintenance
To ensure the longevity and proper function of your monitor stand:
- Paqijî: Bi nermîyekê rawestgehê paqij bike,amp qumaş. Ji paqijkerên aşınker an çareserkerên ku dikarin zirarê bidin boyaxê dûr bisekinin.
- Kontrolên Peryodîk: Hemû pêç û girêdan dem bi dem kontrol bikin da ku piştrast bibin ku ew teng û ewle ne. Ger pêwîst be dîsa teng bikin.
- Kapasîteya barkirinê: Do not place items on the monitor arm or exceed the maximum weight capacity.
7. Destpêkirin
| Pirsegirêk | Sedema gengaz | Çare |
|---|---|---|
| Monitor sags or does not hold tilt position. | Tilt mechanism screw is loose. | Tighten the tilt adjustment screw on the VESA head using the provided Allen key. |
| Stand wobbles or is unstable. | Desk clamp/grommet mount is not tight enough. | C-cl ji nû ve teng bikeamp or grommet mount screw/nut. Ensure the desk surface is stable. |
| Monitor cannot be rotated or swiveled smoothly. | Dibe ku movik pir teng bin an jî pêdivî bi rûnkirinê hebe. | Check for any obstructions. If joints are too stiff, apply a small amount of silicone-based lubricant (avoid oil-based). |
| Cables are strained during adjustment. | Insufficient slack in cable management. | Re-route cables, ensuring enough slack is provided for the full range of arm movement. |
8. Specifications
| Taybetî | Hûrî |
|---|---|
| Cins | WHD200 |
| Mezinahiya Screen Piştgiriya | 17 - 32 înç |
| Maximum Load Capacity | 7 kg (15.4 lbs) |
| Compatibility VESA | 75x75mm, 100x100mm |
| Mounting Type | C-Clamp, Çiyayê Grommet |
| Guherandinên | Height, Tilt (±5°), Swivel (±90°), Rotation (360°) |
| Berfirehkirina Arm | Heta 42 cm |
| Mal | Metal (Rust-Proof) |
| Reng | Reş |
| Babetê Weight | 1670 gram |
9. Garantî û Piştgirî
Libersekînîn: The Zebronics DMS200 Monitor Desk Stand comes with a 1-year carry-in warranty to the service center from the date of purchase.
Alîkarî: For technical assistance, troubleshooting, or warranty claims, please contact Zebronics customer support. Refer to the official Zebronics webmalper an belgeyên kirîna we ji bo hûrguliyên têkiliyê.
Manufacturer: Zebronics India Private Limited, 13/7 Smith Road, Royapettah, Chennai, Tamil Nadu - 600 002, India.