
YOSEC E-816C
YOSEC Fireproof Gun Safe Lock Replacement E-816C
Manual Instruction
Product Overview
This manual provides instructions for the installation, operation, and maintenance of your YOSEC E-816C Electronic Digital Keypad Lock. This lock is designed as a replacement for gun safes and DIY safe boxes, featuring a chrome finish and robust security features.
Key features include a 1-8 digit programmable code, a 3-error code lockout mechanism, and a low battery warning. The keypad diameter is 100mm (3.74 inches).
Agahiyên Ewlekariyê
- Always ensure the safe is empty and unlocked before performing any installation or maintenance.
- Keep all components, especially small parts and batteries, out of reach of children.
- Use only a 9V lithium cell battery (not included) for operation. Do not mix old and new batteries, or different types of batteries.
- Do not attempt to modify the lock mechanism or electronic components, as this may compromise security and void the warranty.
- Ensure the keypad size matches your safe box before installation.
Naveroka pakêtê
Piştrast bike ku hemî pêkhate di pakêtê de hene:
- Keypad
- Lijneya Circuit Çapkirî (PCB)
- Reset Button
- Solenoid
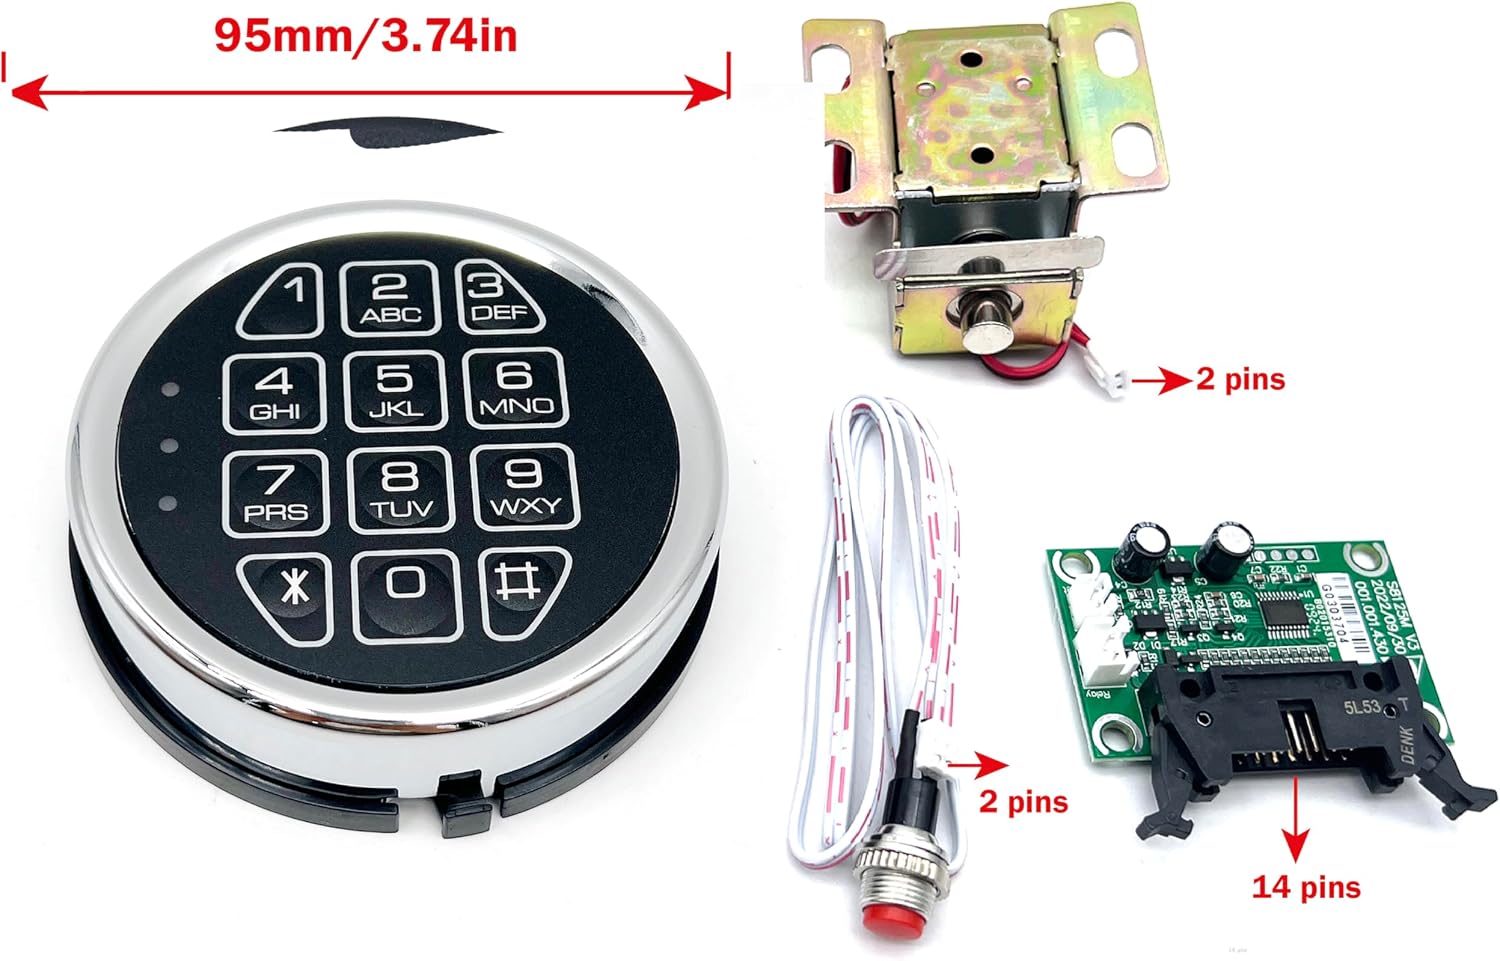
Wêne: Serview of the YOSEC E-816C lock components, showing the keypad, solenoid, PCB, and reset button. The keypad measures 95mm (3.74 inches) in diameter.
Specifications
| Nîşan | YOSEC |
| Hejmara Model | E-816C |
| Type Lock | Electronic Digital Keypad |
| Mal | Hesinî |
| Qedandin | Chrome |
| Keypad Diameter | 100 mm (3.74 înç) |
| Çavkaniya Hêzê | One 9V Lithium Cell Battery (not included) |
| Dirêjahiya Kodê | 1-8 Hejmar |
| Taybetmendiya Lockout | After 3 incorrect code entries |
| Taybetmendiya Taybet | Anti-Peeping Password, Sound/Silent Operation |
Sazkirin û Sazkirin
1. Sazkirina Pîl
- Locate the battery compartment on the back of the keypad or the designated battery holder.
- Insert one 9V lithium cell battery, ensuring correct polarity (+/-).
- Parçeya pîlê bi ewlehî bigire.

Image: Disassembled view of the lock, illustrating the internal components and where the battery connects.
2. Physical Installation (General Guidelines)
This lock is a replacement unit. Installation typically involves:
- Removing the existing lock mechanism from your safe door.
- Mounting the new YOSEC E-816C keypad to the exterior of the safe door.
- Connecting the solenoid and PCB to the internal locking mechanism of your safe.
- Ensuring all wires are properly routed and secured to prevent pinching or damage.
- Test the lock operation before closing the safe door completely.
Note: Specific installation steps may vary depending on your safe model. Consult your safe's manual for detailed instructions on lock replacement.
Telîmatên Operating
1. Vekirina Kilîtê
To open the lock, enter your 1-8 digit code followed by the '#' key. The factory default code is typically 159. If the code is correct, the lock will emit a sound (if sound is enabled) and the solenoid will retract, allowing you to open the safe door.

Wêne: Bi hûrgilî view of the electronic keypad, showing the numerical buttons and special function keys.
2. Changing the User Code
Detailed instructions for changing the user code are typically provided with the lock's internal PCB or a separate quick guide. Generally, the process involves:
- Entering the current code to open the lock.
- Pressing a designated programming button (often on the PCB) or a specific key sequence on the keypad.
- Entering the new 1-8 digit code.
- Confirming the new code.
- Always test the new code multiple times with the safe door open before closing it.
3. Silent Mode Operation
The lock can be programmed for silent operation, disabling the buzzer sound. Refer to the specific instructions provided with your lock's PCB for the key sequence to toggle sound on/off.
4. Hişyariya Battery Low
The lock features a low battery warning. When the battery is low, the keypad may emit a series of beeps or a specific light indicator will flash after entering a code. Replace the battery promptly when this warning occurs.
5. Lockout Feature
If 3 incorrect codes are entered consecutively, the lock will enter a lockout mode for 20 seconds, preventing further attempts. Wait for the lockout period to expire before trying again.
Video: How to Operate the Lock
Video: This video demonstrates the basic operation of the YOSEC E-816C lock, including how to use the factory code (159) to open it. It shows the keypad interaction and the lock's response.
Lênerrînî
1. Guhertina Pîl
To replace the 9V battery:
- Ensure the safe is open.
- Carefully remove the keypad face by pressing the tab counterclockwise or following the specific instructions for your model to access the battery compartment.
- Remove the old 9V battery.
- Insert a new 9V lithium cell battery, observing polarity.
- Reattach the keypad face.
- Test the lock operation.
2. Paqijkirin
Wipe the keypad surface with a soft, dry cloth. Do not use abrasive cleaners or solvents, as these can damage the finish or electronic components.
Çareserkirina pirsgirêkan
| Pirsegirêk | Sedema gengaz | Çare |
|---|---|---|
| Klavyeyê bersivê nade. | Dead or low battery. Incorrect battery installation. Loose connection. | Replace the 9V battery. Check battery polarity. Ensure all wiring connections are secure. |
| Lock does not open after entering code. | Incorrect code entered. Lockout mode active. Solenoid malfunction. | Verify the correct code. Wait 20 seconds if in lockout mode. Check solenoid connection and function. |
| Low battery warning (beeping/flashing light). | Pîl kêm e. | Pîla 9V tavilê biguherîne. |
| Cannot change code. | Incorrect programming sequence. | Refer to the specific programming instructions for your lock's PCB. Ensure the safe is open during code change. |
Garantî û Piştgirî
For warranty information or technical support, please contact the seller, hongon, or the manufacturer, YOSEC. Retain your purchase receipt for warranty claims.
Têkiliya Firoşkar: hongon on Amazon
Belgeyên Têkildar - E-816C
 |
Kasetên Şexsî yên Agirnegir ên Li Ser Stûyê Bi Kilîda Elektronîkî - Rêbernameya Xwediyê Rêbernameyeke berfireh a bikarhêner ji bo Kasetên Şewatnegir ên Kesane yên Stack-On bi Kilîta Elektronîkî (modelên PFS-012-BG-E, PFS-016-BG-E, PFS-019-BG-E), ku sazkirin, xebitandin, ewlehî, montajkirin, Pirsên Pir tên Pirsîn (FAQs) û garantiyê vedihewîne. |
 |
Rêbernameya Bikarhêner a Kîsa Agirnegir a VEVOR - Model YX20230216-005 Rêbernameya bikarhêner a fermî ji bo Çenteya Agirnegir a VEVOR (Model YX20230216-005). Talîmatên montajê, tedbîrên karanînê, taybetmendiyên teknîkî, û agahdariya têkiliyê ji bo piştgiriyê peyda dike. |
 |
Rêbernameya Xebatê ya Reaktorê GRACO E-30i û E-XP2i Rêbernameya xebitandinê ya berfireh ji bo GRACO Reactor E-30i û E-XP2i, pergalek elektrîkî û germkirî ya rêjeya pêkhateyên pirjimar ji bo rijandina kef û pêçanên polîurea. Rêbernameya sazkirin, ewlehî û xebitandinê vedihewîne. |
 |
Steinel HM 2120 E & HM 2320 E Heat Gun User Manual Comprehensive user manual for the Steinel HM 2120 E and HM 2320 E professional heat guns, detailing safety instructions, device components, operation, and technical specifications. |
 |
STEINEL Hot Air Guns: HG 2320 E, HL 2020 E, HL 1920 E, HL 1820 S, HL 1620 S - User Manual Comprehensive user manual for STEINEL professional hot air guns (HG 2320 E, HL 2020 E, HL 1920 E, HL 1820 S, HL 1620 S), covering safety, operation, specifications, applications, and accessories. |
 |
Rêbernameya Bikarhêner a Çîmentoya Çîmentoya Germ a Bêkablo ya VEVOR SD-830 Rêbernameya bikarhêner a fermî û rêbernameya piştgiriya teknîkî ji bo Tifinga Çîmentoya Germ a Bêkabloyî ya VEVOR, Modela SD-830. Li ser xebitandin, şarjkirin, ewlehî, taybetmendî û avêtinê fêr bibin. |
Ask a question about this manual
Ask about setup, troubleshooting, compatibility, parts, safety, or missing instructions. Manuals+ will review the question and use this page’s manual context to help answer it.