
Pêşkêş
Thank you for choosing the Parrot Uncle Flush Mount Ceiling Light, Model BBD3012. This vintage-style ceiling fixture is designed to provide versatile illumination with its adjustable color temperature feature, suitable for various indoor spaces such as dining rooms, bedrooms, living rooms, and kitchens. This manual provides essential information for safe installation, operation, and maintenance of your new lighting fixture. Please read these instructions thoroughly before beginning installation and retain them for future reference.
Agahiyên Ewlekariya Girîng
To reduce the risk of electric shock, fire, or injury to persons, please read and follow all warnings and instructions carefully.
- GAZÎ: Rîska elektrîkê. Berî ku saz bikin an servîs bikin, elektrîkê li sîgorteyê an qutbirê qut bikin.
- All electrical connections must be in accordance with local codes and ordinances, and the National Electric Code (NEC). If you are unfamiliar with proper electrical wiring connections, obtain the services of a qualified electrician.
- This fixture is intended for indoor use only. Do not install in wet locations.
- Piştrast bike ku rûyê montajê ji hêla avahîsaziyê ve saxlem e û dikare giraniya amûrê hilgire.
- Do not connect this fixture to a dimmer switch. The color temperature adjustment is controlled by a standard wall switch.
- Hewl nedin ku amûrê an pêkhateyên wê biguherînin.
- Di dema sazkirinê de lepikên ewlehiyê û çavikên ewlehiyê li xwe bikin.
Naveroka pakêtê
Berî destpêkirina sazkirinê, piştrast bikin ku hemî pêkhate li wir in. Ger perçeyek wenda be an jî zirar dîtibe, hewl nedin ku amûrê bicivînin an saz bikin. Ji bo alîkariyê bi karûbarê xerîdar re têkilî daynin.
- Flush Mount Ceiling Light Fixture (1)
- Çêlka Çiyayê (1)
- Wire Nuts (3)
- Pêlên lêdanê (2)
- Junction Box Screws (2)
- Destûra Rêbernameyê (1)
Sazkirin û Sazkirin
Pêş-Sazkirin
- Hêzê qut bikin: Before starting installation, ensure the power to the circuit is turned off at the main fuse box or circuit breaker.
- Herêmê amade bikin: Clear the work area and gather all necessary tools (screwdriver, wire strippers, electrical tape, safety glasses).
- Naverokê veke: Carefully remove all parts from the packaging and place them on a clean, soft surface to prevent scratches.
Pêngavên Sazkirinê
- Bişkojka Mountkirinê ve girêdin: Secure the mounting bracket to the junction box in the ceiling using the provided junction box screws. Ensure the bracket is firmly attached.
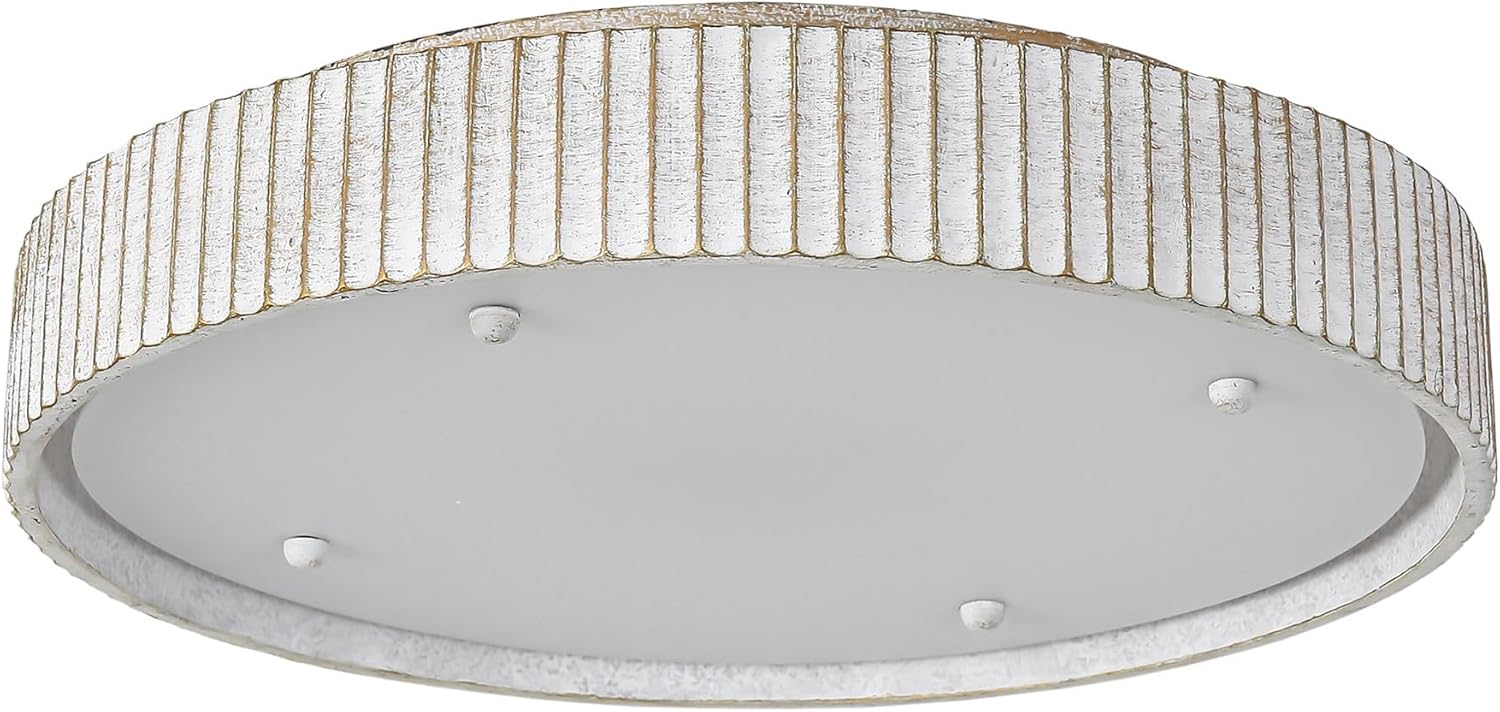
Image: The underside of the light fixture, showing the mounting points and the central LED panel. This image helps visualize where the mounting bracket would attach.
- Têkiliyên Elektrîkê çêbikin:
- Girêdan bike reş têl ji amûrê ber bi reş (live) wire from the junction box using a wire nut.
- Girêdan bike spî têl ji amûrê ber bi spî têla (bêalî) ji qutiya girêdanê bi karanîna gwîzek têl veqetînin.
- Girêdan bike erd têl (sifirê tazî an kesk) ji amûrê ber bi erd wire from the junction box (or to the green ground screw on the mounting bracket) using a wire nut.
- Têlên Tuck: Carefully tuck all wires into the junction box, ensuring no wires are pinched.
- Attach Fixture to Mounting Bracket: Align the fixture with the mounting bracket and secure it using the provided mounting screws. Tighten the screws until the fixture is flush with the ceiling.

Image: The Parrot Uncle flush mount ceiling light installed in a dining room, demonstrating its appearance when mounted.
- Vejandina Hêzê: Once the installation is complete and secure, restore power at the main fuse box or circuit breaker.
- Pêkhatina testê: Turn on the wall switch to test the light fixture.
Telîmatên Operating
This Parrot Uncle Flush Mount Ceiling Light features an integrated LED board with three adjustable color temperatures (3000K, 4500K, 6000K). The color temperature is controlled by cycling your standard wall switch.
- Vekirin: Flip the wall switch to the "ON" position. The light will illuminate at its last selected color temperature. If it's the first use, it will typically default to 3000K (Warm White).

Image: The ceiling light emitting a warm white glow, suitable for cozy environments (3000K).
- Guhertina Germahiya Rengê: To cycle through the color temperatures (3000K Warm White, 4500K Neutral White, 6000K Cool White), quickly flip the wall switch "OFF" and then "ON" again within 1-2 seconds. Each toggle will advance to the next color temperature.

Image: The ceiling light emitting a neutral white glow, ideal for general tasks (4500K).

Image: The ceiling light emitting a cool white glow, suitable for bright task lighting (6000K).
- Fonksiyona Bîrê: The fixture includes a memory function that will recall the last selected color temperature when turned off for more than 5 seconds and then turned back on.
- No Dimmer Required: This fixture is not compatible with dimmer switches. The brightness is fixed at 1170 lumens, and color temperature is adjusted via the wall switch.
Lênerrînî
Proper care and maintenance will ensure the longevity and optimal performance of your lighting fixture.
- Paqijî: Always disconnect power before cleaning. Use a soft, dry, or slightly damp cloth to wipe the exterior of the fixture. Do not use harsh chemicals, abrasive cleaners, or polishes as they may damage the finish or acrylic shade.
- Guhertina Bulb: This fixture uses an integrated LED light source and does not require bulb replacement.
- Berçavderbasî: Hemû girêdanên elektrîkê û alavên montajê bi awayekî periyodîk ji bo tengbûna wan kontrol bikin.
Çareserkirina pirsgirêkan
If you experience issues with your fixture, refer to the following common problems and solutions:
| Pirsegirêk | Sedema gengaz | Çare |
|---|---|---|
| Ronahî naşewite. |
|
|
| Ronahî dibiriqe an dimire. |
|
|
| Color temperature does not change. |
|
|
Specifications
| Nîşan | Apê Parrot |
| Navê Model | Flush Çiyayê Ceiling Light |
| Hejmara Model | BBD3012 |
| Mezinahiya Hilberê | 17.5"D x 17.5"Fi x 3.7"B (44.45 cm Di x 44.45 cm Fi x 9.4 cm Bilind) |
| Mal | Iron, Resin, Acrylic |
| Reng | Vintage White with Gold Accents |
| Tîpa Çavkaniya Ronahî | LED a entegre |
| Wattage | 18 Watt |
| Brightness | 1170 Lumen |
| Germahiya Rengê | 3000K (Spîya Germ), 4500K (Spîya Bêalî), 6000K (Spîya Sar) |
| Voltage | 120 Volt |
| Cureyê Sazkirinê | Flush Mount |
| Bikaranîna hundur / Derveyî | Tenê Bikaranîna hundurîn |
| Taybetmendiya Taybet | Adjustable Color Temperature (via wall switch) |
Garantî û Piştgiriya Xerîdar
This Parrot Uncle lighting fixture comes with a limited warranty. Please refer to the warranty card included with your purchase for specific terms and conditions. For technical assistance, missing parts, or warranty claims, please contact the manufacturer, Eileen Grays LLC, or your retailer.
Manufacturer: Eileen Grays LLC
Ji bo piştgiriyê, ji kerema xwe serdana Parrot Uncle Store on Amazon an jî bi xala kirîna xwe re têkilî daynin.