1. Telîmatên Ewlekariya Girîng
Hemû hişyariyên ewlehiyê, rênimayî, wêne û taybetmendiyên ku bi vê amûra elektrîkê re hatine dayîn her tim bixwînin û fêm bikin. Neşopandina hemû rênimayên ku li jêr hatine navnîş kirin dibe ku bibe sedema şoka elektrîkê, agir û/an birîndarbûna giran. Hemû hişyarî û rênimayan ji bo referansa pêşerojê hilînin.
- Ewlehiya Qada Kar: Cihê kar paqij û baş ronîkirî bihêle. Cihên tevlihev an tarî dibin sedema qezayan. Amûrên elektrîkê di atmosferên teqîner de, wek mînak li hebûna şilek, gaz, an tozên şewatbar, nexebitînin.
- Ewlehiya Elektrîkê: Pêdivî ye ku pêvekên amûra elektrîkê bi prizê re li hev bikin. Bi tu awayî pêvekê neguherînin. Ji têkiliya laş bi rûberên erdî an jî yên erdî dûr bisekinin.
- Ewlehiya Kesane: Always wear eye protection, hearing protection, and a dust mask. Dress properly; avoid loose clothing or jewelry. Keep hands away from the blade. Use a push stick when making narrow cuts.
- Bikaranîna Amûr û Lênêrînê: Amûra elektrîkê bi zorê bikar neynin. Ji bo serîlêdana xwe amûra elektrîkê ya rast bikar bînin. Berî ku hûn her sererastkirinekê bikin, aksesûaran biguherînin, an amûrên elektrîkê hilînin, fîşê ji çavkaniya elektrîkê veqetînin.
- Table Saw Specific Safety: Ensure the blade guard is always in place and functioning correctly. Never reach over or around the saw blade. Always stand to the side of the blade when operating.
2. Hilbera Serîview
The Scheppach HS210 is a compact table saw designed for precise cutting of various wood materials. It features a powerful motor and adjustable settings for versatile applications.
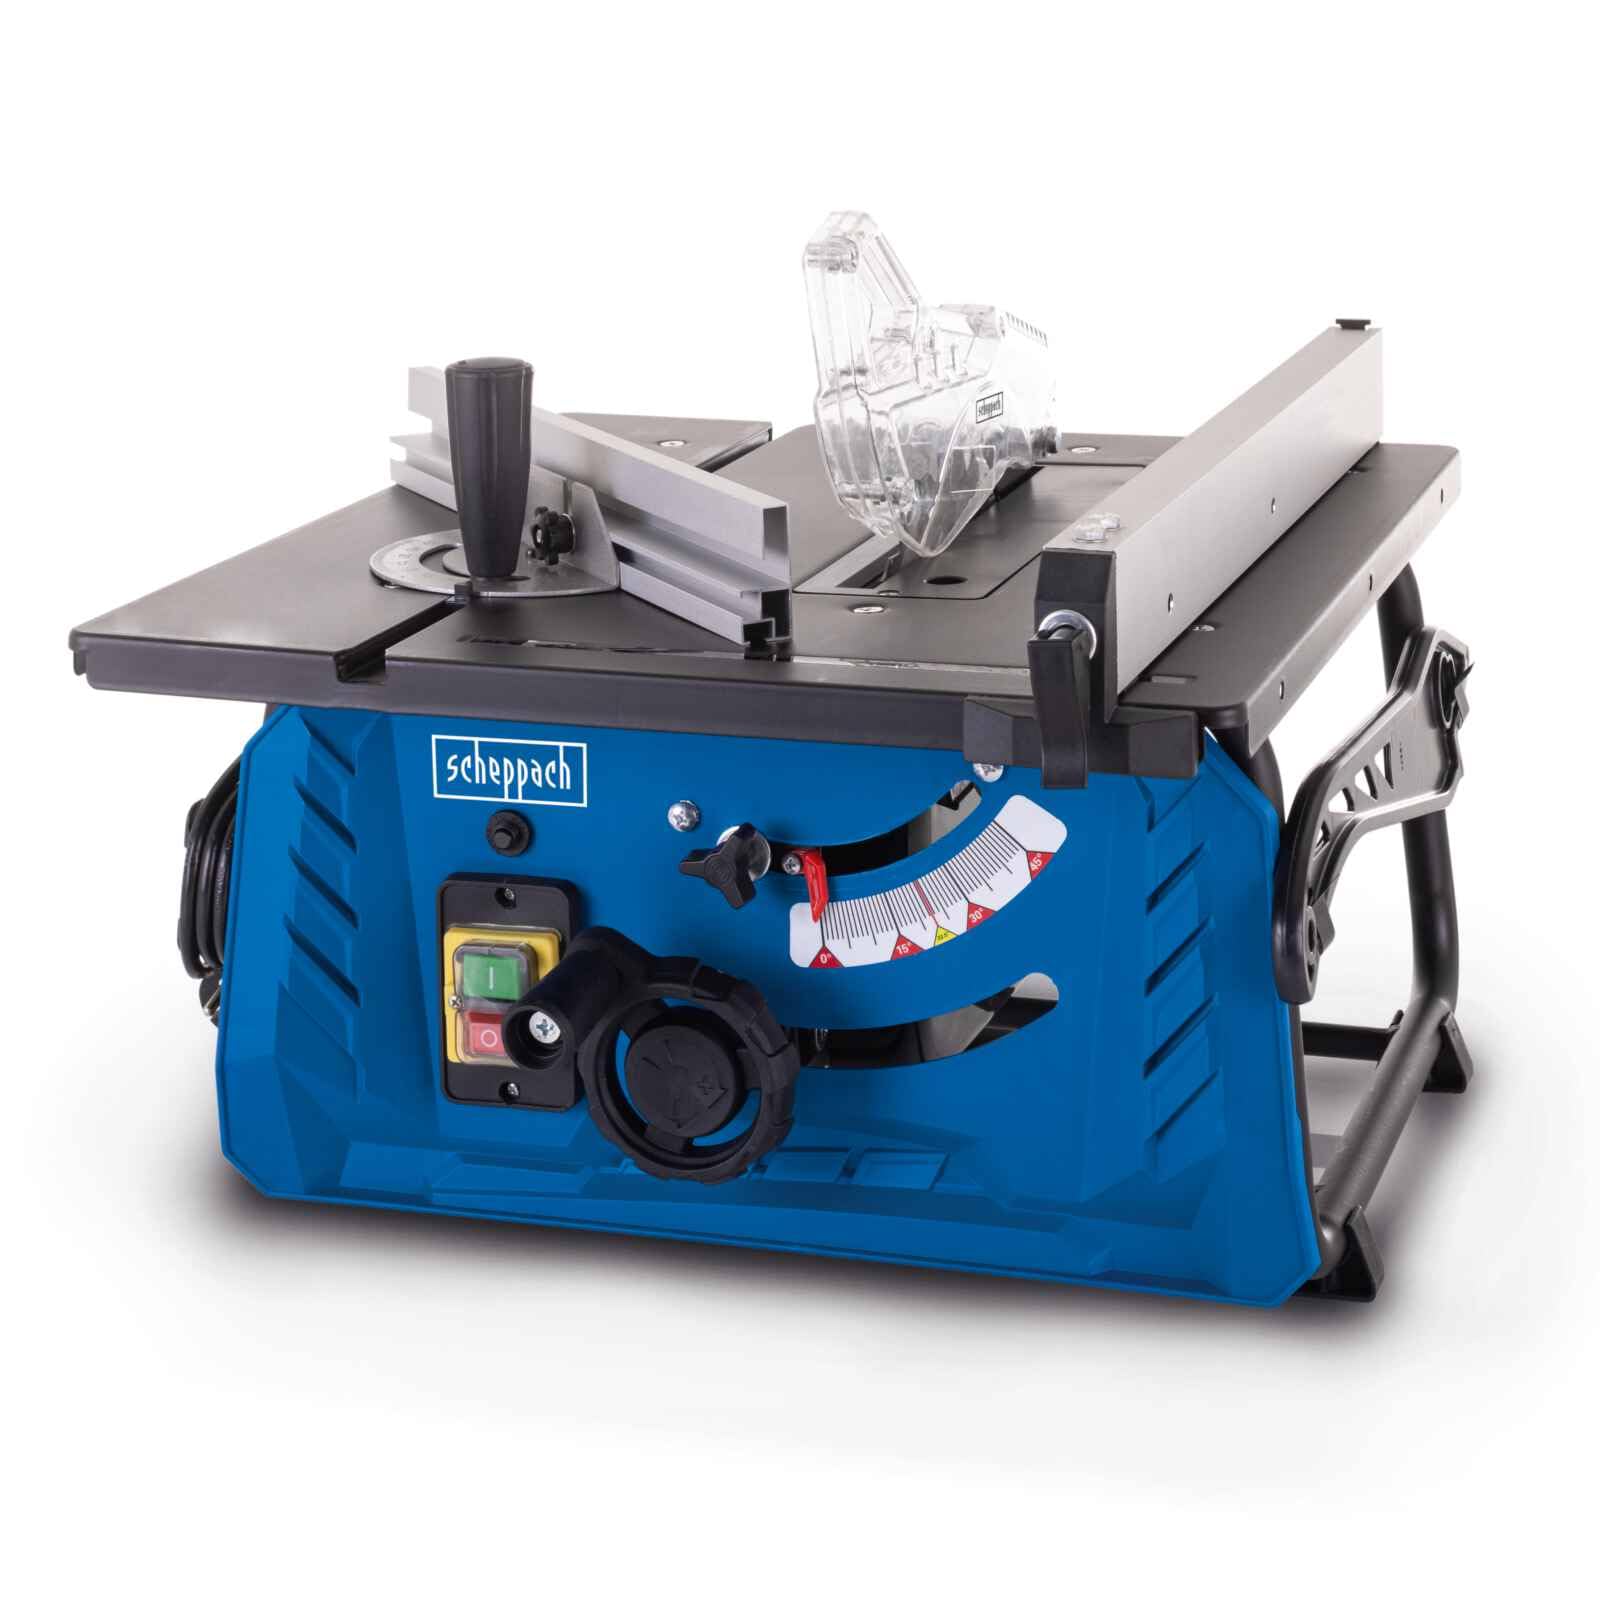
Wêne 2.1: Pêşî view of the Scheppach HS210 Table Saw, showcasing its compact design and main controls.
Taybetmendiyên sereke:
- Compact bench circular saw for precise cutting of beams, profiled boards, and for longitudinal and cross cuts.
- Powerful 1500 W motor with overload protection.
- Handwheel for convenient cutting height adjustment.
- Integrated connection for dust extraction.
- 210 mm diameter blade with 4800 rpm for precise cutting results.
- Blade easily tiltable from 0 – 45° for precise bevel cuts.
- Maximum cutting height at 90° is 70 mm, and at 45° is 54 mm.
- Adjustable cross-cut gauge from -60° to +60° for miter cuts.
- Longitudinal stop (rip fence) clamped on both sides with integrated scale for precision cuts.
- Maximum working safety thanks to the blade guard.
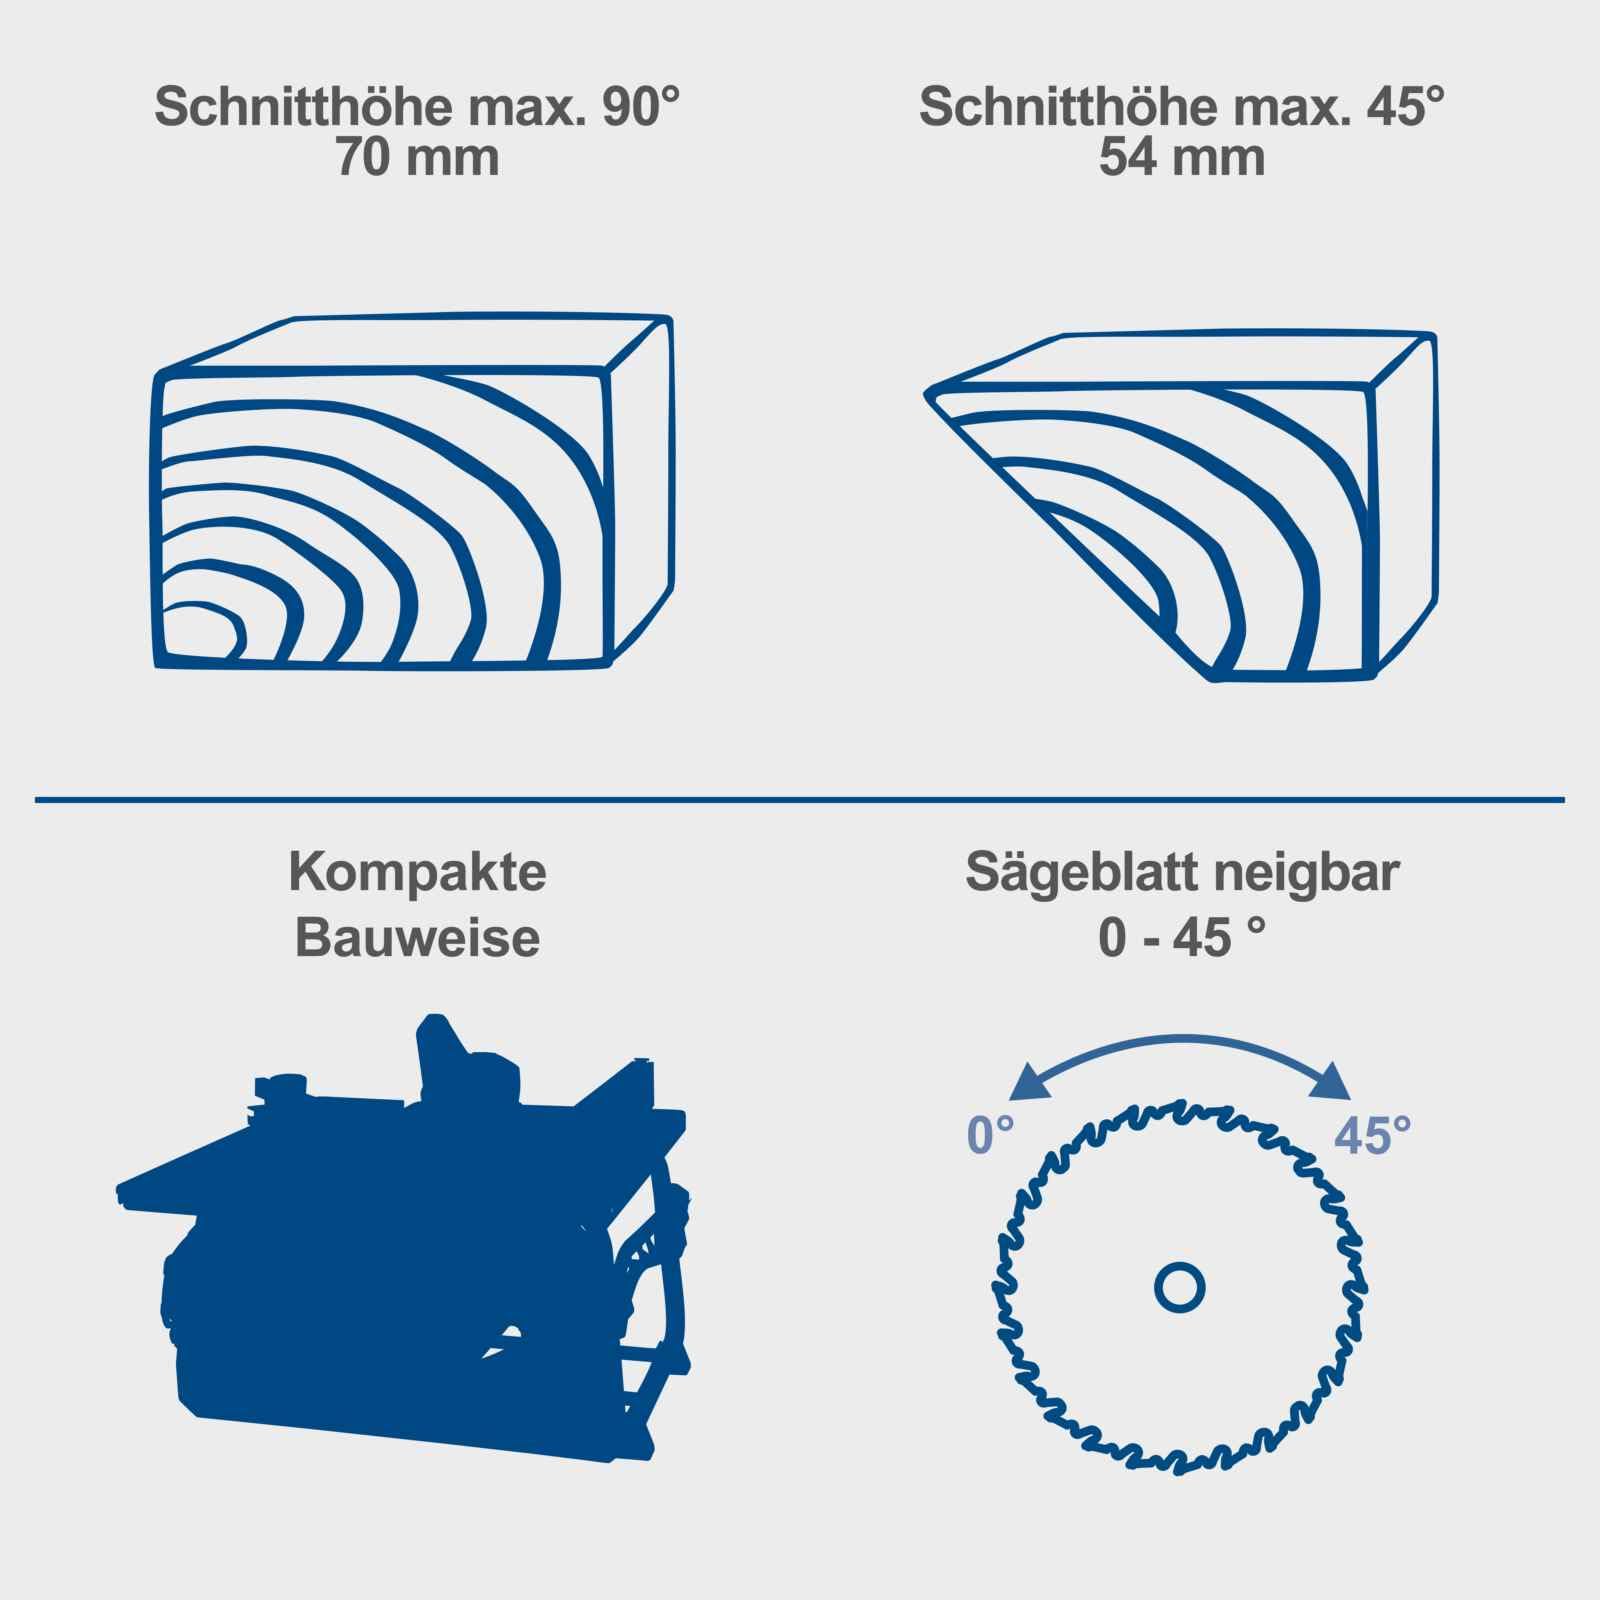
Figure 2.2: Diagram illustrating maximum cutting heights at 90° (70 mm) and 45° (54 mm), compact design, and blade tilt range of 0-45°.
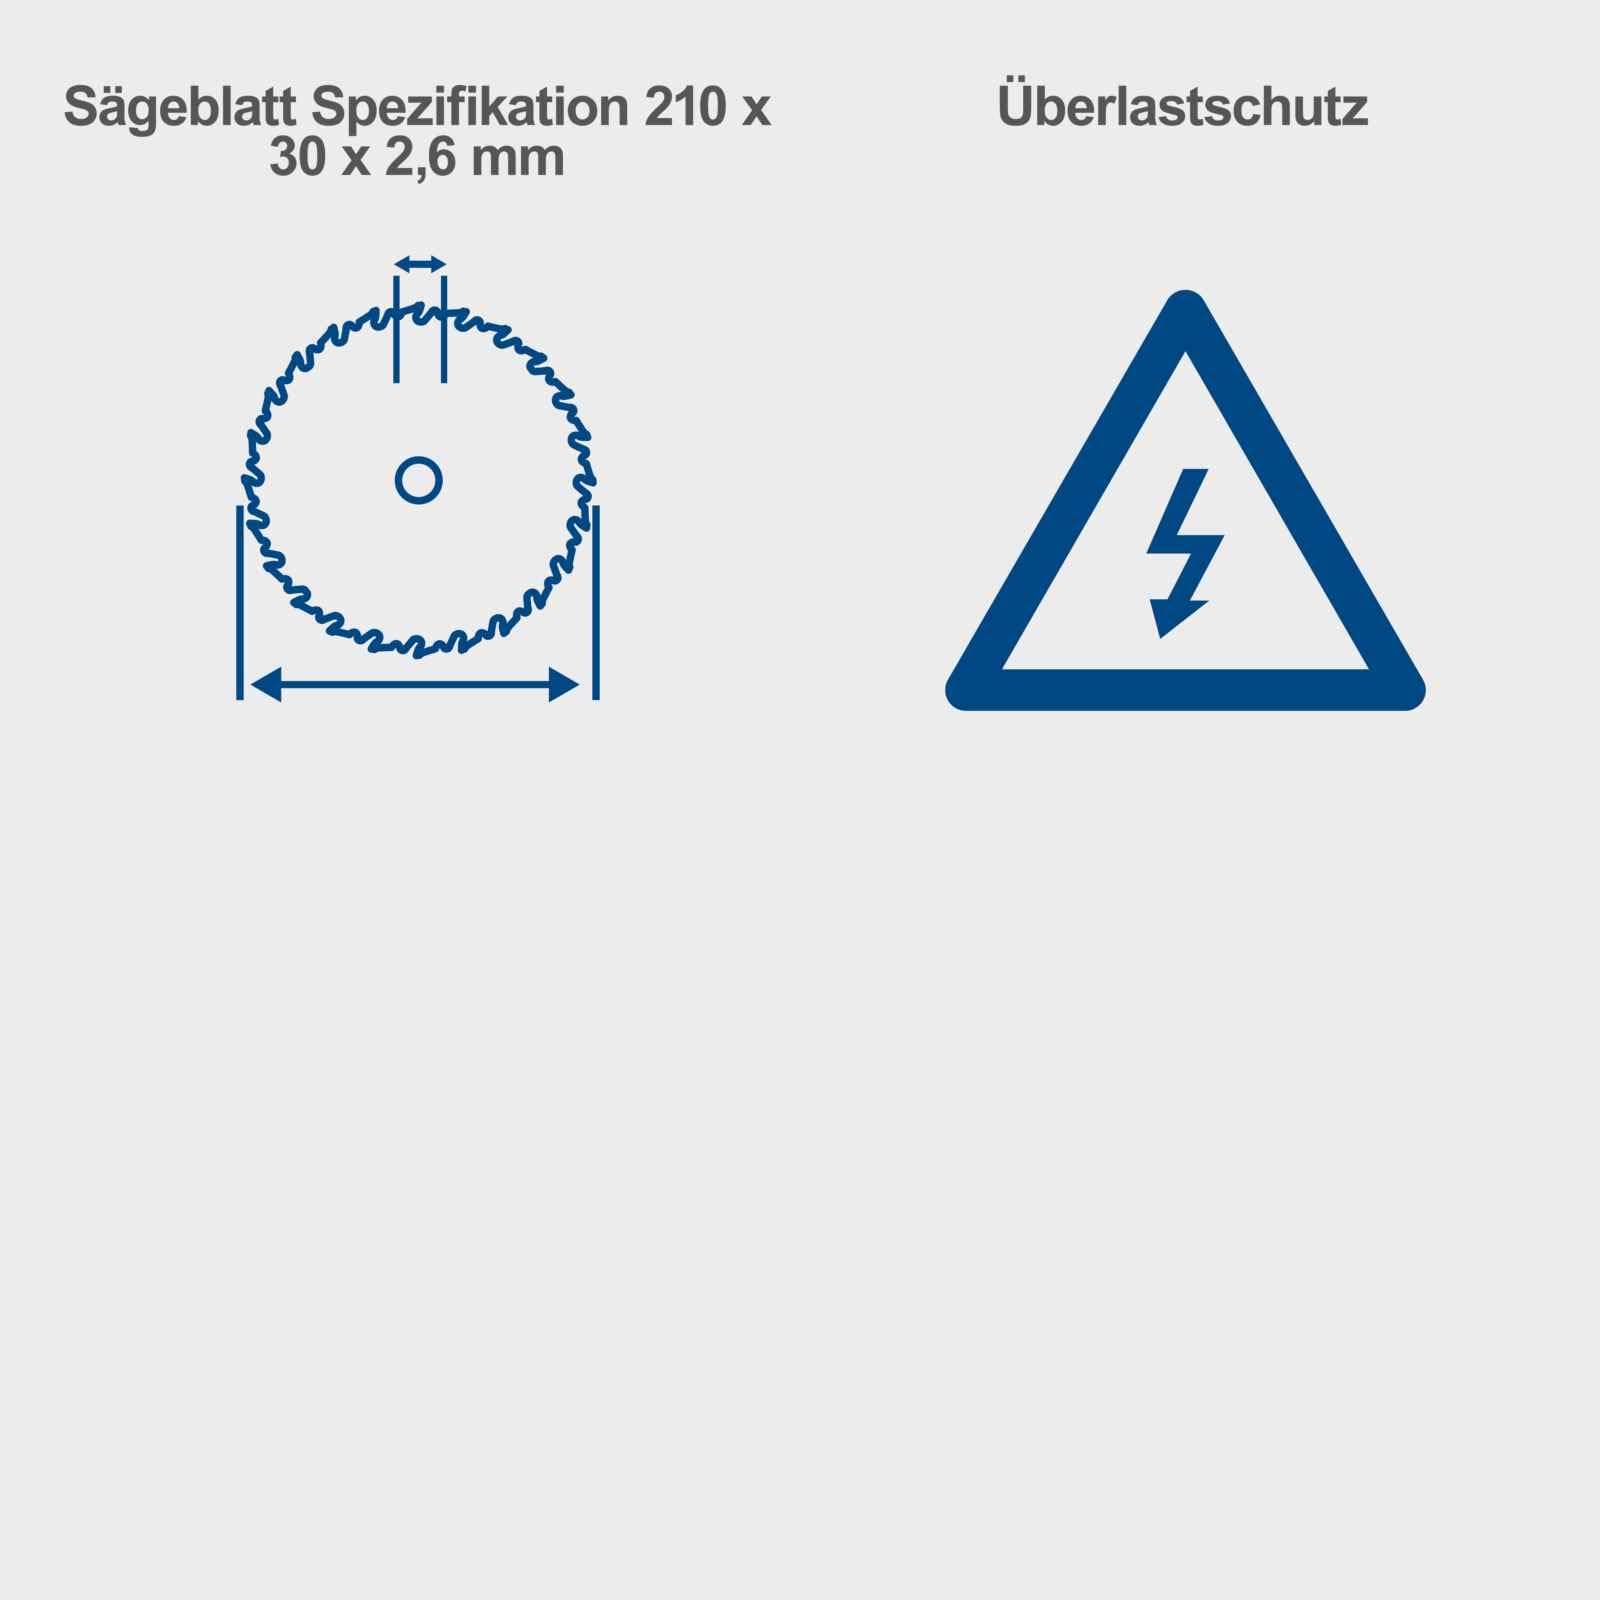
Figure 2.3: Diagram showing the saw blade specification (210 x 30 x 2.6 mm) and the overload protection symbol.
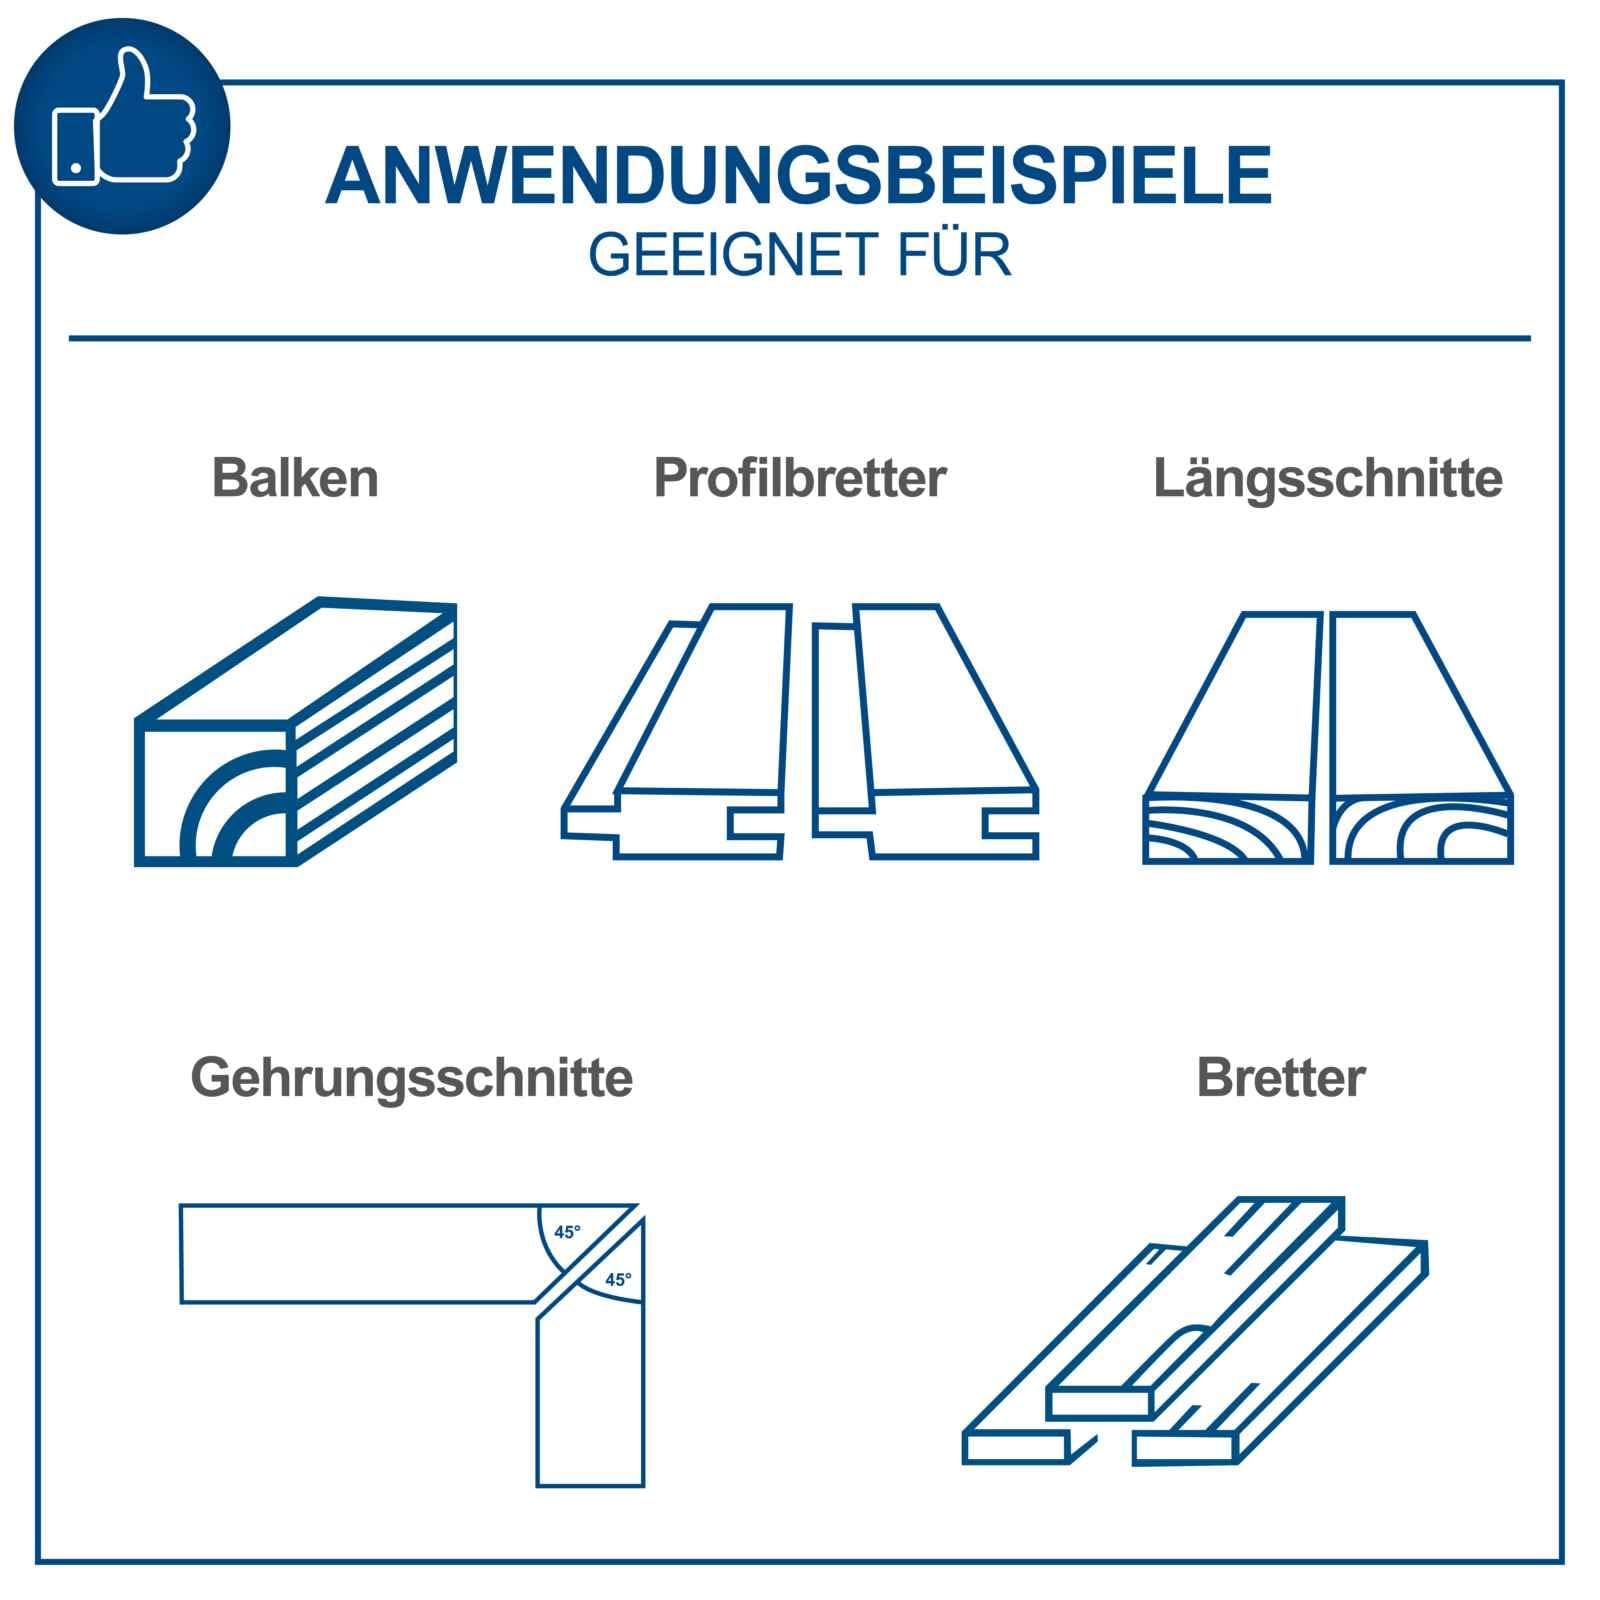
Wêne 2.4: Mînakamples of suitable applications including cutting beams, profiled boards, longitudinal cuts, miter cuts, and general boards.
3. Civîn û Setup
3.1 Vekirina Pakêtê û Kontrola Destpêkê
Carefully remove the table saw and all accessories from the packaging. Inspect all components for any signs of damage. If any parts are damaged or missing, do not operate the tool and contact customer support.
3.2 Attaching Components
Ensure the blade guard is securely in place over the saw blade. Attach the rip fence and cross-cut gauge as needed for your specific cutting tasks. Refer to the included diagrams for proper attachment.
3.3 Girêdana bi Power
Connect the power cord to a suitable electrical outlet. Ensure the power supply matches the specifications of the tool. The tool is equipped with a 1500W motor and requires a standard corded electric connection.
4. Operasyon
4.1 Operasyona bingehîn
Before starting, ensure the work area is clear, the workpiece is properly supported, and all safety devices are in place. Always wear appropriate personal protective equipment.
4.2 Rêkxistina Bilindahiya Birînê
The cutting height can be adjusted using the handwheel located on the front of the saw. Rotate the handwheel to raise or lower the saw blade to the desired cutting depth. Ensure the blade is set slightly higher than the thickness of your workpiece.
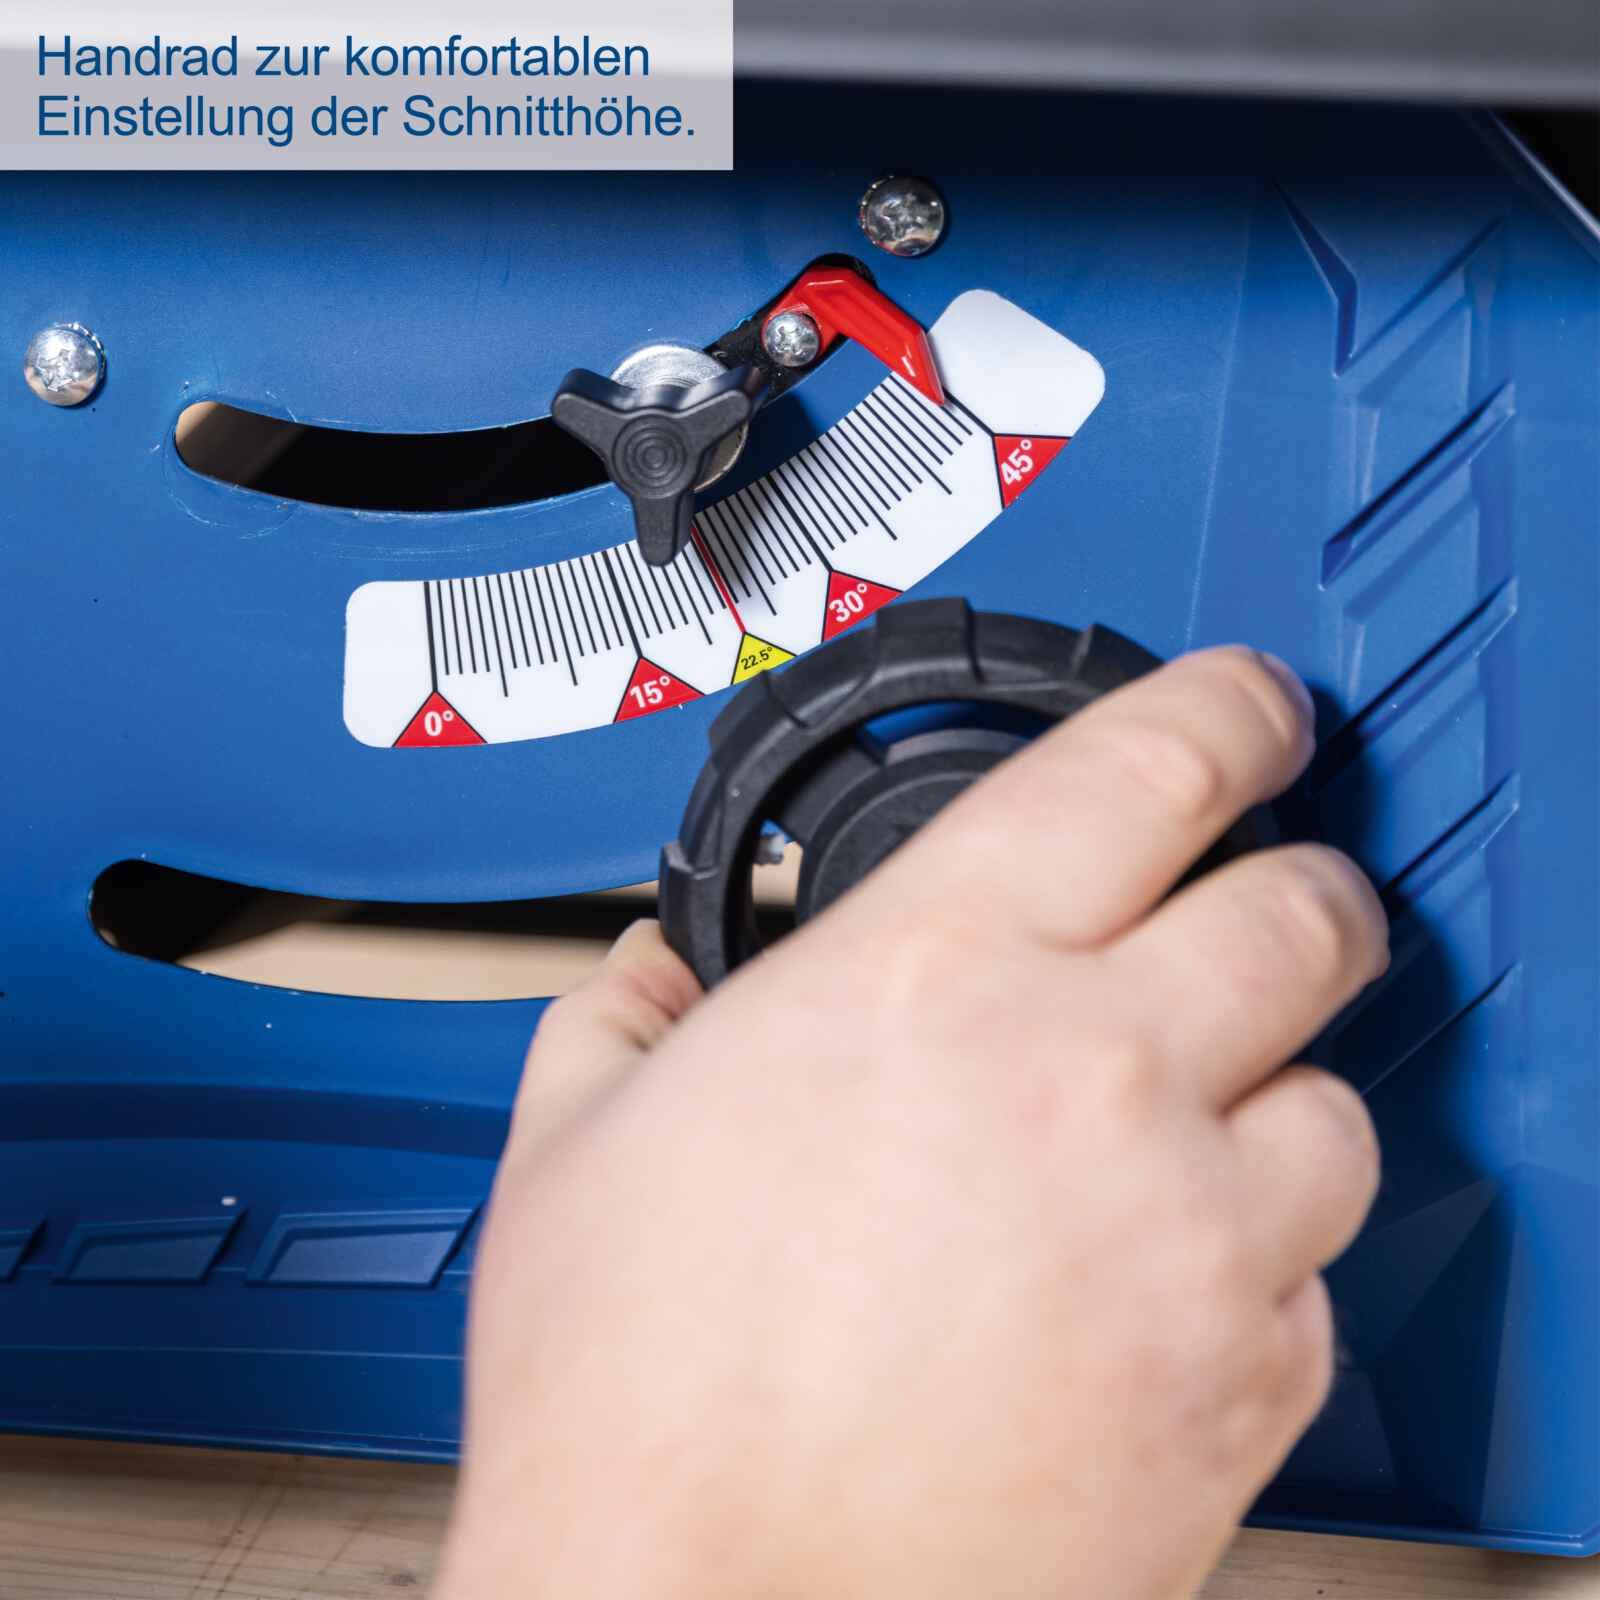
Wêne 4.1: Ji nêzîk ve view of the handwheel used for comfortable and precise adjustment of the cutting height.
4.3 Adjusting Blade Tilt (Bevel Cuts)
For angled cuts (bevels), the saw blade can be tilted from 0° to 45°. Use the tilt adjustment mechanism to set the desired angle. Always ensure the blade is securely locked at the chosen angle before operation.
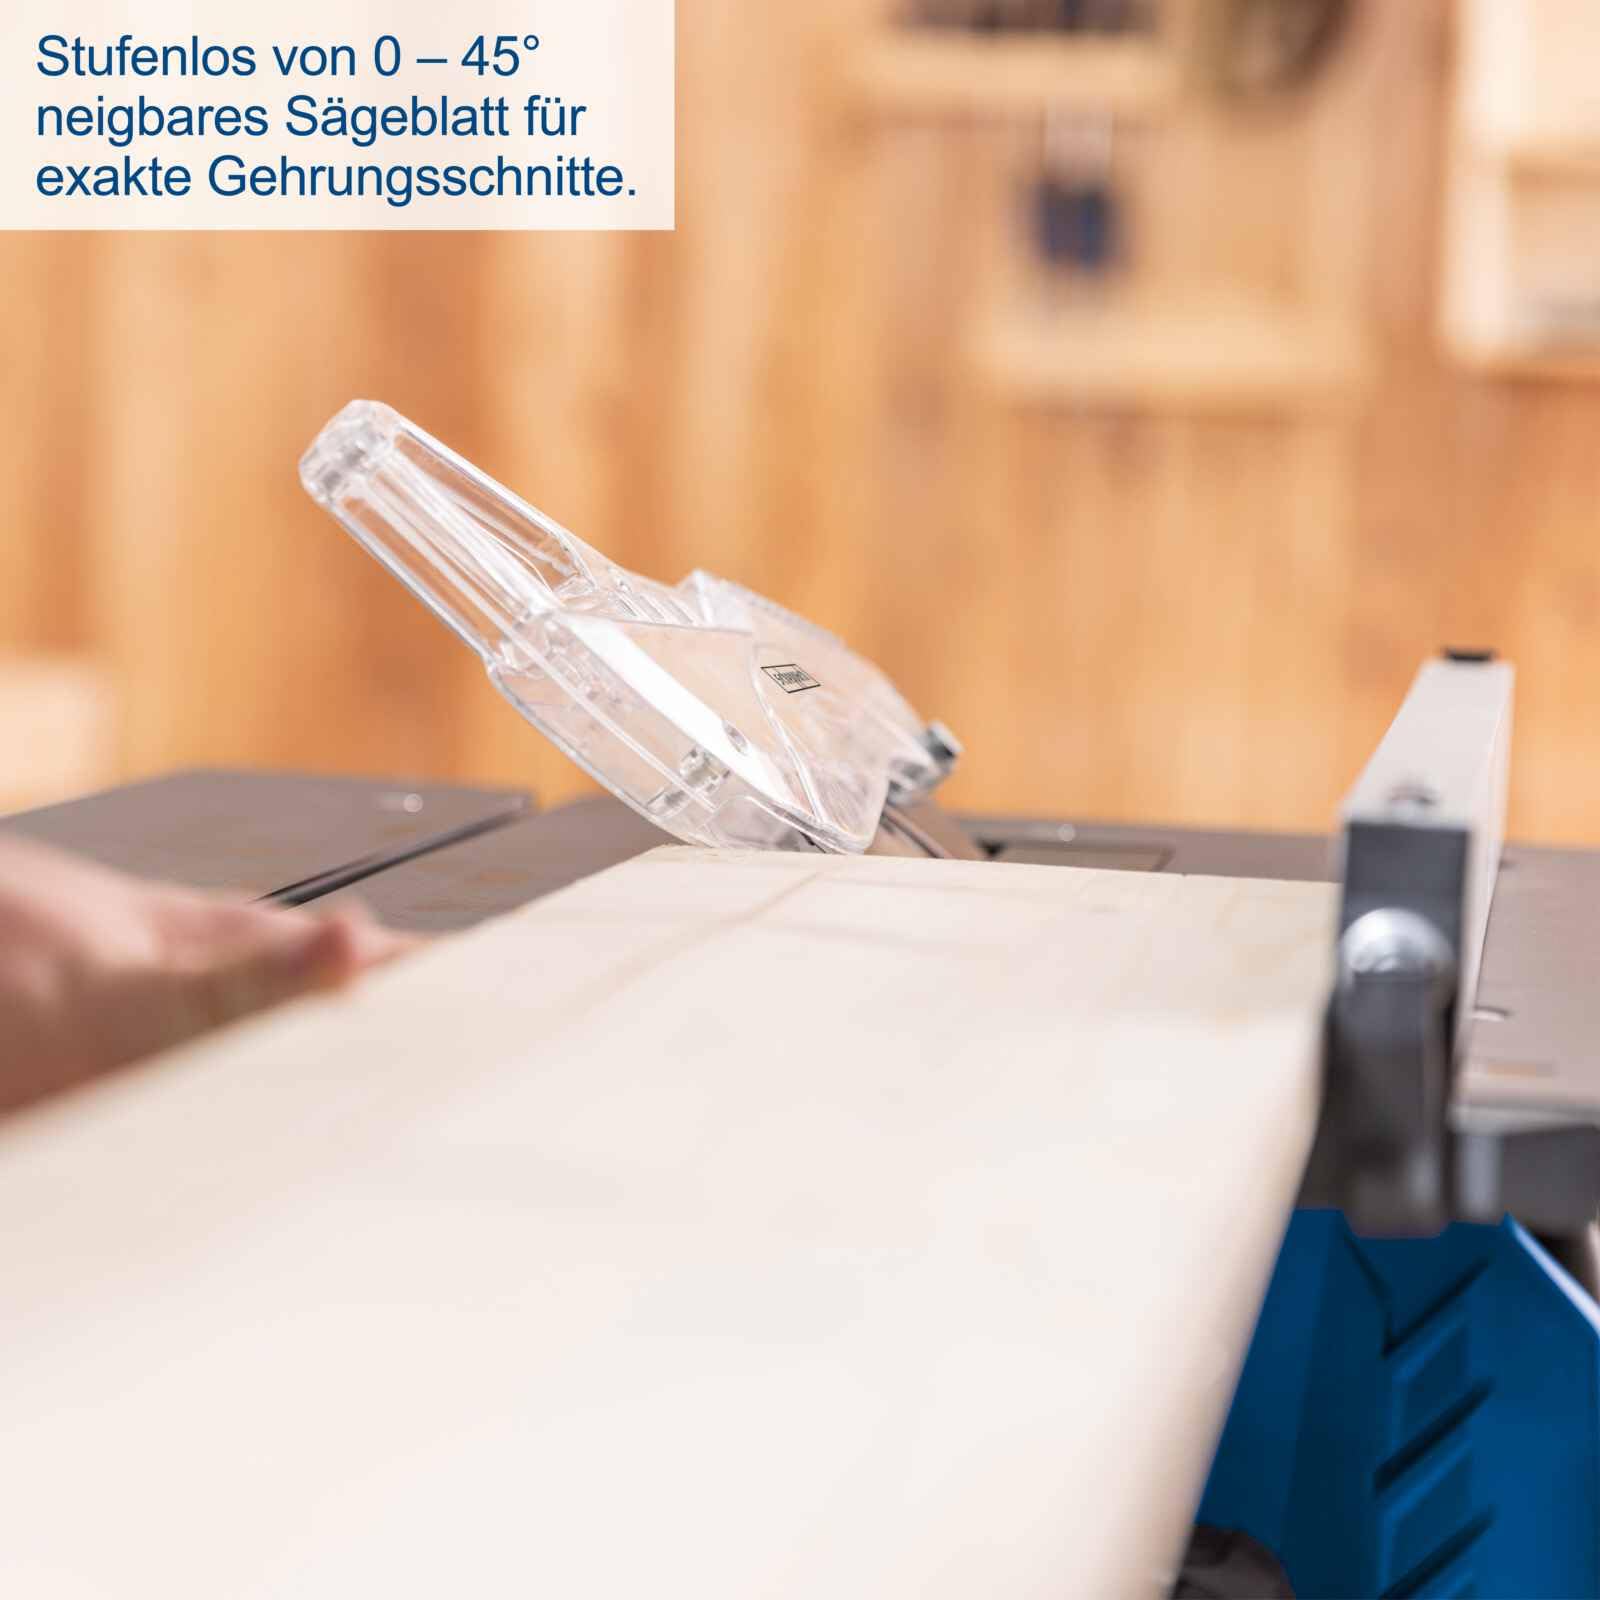
Figure 4.2: The saw blade continuously tiltable from 0-45° for exact miter and bevel cuts.
4.4 Using the Rip Fence (Longitudinal Cuts)
The rip fence is used for making straight, parallel cuts along the length of a workpiece. Position the rip fence to the desired width using the integrated scale and securely clamp it on both sides to prevent movement during cutting.
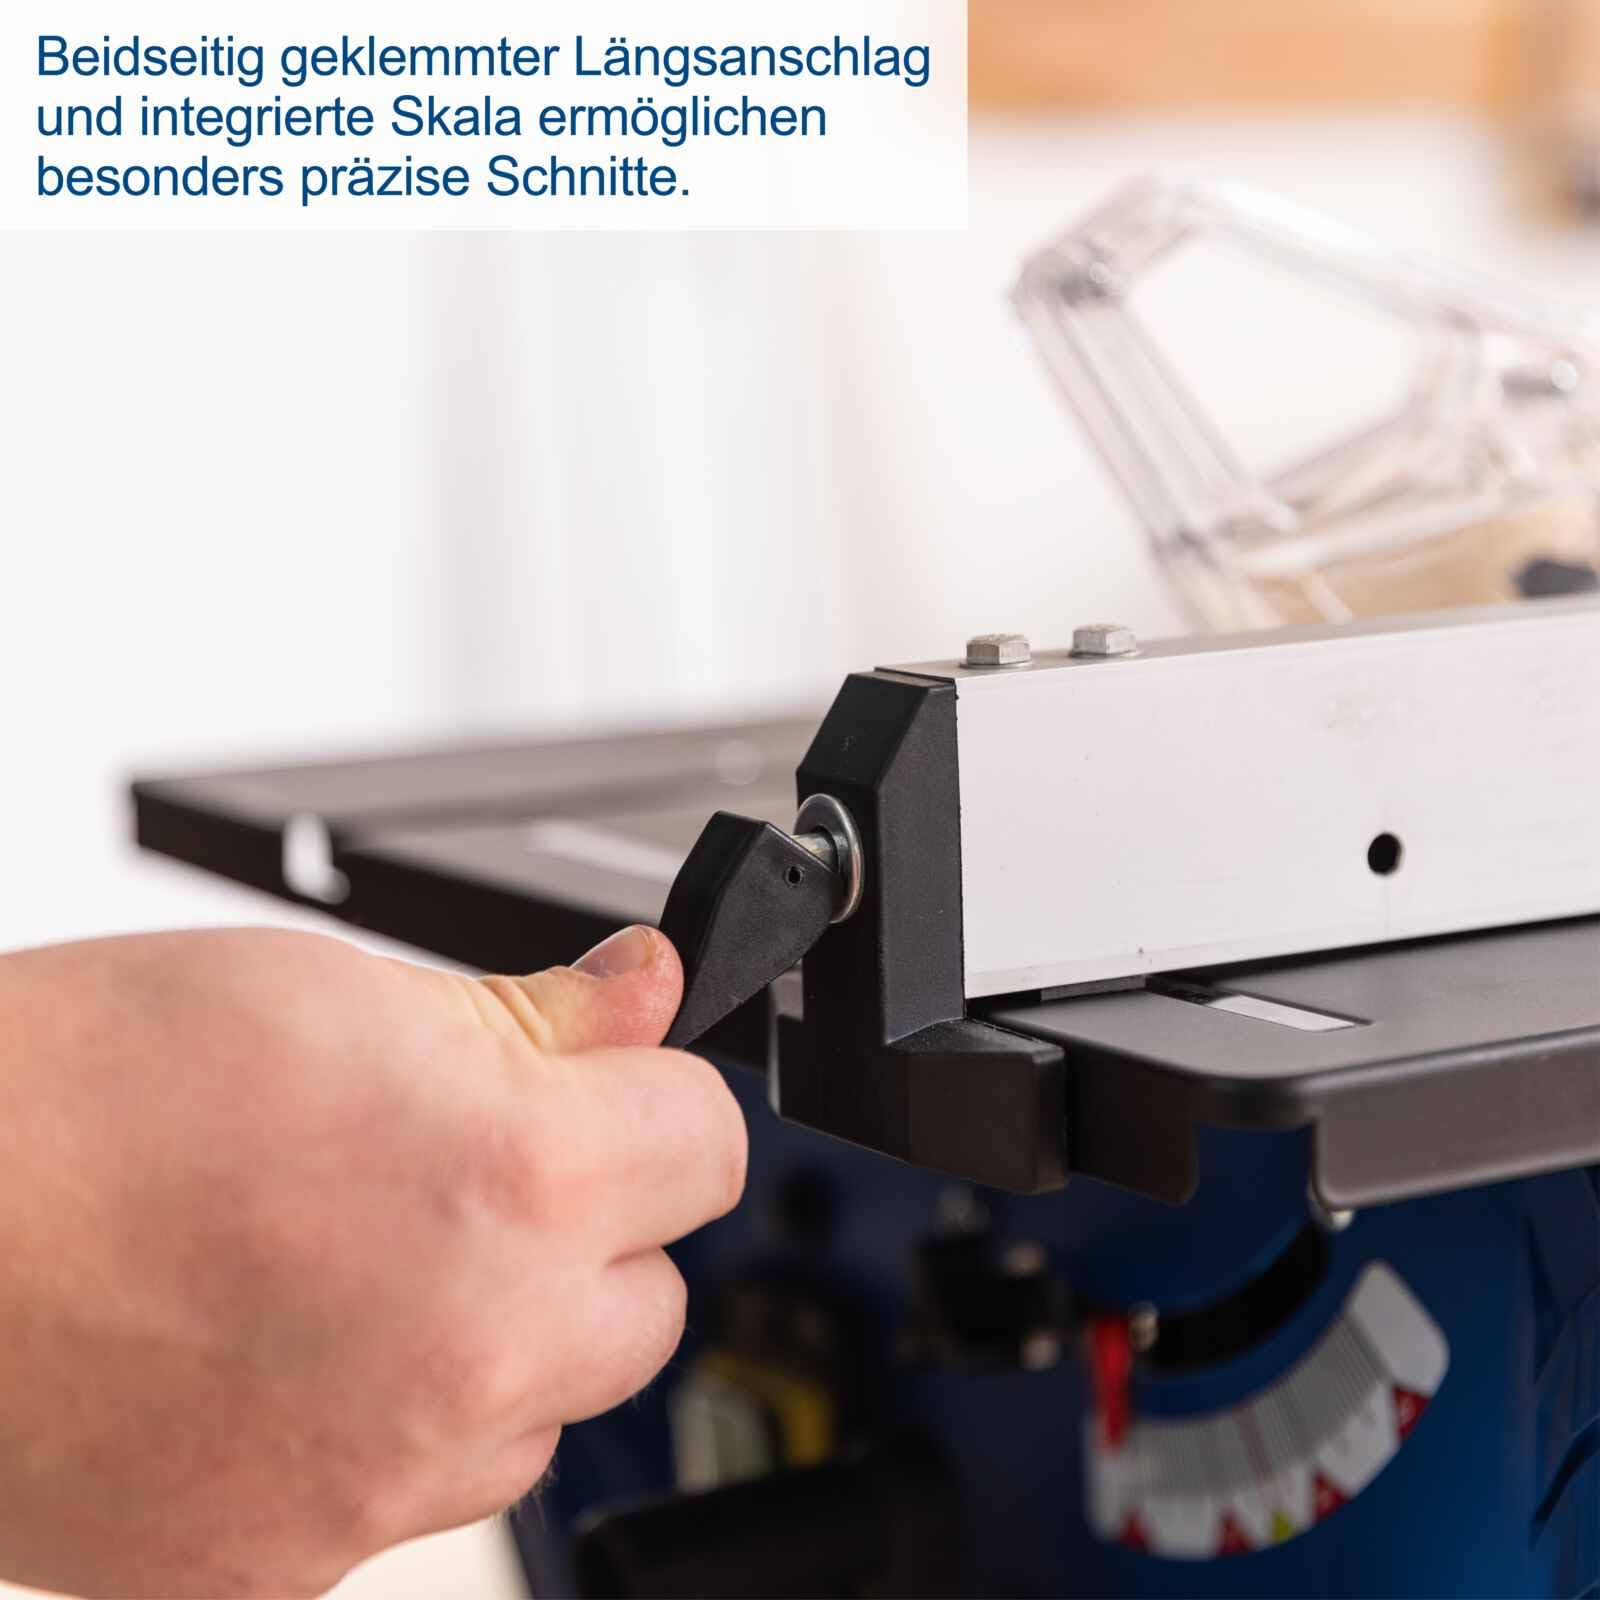
Figure 4.3: The rip fence, clamped on both sides, with an integrated scale for particularly precise longitudinal cuts.
4.5 Using the Cross-Cut Gauge (Miter Cuts)
The adjustable cross-cut gauge allows for precise miter cuts from -60° to +60°. Insert the gauge into the table slot and adjust it to the required angle. Hold the workpiece firmly against the gauge and feed it slowly through the blade.
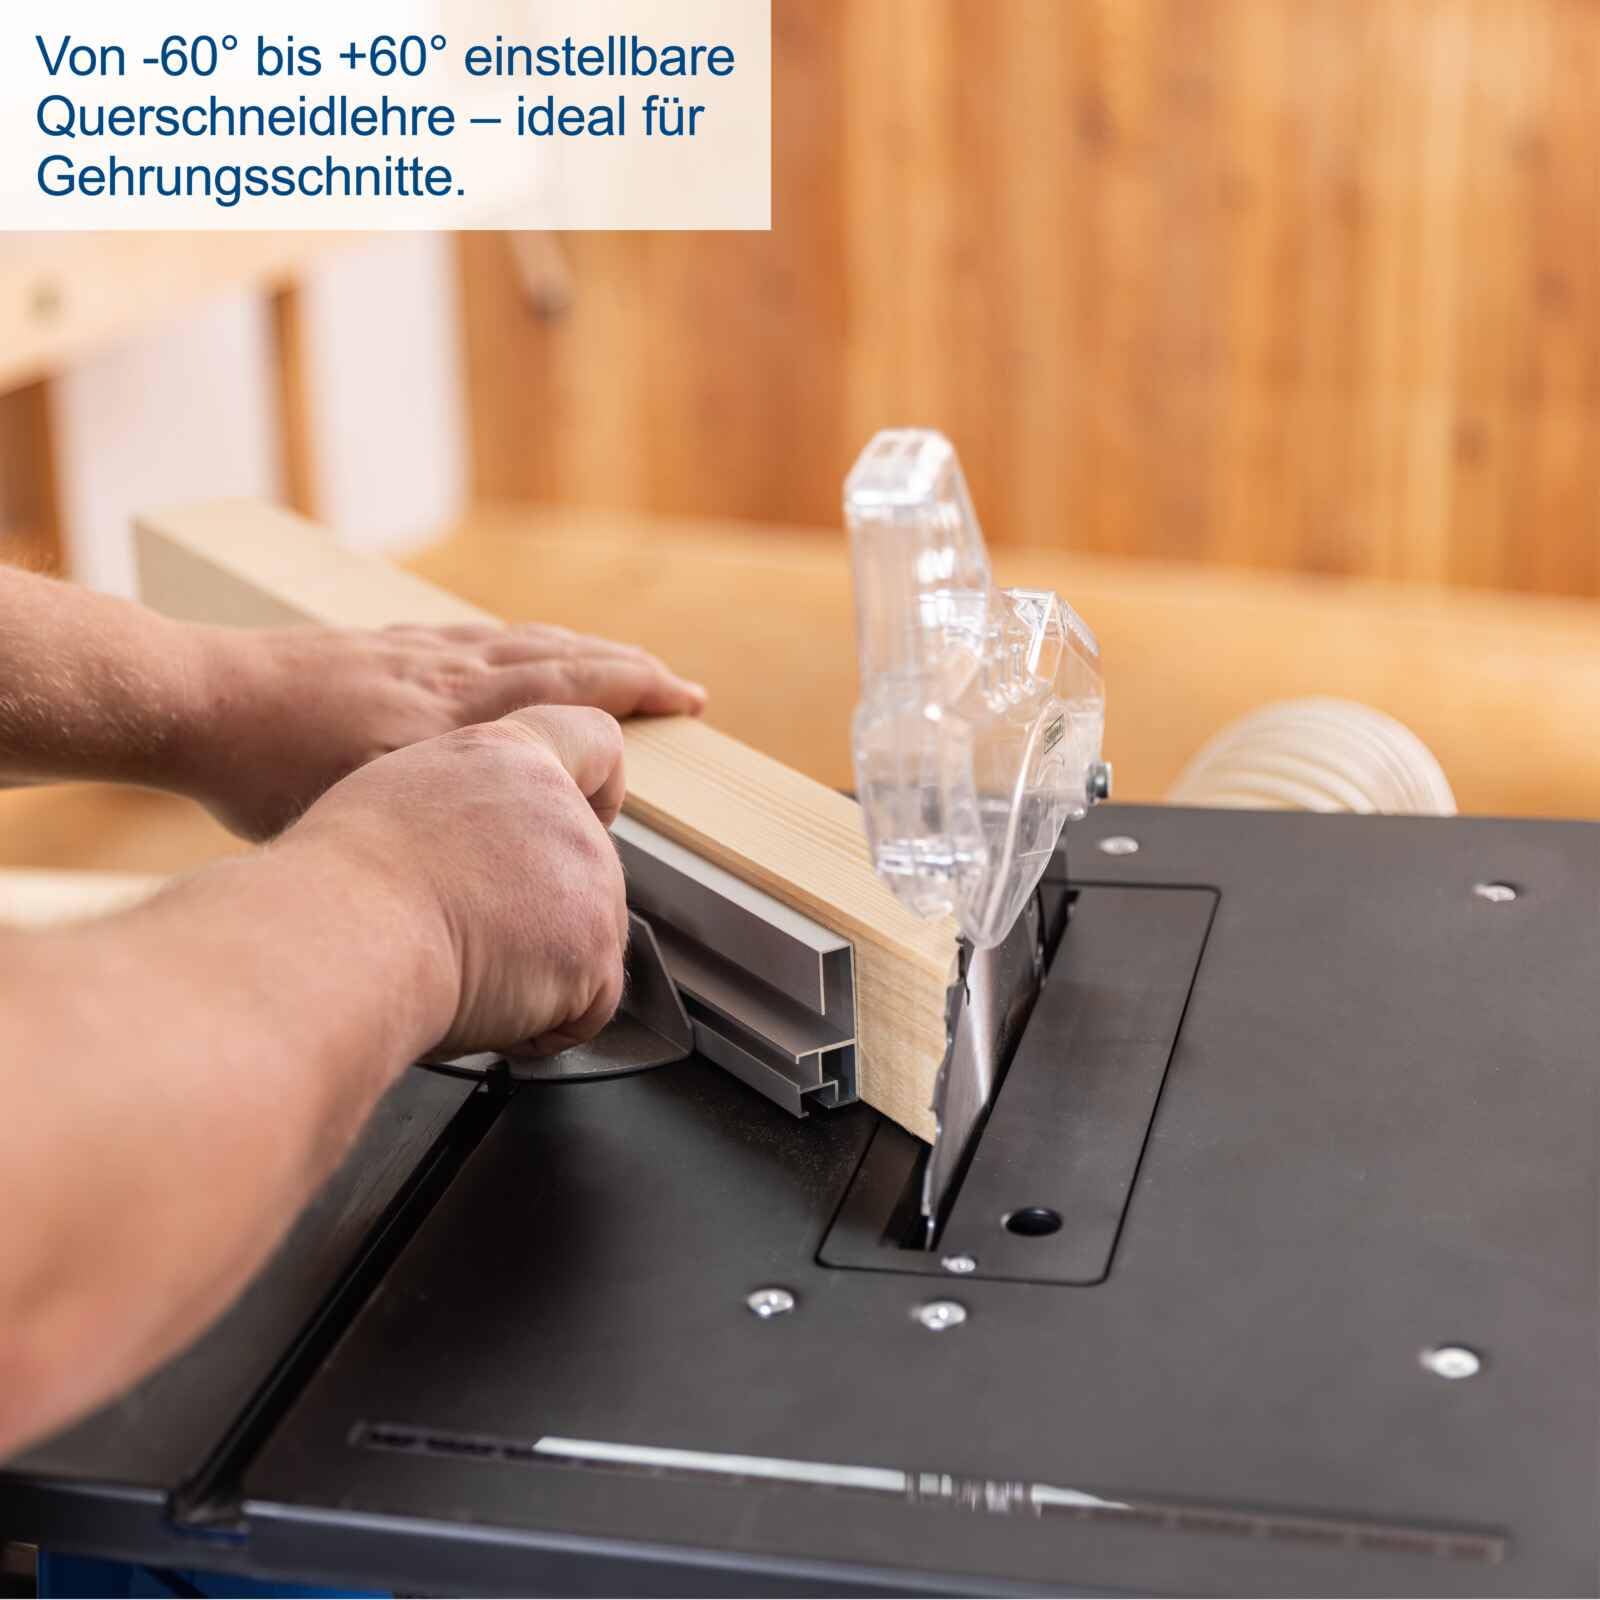
Figure 4.4: The adjustable cross-cut gauge, ranging from -60° to +60°, ideal for accurate miter cuts.
4.6 Parastina Overload
The Scheppach HS210 is equipped with overload protection to prevent damage to the motor. If the motor becomes overloaded, the protection system will activate and temporarily shut down the saw. Allow the motor to cool down before resuming operation and reduce the load on the blade.
4.7 Derxistina tozê
An integrated connection for dust extraction is provided. Connect a suitable dust extractor to minimize sawdust accumulation and maintain a cleaner, safer work environment.
4.8 Push Stick Usage
Always use the provided push stick when making narrow cuts or when your hands would be too close to the saw blade. This ensures maximum safety and control over the workpiece.
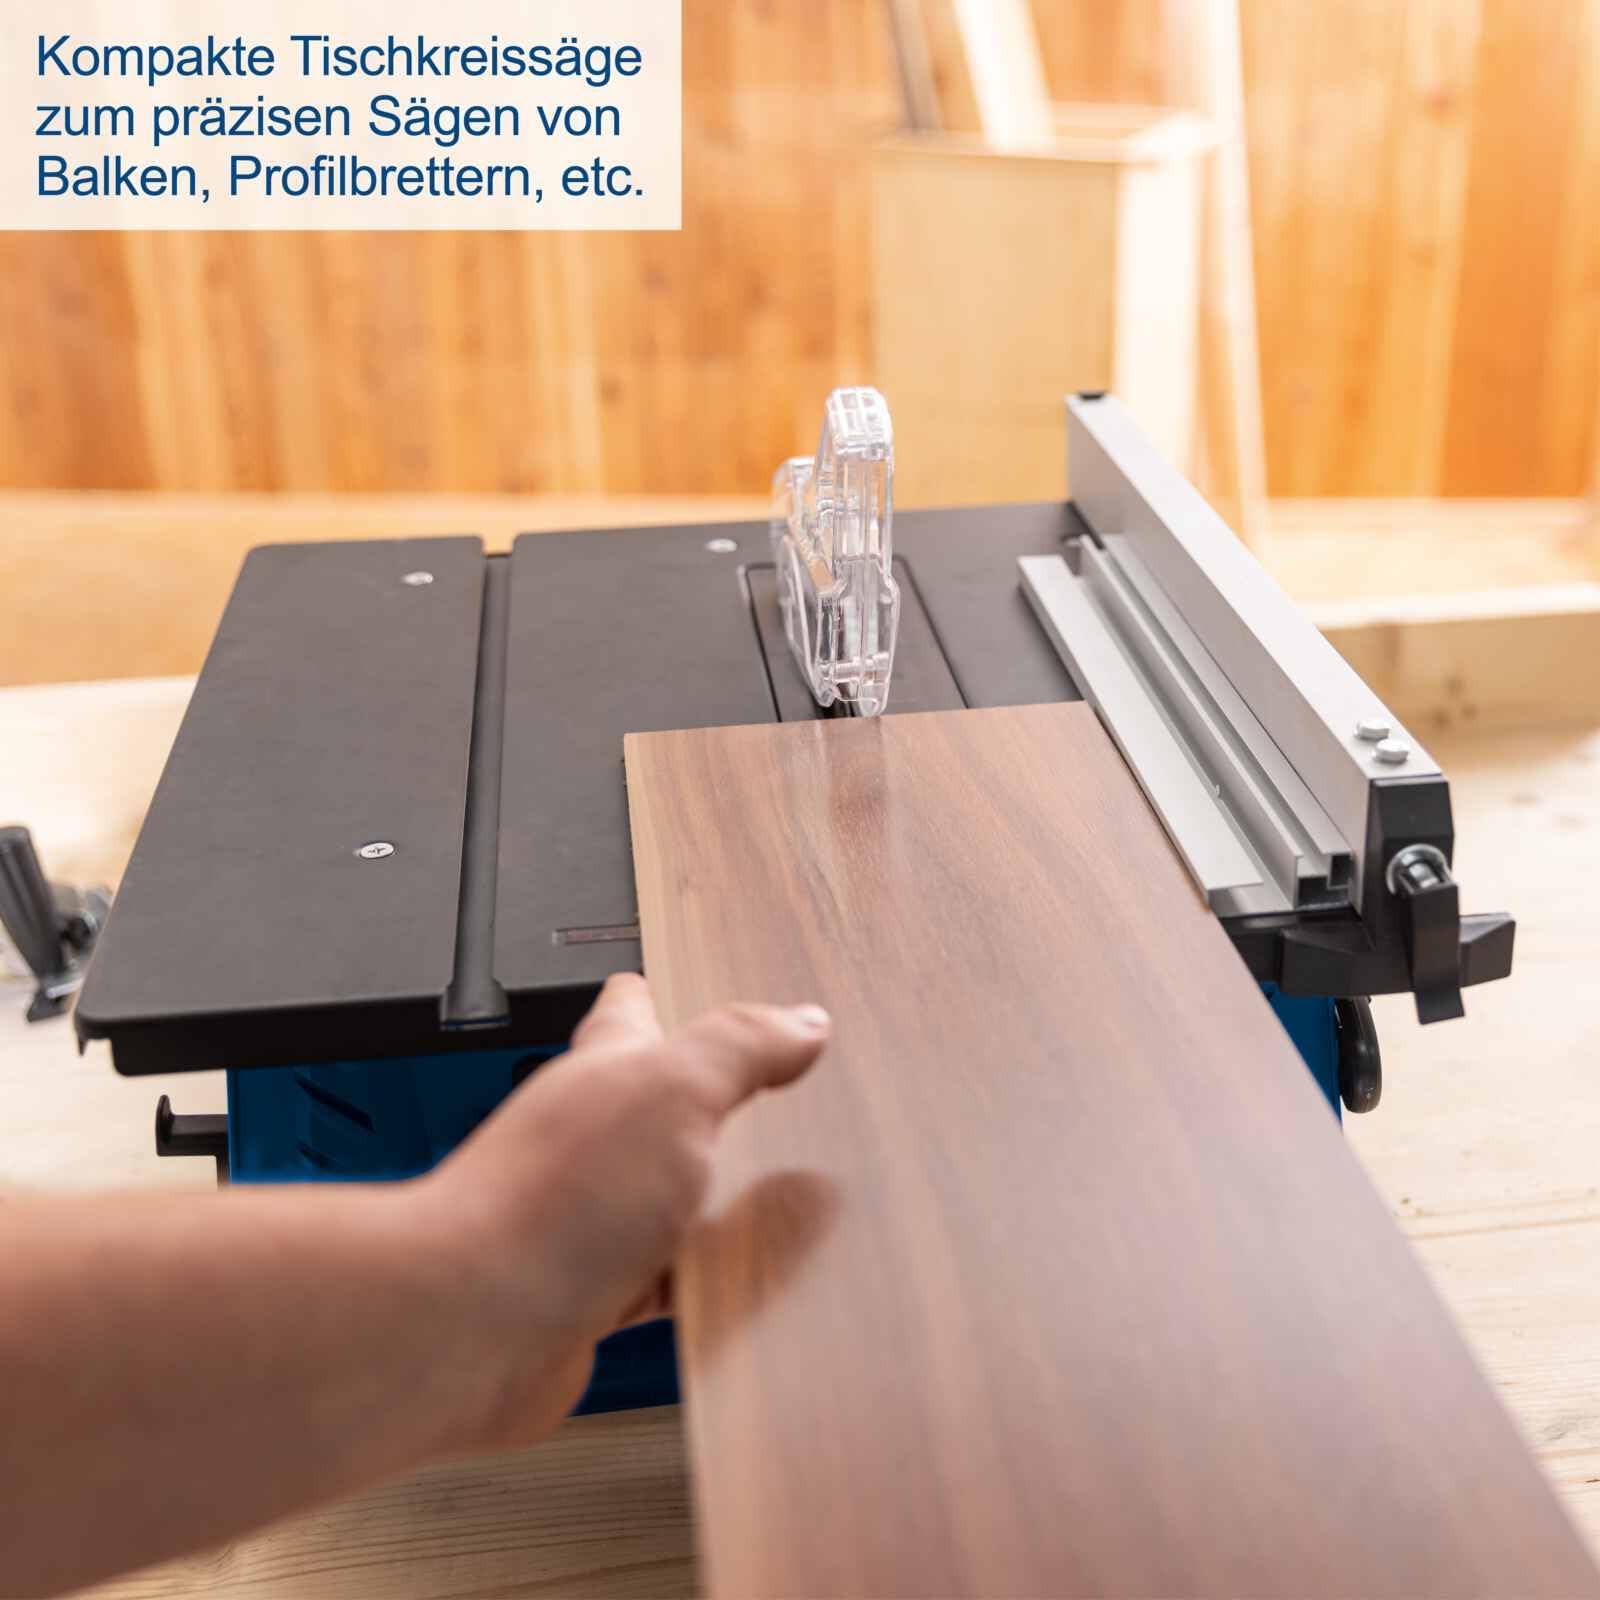
Figure 4.5: The compact table saw in operation, demonstrating its use for precise sawing of various wood materials.
5. Maintenance
5.1 Paqijkirin
Regularly clean the saw table, blade guard, and dust extraction port to prevent sawdust buildup. Use a brush or vacuum cleaner. Ensure the tool is disconnected from the power supply before cleaning.
5.2 Blade Replacement and Care
Periodically inspect the saw blade for sharpness and damage. A dull or damaged blade can lead to kickback and poor cut quality. Replace the blade as needed, ensuring the replacement blade matches the specifications (210 mm diameter, 30 mm bore, 2.6 mm kerf) and is suitable for the material being cut. Always disconnect power before changing the blade.
5.3 Kontrola Giştî
Before each use, check all screws and fasteners for tightness. Inspect the power cord for any damage. Ensure all moving parts operate smoothly and without excessive play.
6. Destpêkirin
This section provides solutions for common issues you might encounter with your Scheppach HS210 Table Saw.
- Saw does not start: Check power connection, ensure the switch is in the 'ON' position. If equipped with overload protection, check if it has tripped.
- Motor di dema xebatê de raweste: Overload protection may have activated. Reduce the feed rate or the depth of cut. Allow the motor to cool.
- Poor cut quality (rough edges, burning): The saw blade may be dull or dirty. Replace or clean the blade. Ensure the blade is appropriate for the material. Check the alignment of the rip fence.
- Livîna zêde: Check if the saw blade is securely mounted and not warped. Ensure the saw is placed on a stable surface.
For issues not covered here, please refer to the manufacturer's official support channels.
7. Specifications Teknîkî
| Specification | Giranî |
|---|---|
| Cins | HS210 |
| Input Power | 1500 W |
| Çavkaniya Hêzê | Corded Electric |
| No-load Leza | 4800 rpm |
| Saw Blade Diameter | 210 mm |
| Kuncika Tîjê | 30 mm |
| Max. Cutting Height at 90° | 70 mm |
| Max. Cutting Height at 45° | 54 mm |
| Blade Tilt Range | 0° - 45° |
| Cross-Cut Gauge Angle | -60° heta +60° |
| Pîvan (L x W x H) | 46 x 38 x 54.5 cm |
| Pîvan | 10.5 kg |
| Material Blade | Pola bilez |
| Rûberên Pêşniyar kirin | Text |
8. Garantî û Piştgirî
For information regarding warranty coverage, terms, and conditions, please refer to the warranty card included with your product or visit the official Scheppach website. For technical support, spare parts, or service inquiries, please contact Scheppach customer service directly.