
1. Destpêk
This user manual provides comprehensive instructions for the installation, configuration, and operation of your KuWFi CPE120 and CPE130 2.4G Wireless WiFi Bridge and Outdoor Access Point. Please read this manual carefully before using the device to ensure proper setup and optimal performance. Keep this manual for future reference.
2. Hilbera Serîview
The KuWFi CPE120 and CPE130 are 300Mbps outdoor wireless devices designed to extend Wi-Fi coverage over long distances, up to 1KM. They support Point-to-Point (PTP) and Point-to-Multi-Point (PTMP) connections, functioning as both a wireless bridge and an access point. These devices are built for outdoor use, featuring waterproof, dustproof, and lightning protection.
2.1. CPE120 Features
- 300Mbps Outdoor Wireless WiFi Bridge.
- Supports 1KM Long Range WiFi Extender functionality.
- LED display for configuring PTP/PTMP connections.
- Supports AP and Bridge operation modes.
- Waterproof, dustproof, and lightning protection.
- Germahiya Xebatê: -30℃ heta 55℃.
2.2. CPE130 Features
- Economic 300Mbps outdoor CPE.
- LED display support for 1KM Long Range.
- Improved wireless networking for extended coverage.
- Seamless wireless connectivity for homes and secondary buildings.
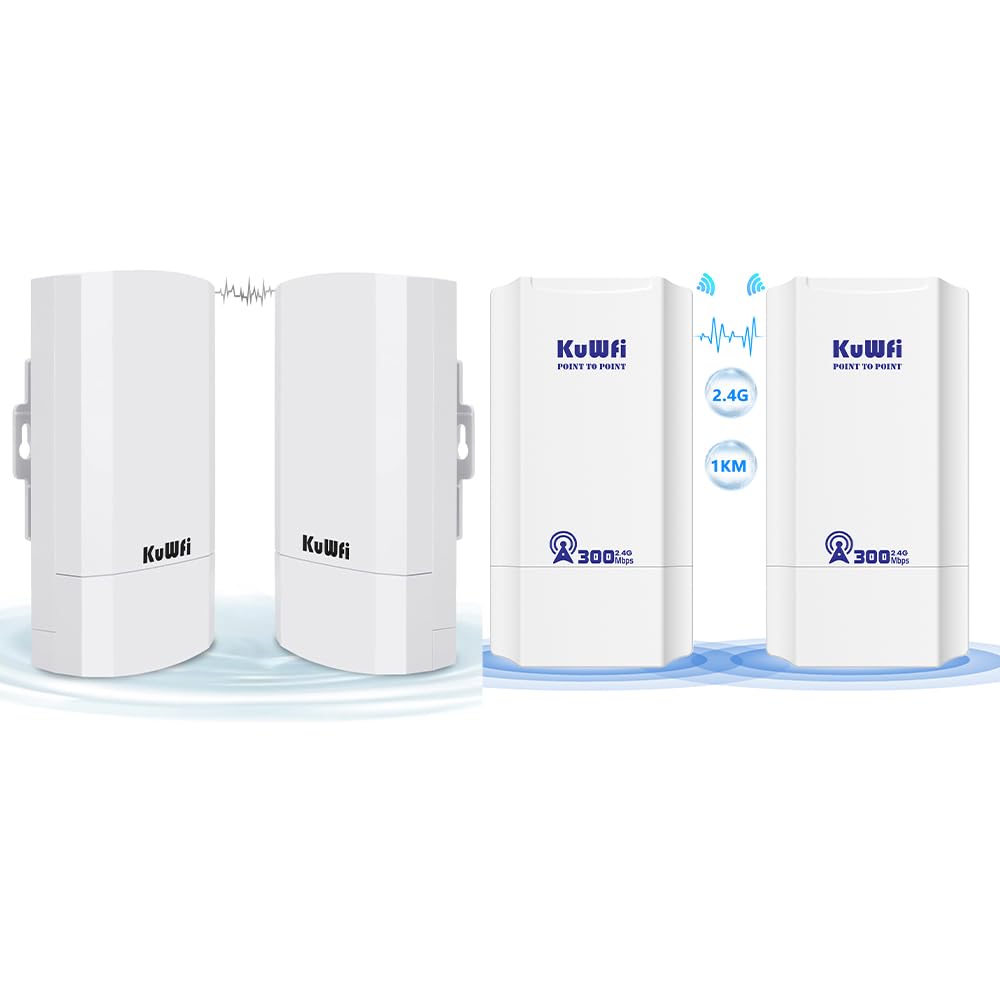
Figure 2.1: KuWFi CPE120/CPE130 Wireless Bridge Devices.

Figure 2.2: KuWFi CPE device highlighting 1KM long-range capability.
3. Naveroka pakêtê
Dema vekirina pakêtê, ji kerema xwe piştrast bikin ku hemî tiştên ku li jêr hatine navnîş kirin hene û di rewşek baş de ne:
- KuWFi CPE120/CPE130 Wireless Bridge Device(s)
- PoE (Power over Ethernet) Injector(s)
- Kablo(yên) Ethernet
- Mounting Accessories (e.g., zip ties)
- Manual Bikarhêner (ev belge)

Figure 3.1: Included accessories and device dimensions.
4. Hardware Serview
Familiarize yourself with the physical components of the CPE device.
4.1. Port û Nîşander
Each CPE device features the following ports and LED indicators on its underside:
- Porta WAN: Used for connecting to the network (e.g., router, NVR) and for Power over Ethernet (PoE) input.
- Porta LAN: Used for connecting to client devices (e.g., IP camera, PC).
- Bişkojka RESET: Used to reset the device to factory defaults. Press and hold for approximately 5-10 seconds while the device is powered on.
- Dîmendera LED: A digital display showing configuration status (e.g., '8.8.8.8' for Master, '8.8.8.9' for Slave, or other status codes).
- Roniyên nîşanker:
- Hêza LED: Rewşa hêzê nîşan dide.
- WAN LED: Indicates WAN port activity.
- LAN LED: Indicates LAN port activity.
- LED-yên Hêza Nîşanê: Multiple LEDs indicating wireless signal strength.

Figure 4.1: CPE Device Ports and Indicators (Master and Slave examples).

Wêne 4.2: Berfireh view of CPE device ports and controls.
5. Sazkirin û Sazkirin
The KuWFi CPE devices can be configured for Point-to-Point (PTP) or Point-to-Multi-Point (PTMP) connections. One device will act as the Mamoste, and the other(s) as Xulam(ên).
5.1. Basic Connection Diagram (PTP)
For a basic Point-to-Point setup, you will need two CPE devices. One acts as the Master, connected to your network source (e.g., router), and the other as the Slave, connected to your client device (e.g., IP camera, PC).
- Master Device Setup:
- Connect an Ethernet cable from your router/NVR to the WAN port of the Master CPE device.
- Power the Master CPE device using the provided PoE injector.
- Ensure the LED display on the Master device shows the correct configuration (e.g., '8.8.8.8').
- Slave Device Setup:
- Connect an Ethernet cable from the LAN port of the Slave CPE device to your client device (e.g., IP camera, PC).
- Power the Slave CPE device using the provided PoE injector.
- Ensure the LED display on the Slave device shows the correct configuration (e.g., '8.8.8.9').
- Çêkirin: Mount the devices outdoors in a clear line of sight for optimal signal transmission. Use the provided mounting accessories.

Figure 5.1: Point-to-Point Extended Network Diagram.

Figure 5.2: Point-to-Point and Point-to-Multi-Point Extended Camera Monitoring Range.
Figure 5.3: Wireless Bridge Master and Slave Connection Examples.
5.2. Configuring Master/Slave Roles
The CPE devices typically use an LED display for initial configuration. Refer to the device's quick start guide or the manufacturer's website for specific steps on how to set one device as Master and the other(s) as Slave(s) using the LED display or a web interface.
- Mamoste: Connects to the main network source (e.g., router).
- Xûlam: Connects to the remote client device(s).
6. Modes Operating
The KuWFi CPE devices support two primary operating modes:
- Moda AP (Xala Gihîştinê): In this mode, the device acts as a wireless access point, broadcasting a Wi-Fi signal for other devices to connect to. This is typically used when the CPE is connected to a wired network and needs to provide wireless access.
- Moda Bridge: In this mode, the device creates a wireless link between two wired networks or extends a wired network wirelessly. This is the primary mode for PTP/PTMP connections, where one CPE bridges the network to another CPE.
7. Maintenance
To ensure the longevity and optimal performance of your KuWFi CPE devices, follow these maintenance guidelines:
- Paqijî: Periodically clean the exterior of the devices with a soft, dry cloth. Do not use liquid cleaners or aerosols.
- Nûvekirinên Firmware: Check the KuWFi official webmalper (www.kuwfi.com) for the latest firmware updates. Keeping the firmware updated can improve performance, add new features, and fix bugs.
- Parastina Jîngehê: Ensure the devices are securely mounted and protected from extreme weather conditions beyond their specified operating range.
8. Destpêkirin
If you encounter issues with your KuWFi CPE devices, refer to the following common troubleshooting steps:
- Hêz tune:
- Ensure the PoE injector is properly connected and receiving power.
- Hemî girêdanên kabloyê kontrol bikin.
- Girêdana Torê Tune ye:
- Verify that the Master and Slave devices are correctly configured (e.g., LED display shows correct codes).
- Check the WAN/LAN LED indicators for activity.
- Ensure there is a clear line of sight between the Master and Slave devices.
- Try resetting both devices to factory defaults and reconfiguring them.
- Confirm that the connected router/NVR is functioning correctly.
- Weak Signal/Slow Speed:
- Adjust the alignment of the devices to ensure optimal signal strength.
- Check for obstructions between the devices.
- Ensure the distance between devices does not exceed the recommended range (1KM).
- Minimize interference from other 2.4GHz wireless devices.
- Nikare Bigihêje Web Interface (if applicable):
- Ensure your computer is connected to the CPE's LAN port or a network segment that can reach the CPE's IP address.
- Verify the CPE's default IP address (refer to the quick start guide or device label).
- Temporarily disable your computer's firewall.
For further assistance, please visit the KuWFi support webmalper an bi karûbarê xerîdar re têkilî daynin.
9. Specifications
| Taybetî | Terîf |
|---|---|
| Nîşan | KuWFi |
| Navê Model | CPE120, CPE130 |
| Taybetmendiya Taybet | Moda Xala Gihîştinê, WPS |
| Frequency Band Class | Yek-Band (2.4GHz) |
| Standarda Têkiliya Wireless | 802.11n |
| Amûrên Lihevhatî | Laptop, Komputera Şexsî, Smartphone, Tablet |
| Teknolojiya Girêdanê | Wi-Fi |
| Cureyê Antenna | Fixed |
| Protokola Ewlekariyê | WPS (Sazkirina Parastî ya Wi-Fi) |
| Rêbaza Kontrolê | Touch (referring to LED display interaction) |
| Firehiya Porta LAN | 1000 Mbps |
| Rêjeya Veguhestina Daneyên Herî Zêde ya Jor | 300 Megabit Per Second |
| Is Modem Compatible | Na |
| Coverage | 1KM Long Range |
| Germahiya xebitandinê | -30 ℃ heta 55 ℃ |
| Germahiya Storage | -40 ℃ heta 70 ℃ |
| Avê / Dustproof | Erê |
| Parastina Birûskê | Erê |
10. Agahiyên Ewlekariyê
Ji kerema xwe tedbîrên ewlehiyê yên jêrîn bişopînin:
- Amûrê venekin casing. Hemû xizmetguzarî ji karmendên pispor re bişînin.
- Ensure proper grounding for lightning protection.
- Use only the power adapter and PoE injector provided by the manufacturer.
- Amûrê ji bo demek dirêj nêzîkî çavkaniyên germê an jî di bin tîrêjên rojê yên rasterast de nehêlin.
- Amûrê ji avê an jî şilbûna zêde dûr bigirin.
11. Garantî û Piştgirî
Specific warranty information is not provided within this manual. For details regarding warranty coverage, technical support, or customer service, please refer to the product packaging, the official KuWFi webmalper (www.kuwfi.com), or contact your retailer.