GOOJODOQ Portable Handheld Turbo Fan
GOOJODOQ Portable Handheld Turbo Fan User Manual
Model: Portable Handheld Turbo Fan
1. Destpêk
Thank you for choosing the GOOJODOQ Portable Handheld Turbo Fan. This manual provides essential information for the safe and efficient operation, maintenance, and troubleshooting of your device. Please read it thoroughly before use and retain it for future reference.
2. Telîmatên Ewlekariyê
- Fansê di nav avê an şilekên din de nehêlin.
- Keep the fan away from open flames, heat sources, and direct sunlight to prevent battery damage or overheating.
- Tilî an tiştên biyanî nexin nav grila fanosê.
- Ev cîhaz ne lîstokek e. Li derûdora zarokan bimînin.
- Ji bo şarjkirinê tenê kabloya şarjê ya ku hatiye dayîn an jî kabloyek USB-C ya pejirandî bikar bînin.
- Do not attempt to disassemble, repair, or modify the fan. Contact customer support if service is required.
- Dispose of the fan and its battery according to local regulations.
3. Naveroka pakêtê
Ji kerema xwe pakêtê ji bo tiştên jêrîn kontrol bikin:
- GOOJODOQ Portable Handheld Turbo Fan
- Kabloya barkirinê ya USB-C
- Manual Bikarhêner
- Hand Strap (may be pre-attached or included separately)
4. Hilbera Serîview
4.1 Fan Components
The GOOJODOQ Portable Handheld Turbo Fan features a compact design with a powerful motor and intuitive controls.

jimar 1: Pêşde view of the GOOJODOQ Portable Handheld Turbo Fan, showing the digital display and airflow.
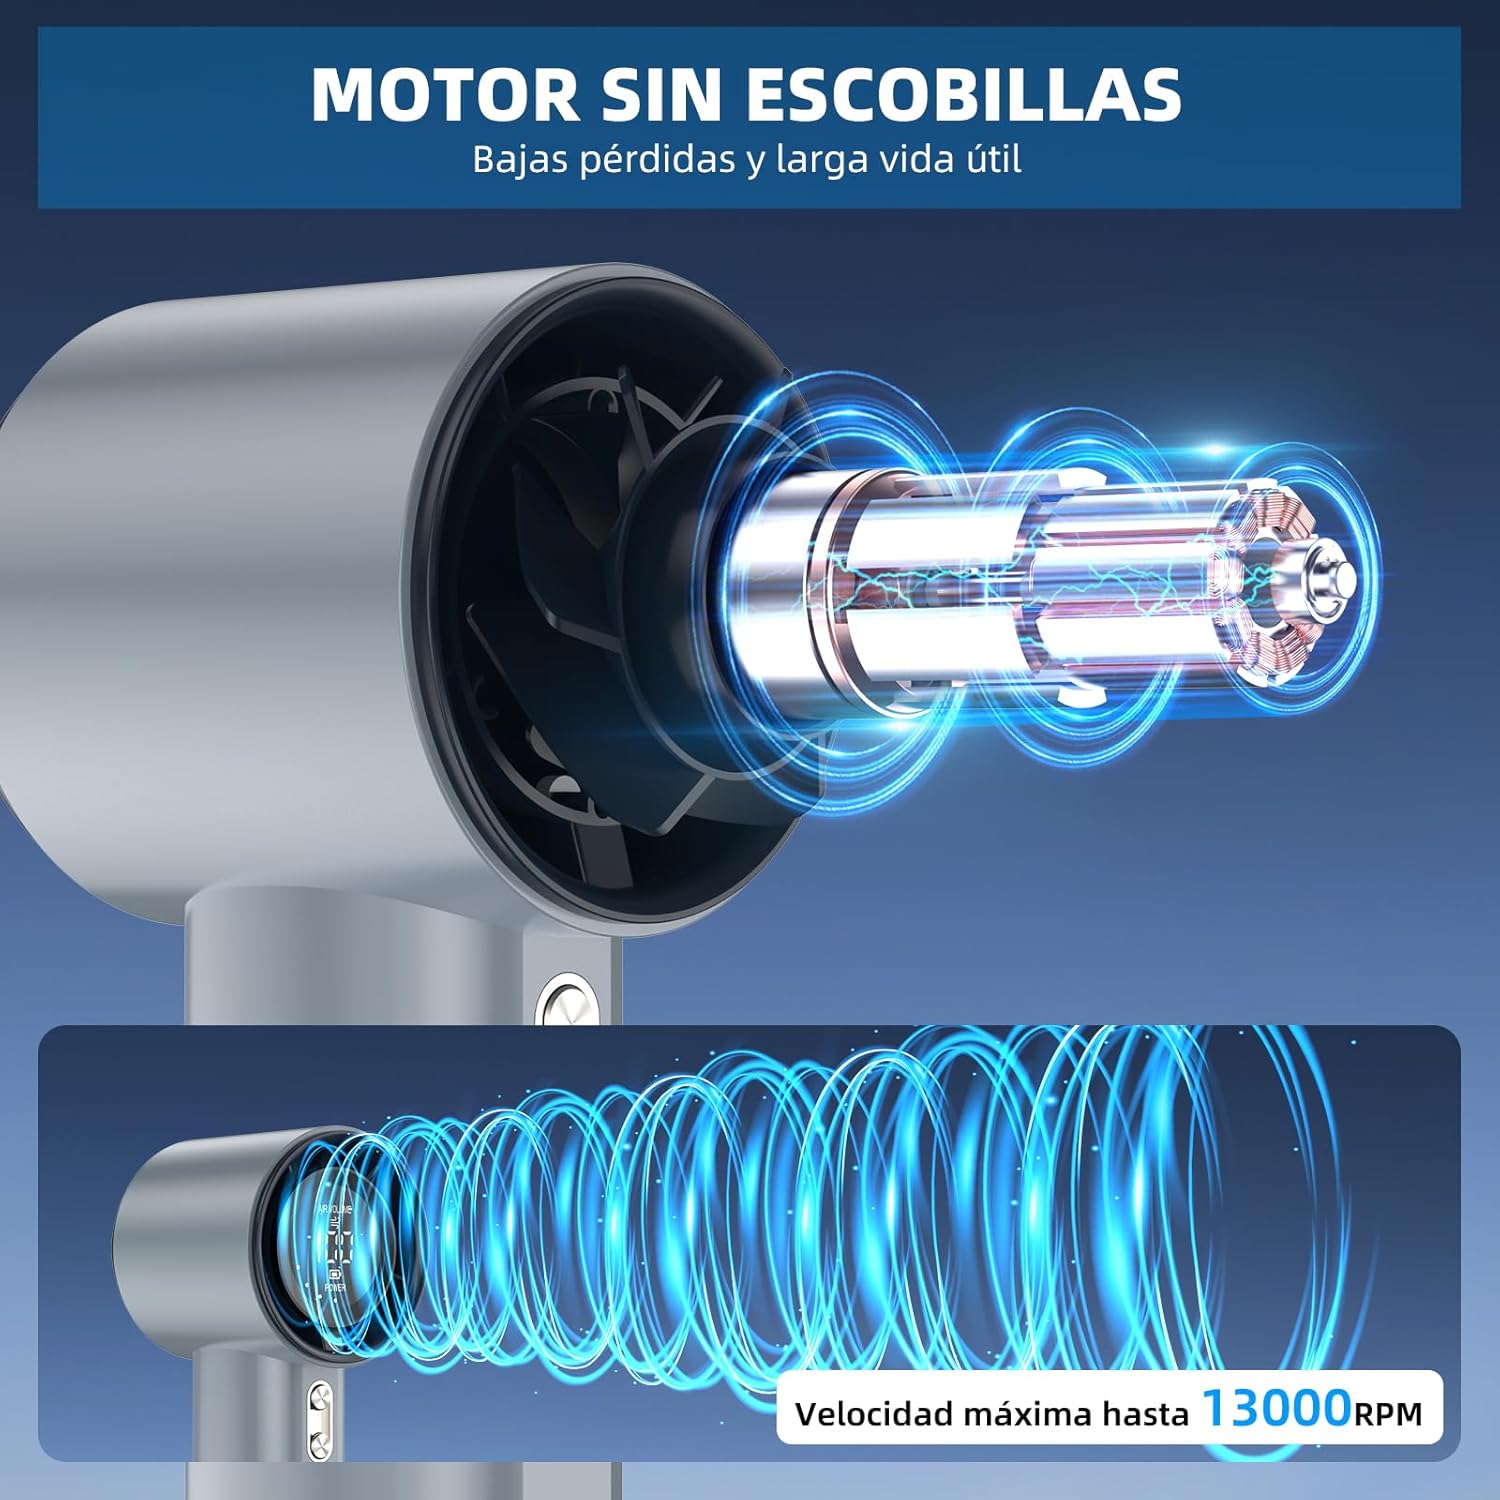
jimar 2: Internal structure illustrating the brushless motor and optimized airflow design, capable of up to 13000 RPM.
4.2 Bişkojên Kontrolê
The fan is equipped with two control buttons for easy operation.
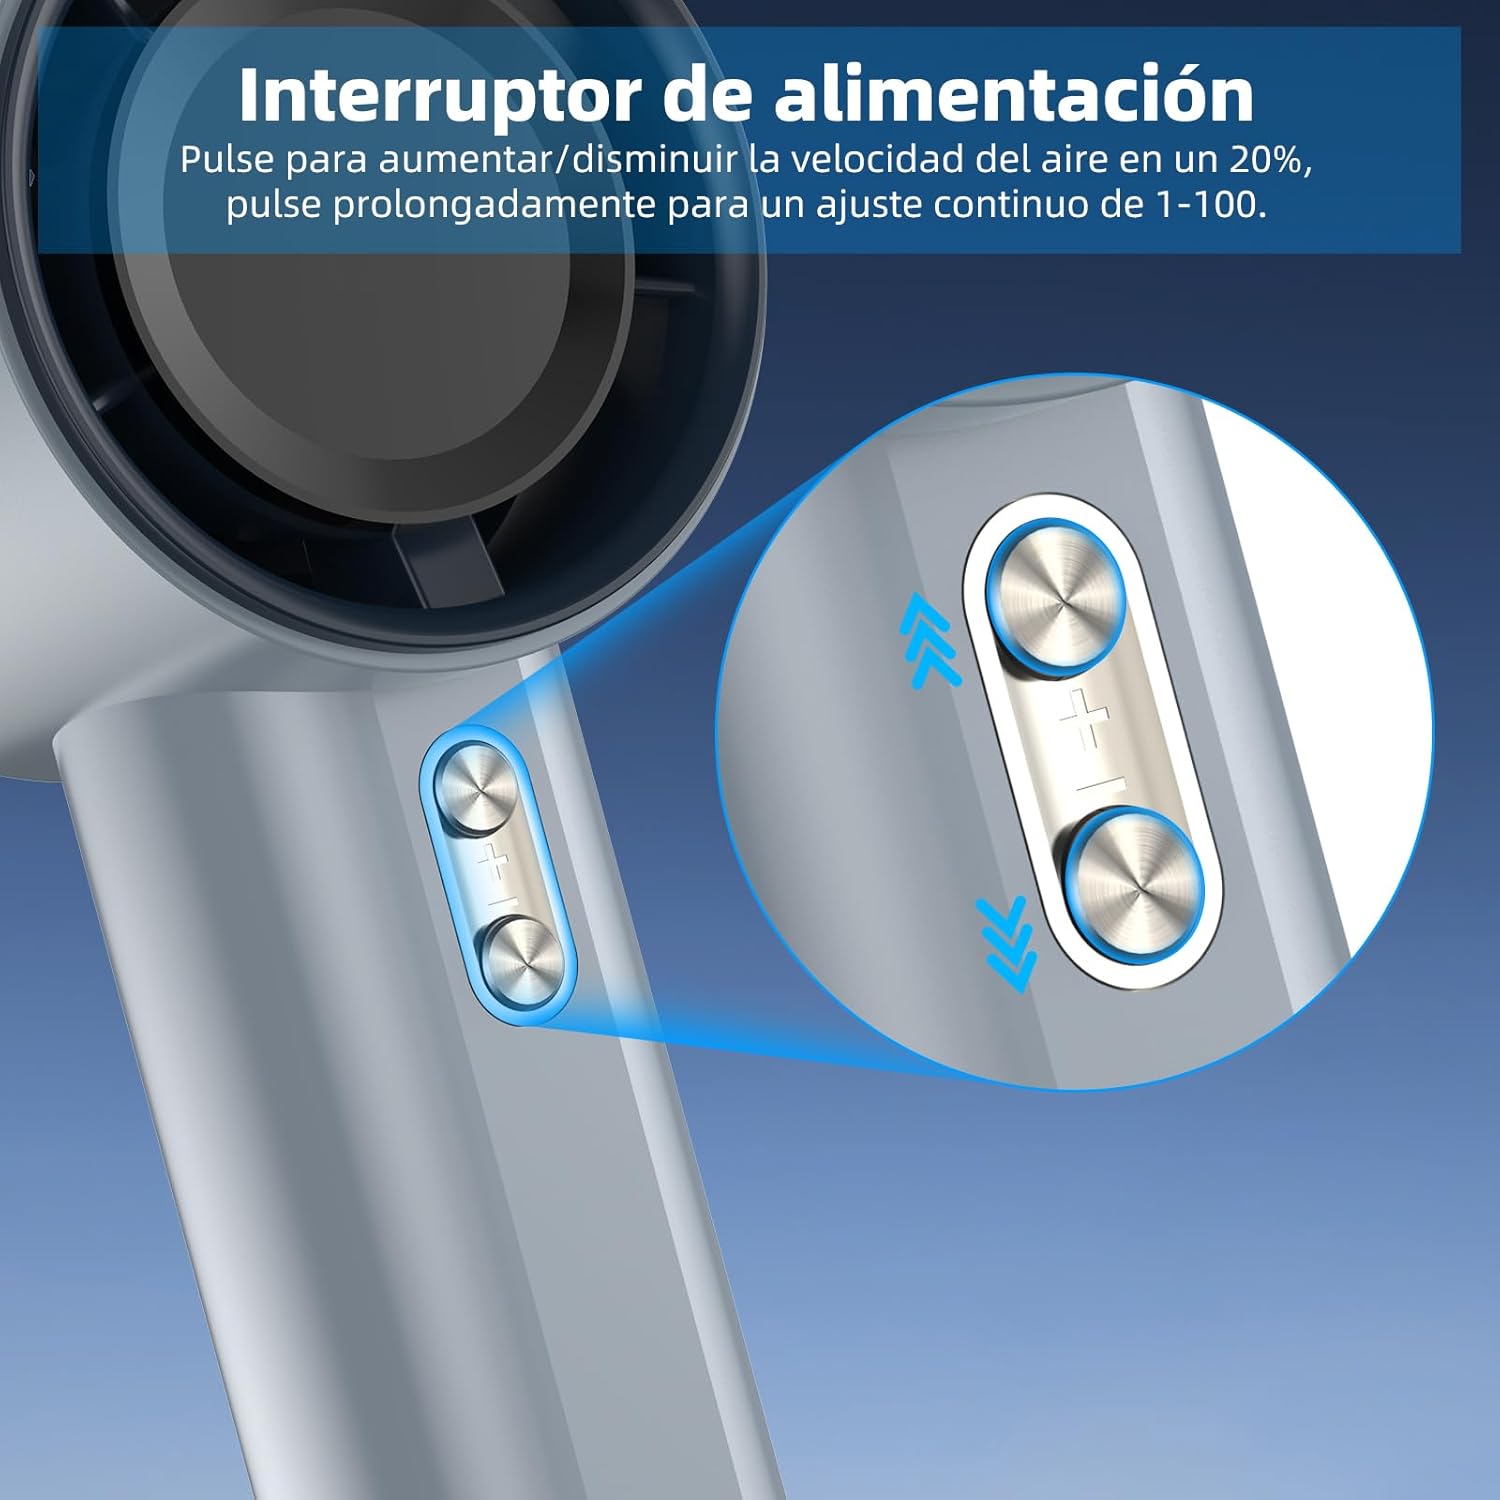
jimar 3: Detail of the power/speed adjustment buttons. Short press to adjust speed by 20%, long press for continuous 1-100 speed adjustment.
4.3 Dîmendera Dîjîtal
The integrated digital display provides real-time information about the fan's status.

jimar 4: The digital display indicates the current air volume (speed level from 1-100) and battery power level.
Dîmender nîşan dide:
- DENGÊ HAWAYÊ: Indicates the current fan speed level (1-100).
- ERK: Barê pîlê mayî nîşan dide.
5. Sazkirin
5.1 Barkirina Destpêk
Before first use, fully charge the fan. The fan is equipped with a 4000mAh battery.
- Connect the provided USB-C charging cable to the charging port on the fan.
- Connect the other end of the USB-C cable to a compatible USB power adapter (e.g., phone charger, computer USB port) or power bank.
- The digital display will show the charging status. A full charge typically takes approximately 2.5 hours.
- Piştî ku bi tevahî dakêşin, kabloya barkirinê veqetînin.

jimar 5: The fan's USB-C charging port and internal 4000mAh battery, indicating a 2.5-hour charging time for up to 12 hours of operation.
A full charge can provide up to 12 hours of working time, depending on the speed setting.
5.2 Girêdana Kembera Destan
For added security and portability, attach the hand strap to the designated loop on the fan handle.

jimar 6: The fan with an attached hand strap, demonstrating its use for secure carrying.
6. Telîmatên Operating
6.1 Power On / Off
- To turn on the fan: Press and hold either the '+' or '-' button for a few seconds until the display illuminates and the fan starts.
- To turn off the fan: Press and hold either the '+' or '-' button for a few seconds until the display turns off.
6.2 Mîhengkirina Leza Fanê
The fan offers 100 adjustable speed levels.
- Rêzkirina zêde: Short press the '+' button to increase the fan speed by 20 levels. Short press the '-' button to decrease the fan speed by 20 levels.
- Continuous Adjustment: Press and hold the '+' button to continuously increase the fan speed. Press and hold the '-' button to continuously decrease the fan speed. Release the button when the desired speed is reached.
The current speed level (AIR VOLUME) will be displayed on the digital screen.
7. Maintenance
7.1 Paqijkirin
- Berî paqijkirinê, piştrast bikin ku fan vemirî ye û ji her çavkaniya hêzê veqetandî ye.
- Derveyê fanosê bi qumaşek nerm û hişk paqij bikin.
- Use a soft brush or cotton swab to gently remove dust from the air inlet and outlet grilles. Do not use water or harsh cleaning agents.
7.2 Storage
- Fanê li cîhekî sar û hişk, dûr ji tîrêjên rojê yên rasterast û germahiyên zêde hilînin.
- If storing for an extended period, charge the battery to approximately 50% every three months to prolong battery life.
8. Destpêkirin
| Pirsegirêk | Sedema gengaz | Çare |
|---|---|---|
| Fan vênake. | Pîl diqede. | Charge the fan fully using the USB-C cable. |
| Fan vênake. | Bişkoka hêzê bi awayekî rast nehatiye pêlkirin. | Press and hold either the '+' or '-' button for a few seconds to power on. |
| Fan speed cannot be adjusted. | Bişkok bêbersiv in. | Ensure the fan is on. If issue persists, try charging the fan. |
| Herikîna hewayê kêm kirin. | Air inlets/outlets are blocked by dust. | Clean the air grilles as described in the Maintenance section. |
| Fan bi awayekî nediyar radiweste. | Pîlê kêm. | Fanê ji nû ve şarj bike. |
If you encounter issues not listed here or if problems persist, please contact GOOJODOQ customer support.
9. Specifications
| Nîşan | GOOJODOQ |
| Cins | Fanê Turbo yê Destan ê Veguhêzbar |
| Hêz / Wattage | 5 Watt |
| Mal | Pîlastîk |
| Hejmara Leza | 100 (Gerker) |
| Kapasîteya Pîl | 4000mAh (nêzîkî) |
| Time Charging | Approx. 2.5 saetan |
| Dema xebitandinê | Heta 12 saetan (li gorî leza) |
| Babetê Weight | 400 g |
| Mezinahiya Hilberê | 6.1D x 5.9W x 16H Santîmetre |
| Çavkaniya Hêzê | USB-C |
| Tîpa Kontrolê | Touch Panel Control (Buttons) |

jimar 7: The compact and portable design of the fan, shown being placed into a small bag. While the image indicates 225g, the product specifications state an item weight of 400g.
Nîşe: Specifications bêyî agahdariya pêşîn têne guhertin.
10. Garantî û Piştgirî
For warranty information, technical support, or customer service inquiries, please refer to the contact details provided on the product packaging or visit the official GOOJODOQ webmalper. Ji kerema xwe dema ku hûn bi piştgiriyê re têkilî datînin, modela hilberê xwe û dîroka kirînê li ber dest bigirin.
Ask a question about this manual
Ask about setup, troubleshooting, compatibility, parts, safety, or missing instructions. Manuals+ will review the question and use this page’s manual context to help answer it.