1. Destpêk
This manual provides detailed instructions for the assembly, operation, and maintenance of your EROMMY 10x20 FT Wood Grain Louvered Pergola. Please read all instructions carefully before beginning assembly and retain this manual for future reference. This pergola is designed to provide an adjustable outdoor living space with protection from sun and rain.
2. Agahdariya Ewlekariya Girîng
- Always follow the assembly instructions provided in this manual.
- Use caution when adjusting the louvered roof.
- Secure the pergola to a stable foundation to prevent tipping.
- Regularly inspect and maintain the product to ensure its safety and longevity.
- Keep the product clean and free of debris to prevent potential hazards.
- Do not use the product in extreme weather conditions or when the ground is wet or slippery.
- Always follow local building codes and regulations when installing the pergola.
3. Naveroka pakêtê
The EROMMY 10x20 FT Louvered Pergola is delivered in multiple boxes (typically 6-7 boxes). Ensure all parts are present and undamaged before beginning assembly. Refer to the parts list in your included manual for a complete inventory.
Not: The total weight of the packages is substantial (410 pounds). It is recommended to have at least two people to move the boxes to the installation site.

4. Setup û Meclîsa
Assembly typically requires 3-4 people and can take approximately 2-3 hours. However, some users report 7-7.5 hours for complete setup, especially when working with fewer people or performing additional tasks like anchoring.
4.1 Unboxing and Part Preparation
Carefully unbox all components. You will find numerous frame pieces, nuts, bolts, and attachments. All parts are covered with protective film; remove this film before assembly. This process can be time-consuming.
4.2 Meclîsa Çarçoveyê
Begin by assembling the top frame. This involves screwing in various nuts and bolts. Having two people is highly recommended for this step.
4.3 Post and Beam Connection
Connect the posts to the assembled beams. Ensure all screws are in place before fully tightening them.
4.4 Louver Installation
Install the louvered panels into the roof frame. Ensure the plastic pieces that support the shade rails are correctly positioned at the bottom before attaching the rails. If these pieces fall off, reinsert them before proceeding.

4.5 Curtains and Netting Installation
Attach the curtains and netting to the designated tracks. The pergola includes three bands on the poles to secure detachable curtains and nets, preventing them from flying during strong winds.

4.6 Anchoring the Pergola
Once the pergola is fully assembled and positioned in its final location, anchor it to the ground. You will need a hammer drill and appropriate bits (not included) to drill four holes for each post. Clean out concrete dust before inserting the anchor sleeves and tightening them with a wrench.
5. Telîmatên Operating
5.1 Adjustable Louvered Roof
The louvered roof can be adjusted to control sunlight and shade. Use the provided handles to open or close the louver sections. The pergola features two louver sections that can be operated separately to meet various shading needs.

5.2 Curtains and Netting
The included curtains and netting can be deployed for privacy, sun protection, or insect control. They can be zipped up or tied back to the poles using the humanized straps.
6. Maintenance
Regular cleaning, inspection, and simple maintenance will extend the lifespan of your pergola. The aluminum frame and louvered roof are designed to withstand various weather conditions.
- Paqijî: Clean the frame and louvers with mild soap and water. Rinse thoroughly.
- Berçavderbasî: Periodically check all nuts, bolts, and connections to ensure they are tight. Inspect curtains and netting for any damage.
- Pergala drainage: Ensure the built-in gutter system is free of debris to allow for proper rainwater drainage.
7. Destpêkirin
- Berhevkirina Avê: Check the internal gutter system for blockages. Ensure the pergola is level for effective drainage.
- Shade Rails Not Staying Up: Verify that the small plastic support pieces are correctly inserted at the bottom of the shade rails.
- Pêkhateyên Loose: Her gwîz an çîpên zeliqandî hişk bikin.
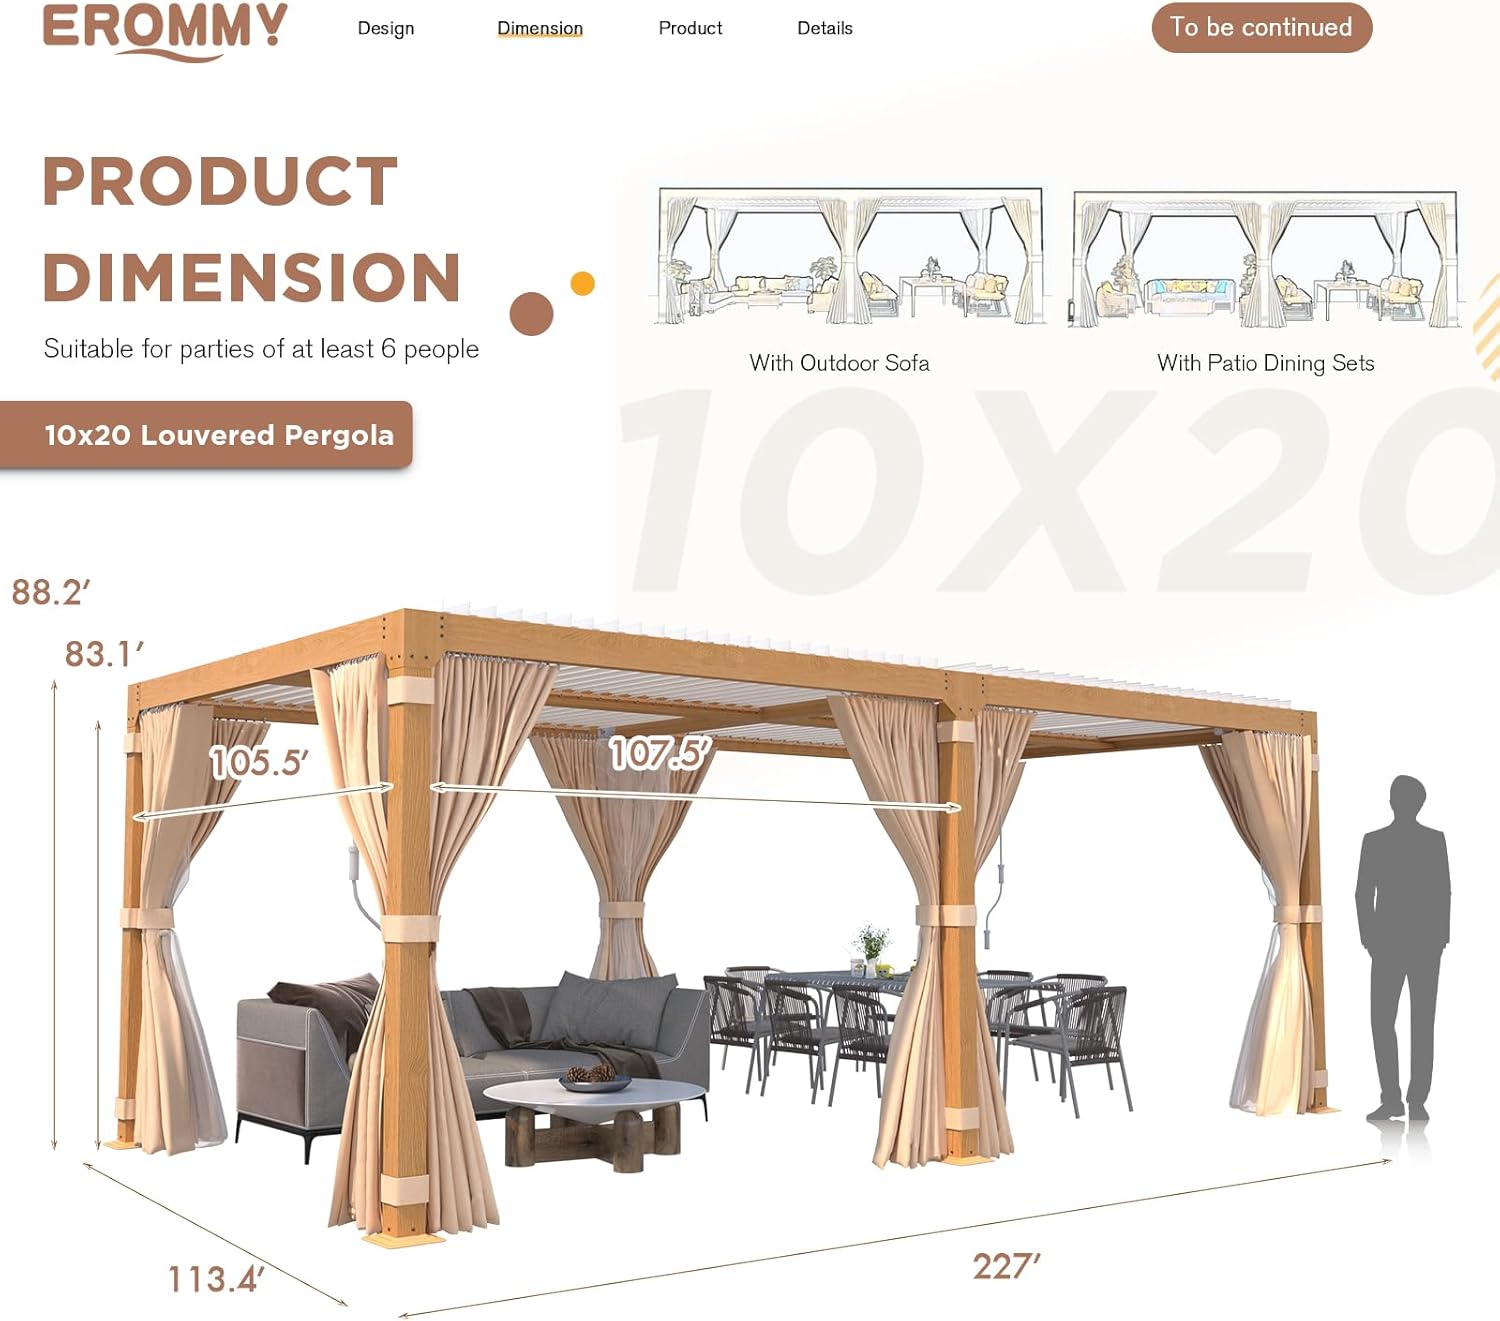
8. Specifications
| Taybetmendî | Giranî |
|---|---|
| Nîşan | EROMMY |
| Cins | 10x20 FT Wood Grain |
| Mal | Aluminum, Alloy Steel, Metal, Wood |
| Mezinahiya Hilberê | 227"D x 115.3"Fi x 88.2"Bilindahî |
| Babetê Weight | 410 Pound |
| Asta Berxwedana Avê | Water Resistant |
| Parastina ji Ronahiya Ultraviyole | 99% |
| Civîna Pêdivî ye | Erê |
9. Garantî û Piştgirî
For any issues, questions, or support needs regarding your EROMMY Louvered Pergola, please contact the EROMMY service team. They are committed to responding promptly to any concerns.
Additional protection plans may be available for purchase separately. Please refer to your purchase documentation for details on available plans and coverage.