1. Hilbera Serîview
The Warrior 18V Cordless 3/8 Inch Drill/Driver Kit is designed for various drilling and driving tasks around the home and workshop. This versatile tool features a variable speed trigger, an electric brake, and 20 torque clutch settings for precise control. A keyless chuck allows for quick and easy bit changes, and a built-in LED light illuminates the work area for improved visibility in dark corners. The included 18V Lithium-Ion battery is interchangeable with other 18 Volt Warrior tools, offering convenience and flexibility.
Taybetmendiyên sereke:
- Variable speed, reversible operation
- Electric brake for immediate stopping
- 20 torque clutch settings for diverse applications
- Keyless chuck for quick bit changes
- Integrated LED light for enhanced visibility
- 18 Volt Lithium-Ion battery, interchangeable with other Warrior 18V tools
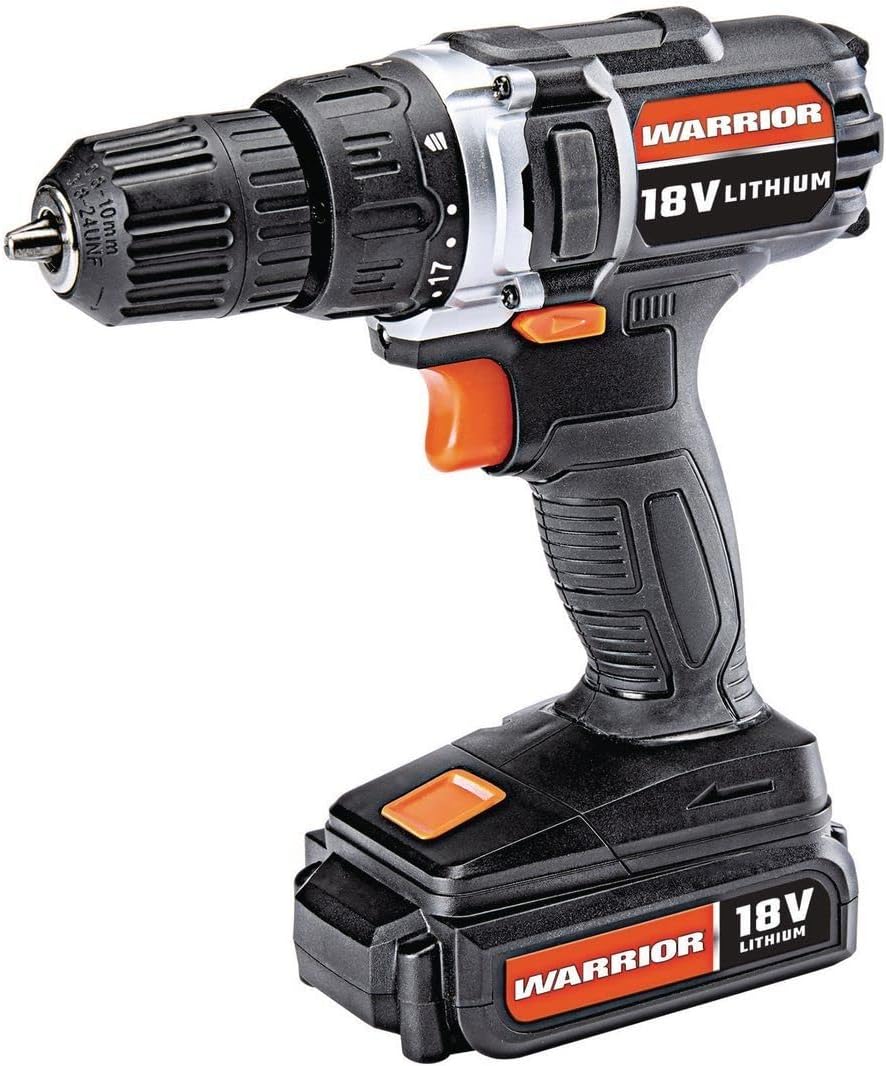
Figure 1: The Warrior 18V Cordless 3/8 Inch Drill/Driver Kit, showcasing sêwirana wê ya kompakt û taybetmendiyên wê yên sereke.
2. Sazkirin
2.1 Şarjkirin û Sazkirina Pîlê
- Barkirina Pîlê: Connect the provided barrel charger to the charging port located on the battery pack. Plug the charger into a standard electrical outlet. The indicator light on the charger will show the charging status (e.g., red for charging, green for fully charged). Ensure the battery is fully charged before first use.
- Sazkirina Pîlê: Align the battery pack with the base of the drill handle. Slide the battery into place until it clicks securely. Ensure it is firmly seated to prevent accidental detachment during operation.
- Jêkirina Pîlê: Press the battery release buttons (typically on the sides of the battery pack) and slide the battery out of the drill handle.
2.2 Danîna û Rakirina Bitên Qulkirinê
- Çakê vekin: Rotate the front collar of the keyless chuck counter-clockwise until the jaws are wide enough to accept the desired drill bit or driver bit.
- Bitê têxe: Insert the shank of the drill bit or driver bit into the chuck jaws. Ensure the bit is centered and inserted as far as possible without touching the chuck body.
- Çakê teng bike: Rotate the front collar of the chuck clockwise until the jaws firmly grip the bit. For maximum grip, give it an extra twist by hand.
- Remove the Bit: Rotate the front collar of the chuck counter-clockwise to loosen the jaws and remove the bit.

Wêne 2: Serview of the drill's features, including the 20 clutch settings, LED light, variable speed, and lightweight design.
3. Telîmatên Operating
3.1 Vekirin/Girtin û Kontrola Leza Guherbar
- To start the drill, press the trigger switch. The speed of the drill is controlled by the amount of pressure applied to the trigger; pressing it further increases the speed.
- To stop the drill, release the trigger switch. The electric brake will engage, stopping the chuck rotation quickly.
3.2 Zivirîna Pêş/Paş
- Bişkoka hilbijêra pêş/paş ve li jor tetikê ye.
- Push the switch to the left for forward rotation (for drilling and driving screws).
- Push the switch to the right for reverse rotation (for removing screws or backing out drill bits).
- When the switch is in the center position, the trigger is locked, preventing accidental startup.
3.3 Torque Clutch Settings
- The torque clutch ring is located behind the chuck. It has 20 numbered settings and a drill symbol.
- Rotate the ring to select the desired torque setting. Lower numbers provide less torque, suitable for smaller screws and softer materials to prevent over-driving or stripping. Higher numbers provide more torque for larger screws and harder materials.
- For drilling applications, select the drill symbol setting for maximum torque.
3.4 Light Work LED
- The integrated LED work light automatically illuminates when the trigger is pressed, providing light to the work surface.

Figure 3: The Warrior 18V Cordless Drill in use, demonstrating its application for household tasks like installing a grab bar.
4. Maintenance
4.1 Paqijkirina Giştî
- Keep the tool's air vents clean and free of debris to ensure proper motor cooling.
- Amûrê bi kefek paqij paqij bike, damp çît. Kîmyewî û paqijkerên hişk bikar neynin.
- Regularly inspect the chuck jaws for wear and clean any accumulated dust or debris.
4.2 Lênêrîn û Hilanîna Pîlê
- Pîlê li cîhek sar û zuwa dûr ji tîrêja tavê ya rasterast û germahiya zêde hilînin.
- For long-term storage, it is recommended to charge the battery to approximately 50% capacity.
- Berî şarjkirinê, ji valakirina tevahî ya bateriyê dûr bisekinin, ji ber ku ev dikare temenê wê kêm bike.
5. Destpêkirin
5.1 Drill Does Not Operate
- Piştrast bikin ku pîlê bi tevahî barkirî ye û bi rêkûpêk hatî saz kirin.
- Kontrol bike ku guhêra hilbijêra pêş/paşve di pozîsyona navendî (kilîtkirî) de nebe.
- Verify that the charger is disconnected from the battery when attempting to operate the drill.
5.2 Reduced Power or Performance
- The battery may be low on charge. Recharge the battery.
- The torque clutch setting may be too low for the task. Adjust to a higher setting or the drill mode.
- Ensure the drill bit is sharp and appropriate for the material being worked on.
6. Specifications
| Taybetî | Specification |
|---|---|
| Nîşan | Şervan |
| Hejmara Model | Warior-XXX |
| Çavkaniya Hêzê | Battery Powered |
| Voltage | 18 Volt |
| Tîpa Hucreya Pîl | Lithium Ion |
| Leza Zivirî ya herî zêde | 900 RPM |
| Mîhengên Torque | 20 Mîhengên Kelûpelê |
| Tîpa Chuck | Chuck Keyless |
| Kapasîteya Qulkirinê Dar | 1 Inch |
| Babetê Weight | 2.47 lîre |
| Mal | Pîlastîk |
| Taybetmendiyên Taybet | Variable Speed, LED Light |
| UPC | 798993496886 |
7. Garantî û Piştgirî
Specific warranty information and customer support contact details were not provided in the product data. Please refer to the product packaging or the manufacturer's official webmalper ji bo şert û mercên garantiyê û vebijarkên piştgiriyê yên herî nûjen.