1. Introduction to the AUTO-VOX X2 Mirror Dash Cam
The AUTO-VOX X2 is a sophisticated mirror dash cam designed to enhance driving safety and provide comprehensive recording capabilities. It features a 9.88-inch full touch streaming media display, offering a clear, real-time view of traffic conditions. The system includes both a front camera for forward recording and a 720P AHD waterproof backup camera for reverse assistance.
Key functionalities include G-Sensor for collision detection, loop recording to manage storage efficiently, parking monitoring for 24-hour surveillance, Lane Departure Warning System (LDWS), and GPS tracking for route and speed data.

Wêne 1.1: Serview of AUTO-VOX X2 features, including parking monitoring, dual views, night vision, emergency lock, touch screen, loop recording, GPS tracking, and LDWS.
Video 1.1: An official AUTO-VOX video demonstrating the features and functionality of the X2 9.88" Rear View Kamera Neynikê ya Dashê.
2. Sazkirin û Sazkirin
Proper installation is crucial for the optimal performance of your AUTO-VOX X2 Mirror Dash Cam. Follow these steps carefully.
2.1 Naveroka pakêtê
Berî destpêkirinê, piştrast bikin ku hemî pêkhate hene:
- AUTO-VOX X2 Mirror Dash Cam Unit
- Kamera paşîn
- Car Charger (Power Cable)
- Video Cable for Rear Camera
- Modula GPS
- Two Sets of Mounting Straps
- Manual Bikarhêner (ev belge)
- Rêberê Zû
- Karta Garantiyê
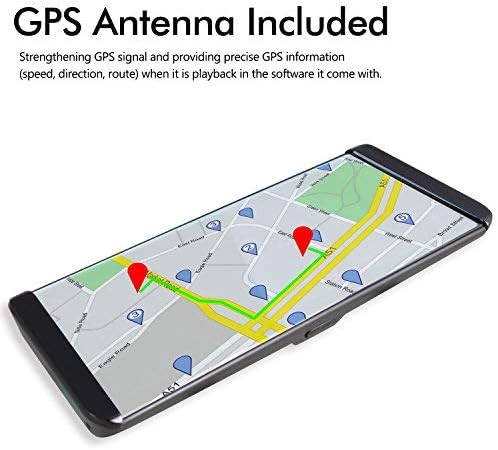
Image 2.1: The complete set of components included with the AUTO-VOX X2 Mirror Dash Cam.
2.2 Mounting the Mirror Dash Cam
- Secure the AUTO-VOX X2 unit over your vehicle's existing rearview mirror using the provided rubber straps. Ensure it is firmly attached and does not obstruct your view.
- Adjust the angle of the front camera lens to ensure it captures the road ahead clearly.
2.3 Connecting Power and GPS
- Connect the car charger cable to the USB port on the dash cam unit.
- Serê din ê şarjêra otomobîlê bi priza çakmaka cixareyê ya wesayîta xwe ve girêdin.
- Connect the GPS module to the designated GPS port on the dash cam unit. Position the GPS module on your dashboard or windshield where it has a clear view ji asîman ji bo wergirtina sînyala çêtirîn.
2.4 Sazkirina Kamera Paşê
- Mount the rear camera at the rear of your vehicle, typically above the license plate or on the rear window. Ensure it has a clear, unobstructed view.
- Route the video cable from the rear camera to the AV (backup camera) port on the main dash cam unit.
- Connect the red wire from the rear camera's video cable to your vehicle's reversing light power supply (+12V). This enables automatic display of the rear view when shifting into reverse gear.

Image 2.2: Detailed wiring diagram illustrating the connections for the rear camera, GPS, and power supply.
3. Telîmatên Operating
The AUTO-VOX X2 is designed for intuitive operation via its touch screen interface.
3.1 Operasyona Screen Touch
The 9.88-inch full touch screen allows for easy navigation and control. Swipe your fingers across the screen to access different menus and settings, or to adjust display brightness and camera views.
3.2 Front Camera Recording
The front camera records in 1296P Full HD, capturing a wide 140-degree field of view. Recording starts automatically when the device powers on. The display can show the front view, paş view, or a split view.

Wêne 3.1: Berêample of the clear, wide-angle view provided by the front camera on the X2 display.
3.3 Rear Camera and Reverse Assistance
When the vehicle is shifted into reverse gear, the rearview camera automatically activates, displaying a wide 140-degree view with parking guidelines on the screen. This assists in safe parking by showing a closer backup image and reducing blind spots.

Image 3.2: The rear camera display with active parking guidelines for easy maneuvering.
3.4 G-Sensor û Tomarkirina Loopê
- G-Sensor: In the event of a collision or sudden impact, the built-in G-Sensor automatically locks the current video footage, preventing it from being overwritten.
- Tomarkirina Loop: When the storage card is full, the system automatically overwrites the oldest unlocked video segments. This ensures continuous recording without manual deletion.

Image 3.3: Illustration of the loop recording function, ensuring continuous video capture.
3.5 Parking Monitor and LDWS
- Çavdêriya Parkkirinê: When enabled, the dash cam will automatically begin recording if an impact is detected while the vehicle is parked. This feature provides 24-hour surveillance. A hardwire kit (5V/2A) is required for continuous 24-hour parking monitoring and must be purchased separately.
- Sîstema Hişyariya Derketina Hêlê (LDWS): This system provides an audible alert if the vehicle unintentionally drifts from its lane, promoting safer driving.

Image 3.4: The parking monitoring feature capturing an event while the vehicle is stationary.
3.6 Lîstika GPS
The integrated GPS tracking system records precise speed, direction, and route information. This data can be reviewed on a PC using the included player software, which requires an internet connection for map display. This feature is valuable for documenting journeys and providing evidence in case of an incident.

Image 3.5: Visual representation of GPS tracking and route playback.
4. Maintenance
To ensure the longevity and optimal performance of your AUTO-VOX X2 Mirror Dash Cam, regular maintenance is recommended.
- Paqijî: Gently wipe the screen and camera lenses with a soft, lint-free cloth. Avoid using abrasive cleaners or solvents.
- Rêvebiriya Karta SD: Regularly format the microSD card (at least once a month) to prevent data corruption and ensure smooth recording. Use a high-quality Class 10 or higher microSD card.
- Lênêrîna Pîl: If using the parking monitor feature, ensure your vehicle's battery is in good condition and consider checking its charge frequently, especially in cold weather or if the vehicle is parked for extended periods. For continuous parking monitoring, a dedicated hardwire kit is recommended to prevent draining the car battery.
- Nûvekirinên Firmware: Check the official AUTO-VOX webji bo baştirkirina performansê û lê zêdekirina taybetmendiyên nû, dem bi dem malperê kontrol bikin da ku nûvekirinên firmware-ê yên berdest baştir bikin.
5. Destpêkirin
If you encounter issues with your AUTO-VOX X2, refer to the following common troubleshooting tips:
- Cîhaz Nakeve: Ensure the car charger is securely connected to both the dash cam and the vehicle's power outlet. Check if the vehicle's power outlet is functioning.
- Pirsgirêkên Tomarkirinê: Verify that a compatible microSD card is inserted and formatted correctly. If the card is full, loop recording should automatically manage space; however, frequent manual formatting can resolve issues.
- Kamera Paşîn Nayê Nîşandan: Check all cable connections between the rear camera and the main unit. Ensure the red wire for reverse assistance is correctly connected to the reversing light's +12V power.
- GPS Signal Problems: Ensure the GPS module is placed in an area with a clear view of the sky, free from obstructions.
- Screen Glare: Adjust the screen brightness settings via the touch screen. Consider using a screen protector designed to reduce glare.
- LDWS Alerts Constantly: The Lane Departure Warning System may be sensitive. Adjust its sensitivity settings in the menu if available, or disable it for city driving if preferred.
If problems persist, please contact AUTO-VOX customer support for further assistance.
6. Specifications
| Taybetî | Specification |
|---|---|
| Navê Model | X2 |
| Mezinahiya Screen | 9.88 înç (Dîmendera Destî) |
| Çareserkirina Kamera Berê | 1296P FHD |
| Çareserkirina Kamera Rear | 720P AHD |
| Qada ji View | 140 Dereceyan |
| Taybetmendiyên Taybet | Built-In GPS, Parking Monitor, G-Sensor, LDWS, Loop Recording, WDR |
| Teknolojiya Girêdanê | USB |
| Mounting Type | Windshield Mount (Mirror Clip-on) |
| Batteries | 1 pîlê Lithium Ion hewce ye |
| Babetê Weight | 2.64 lîre |
| Mezinahiyên pakêtê | 12.5 x 4.7 x 2.6 inches |
7. Garantî û Piştgirî
The AUTO-VOX X2 Mirror Dash Cam comes with a manufacturer's warranty. Please refer to the included Warranty Card for specific terms and conditions. For technical support, troubleshooting assistance, or warranty claims, please contact AUTO-VOX customer service through their official webmalper an agahdariya têkiliyê ya ku di pakêta hilbera we de hatî peyda kirin.
For additional resources and frequently asked questions, visit the official AUTO-VOX support page: www.auto-vox.com/support