
1. Destpêk
Thank you for choosing the Alecto WS-4700 Professional Digital Weather Station. This manual provides detailed instructions for the setup, operation, and maintenance of your new weather station. Please read this manual thoroughly before use to ensure proper functionality and to maximize the lifespan of your device.
2. Hilbera Serîview
2.1 Taybetmendiyên sereke
- Comprehensive professional weather station.
- Displays indoor and outdoor temperature.
- Displays indoor and outdoor humidity.
- Leza û alîyê bayê dipîve.
- Measures atmospheric pressure.
- Radio-controlled clock for accurate timekeeping.
- Rainfall measurement (daily, weekly, monthly).
- Heat index and dew point calculation.
- Animated weather forecast display.
2.2 Components
The Alecto WS-4700 weather station consists of a main display unit and a multi-sensor outdoor unit.

jimar 1: Alecto WS-4700 Professional Digital Weather Station, showing the main display unit and the integrated outdoor sensor array. The display unit is black with a large, illuminated screen showing various weather parameters. The outdoor sensor is white, featuring a rain collector, wind cups, and a wind vane.
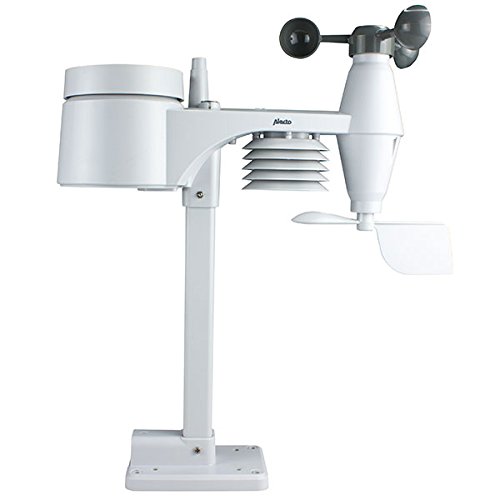
jimar 2: The Alecto WS-4700 outdoor multi-sensor unit. This white unit includes a rain gauge funnel at the top, a radiation shield for temperature/humidity, wind cups for speed, and a wind vane for direction, all mounted on a pole.

jimar 3: Close-up view of the Alecto WS-4700 main display unit. The screen shows time, indoor/outdoor temperature and humidity, 12-hour forecast, barometric pressure history, wind direction, wind speed, and wind chill. Control buttons are visible at the bottom.
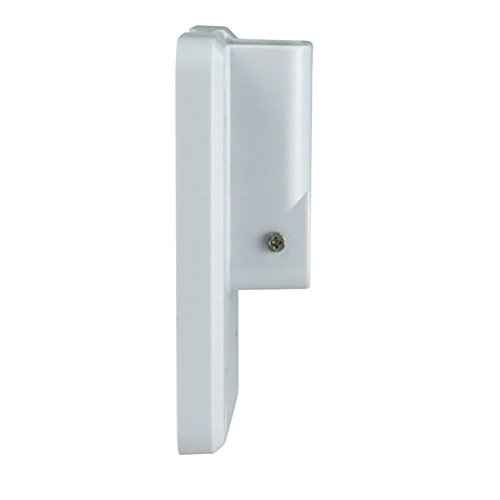
jimar 4: Hêl view of the Alecto WS-4700 main display unit, showing its slim profile û bisekinin.
3. Sazkirin
3.1 Vekirin
Hemû parçeyan bi baldarî ji pakêtê derxînin. Piştrast bikin ku hemû parçe li wir in:
- Yekîneya Nîşandana Sereke
- Outdoor Multi-Sensor Unit
- Mounting hardware (screws, pole, base)
- Manual Bikarhêner (ev belge)
Ji bo hilanîn an veguhastina pêşerojê pakêtê biparêzin.
3.2 Sazkirina Pîl
The Alecto WS-4700 requires AA batteries for operation.
- Yekîneya Nîşandana Sereke: Locate the battery compartment on the back of the display unit. Insert the required number of AA batteries, observing the correct polarity (+/-).
- Outdoor Multi-Sensor Unit: Locate the battery compartment on the outdoor sensor. Insert the required number of AA batteries, ensuring correct polarity. Securely close the compartment to protect against weather.
Not: It is recommended to use high-quality alkaline or lithium batteries for optimal performance, especially in cold climates for the outdoor sensor.
3.3 Cihkirina Sensor
Cihê rast ê sensora derve ji bo xwendinên rast girîng e.
- Cîh: Choose an open area, away from obstructions like buildings, trees, or fences that could block wind or rain.
- Bilindî: Mount the sensor at a height of approximately 2-3 meters (6-10 feet) above the ground for optimal wind and rain measurement.
- Orientation: Ensure the wind vane is oriented correctly (usually facing North) according to the instructions provided with the sensor.
- Ronahiya rojê: Position the sensor to minimize direct sunlight exposure on the temperature/humidity sensors, ideally in a shaded but open area, or rely on the built-in radiation shield.
The main display unit should be placed indoors, within the wireless range of the outdoor sensor. Avoid placing it near large metal objects or electronic devices that could interfere with the wireless signal.
3.4 Initial Setup and Sensor Synchronization
After battery installation, the main display unit will automatically attempt to synchronize with the outdoor sensor.
- Power on the main display unit.
- Power on the outdoor sensor unit.
- The display unit will search for the outdoor sensor. This process may take a few minutes.
- Once connected, outdoor temperature, humidity, wind, and rain data will appear on the display.
- The radio-controlled clock will automatically attempt to set the correct time and date. This may take several hours depending on signal strength.
If synchronization fails, ensure both units have fresh batteries and are within range. You may need to manually initiate a sensor search from the main display unit (refer to the "Operating Instructions" section for specific button functions).
4. Telîmatên Operating
4.1 Nîşandana Serview
The main display unit provides a comprehensive overview of current and historical weather data.
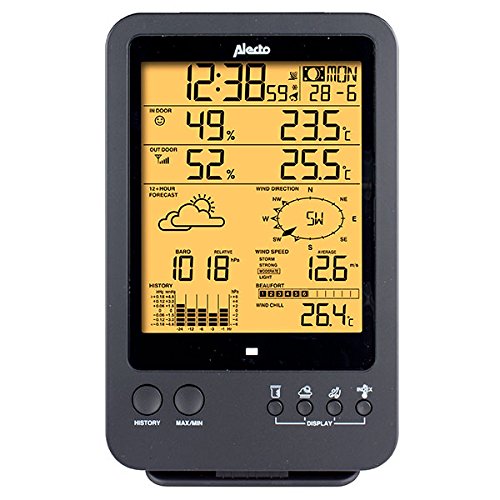
jimar 5: Bi berfirehî view of the Alecto WS-4700 display. Key areas include time and date, indoor/outdoor temperature and humidity, 12-hour weather forecast icons, barometric pressure with history graph, wind direction compass, wind speed, and wind chill.
Common display segments include:
- Dem û Dîrok: Top section, automatically set by radio signal.
- Germahî û Şilbûna Hundir/Derve: Displays current readings.
- 12-Hour Forecast: Animated icons indicating predicted weather conditions.
- Zexta Barometrîk: Current pressure and a historical graph.
- Wind Data: Direction (compass rose), speed (current and average), and wind chill.
- Baranbar: Total rainfall for various periods (daily, weekly, monthly).
- Heat Index / Dew Point: Calculated values for comfort and moisture.
4.2 Fonksiyon Bişkojk
The main display unit features several buttons for navigation and settings. While specific labels may vary, common functions include:
- DÎROK: View historical data for various parameters (e.g., max/min temperature, pressure trends).
- MAX/MIN: Toggle between maximum and minimum recorded values for temperature, humidity, etc.
- PÊŞKÊŞÎ: Cycle through different display modes or units (e.g., °C/°F, mph/km/h).
- DANÎN: Enter setup mode for manual adjustments (e.g., time zone, alarm settings).
- +/- (Up/Down): Adjust values during setup or navigate menus.
Refer to the on-screen prompts and the full manual for detailed button press sequences for specific functions.
4.3 Setting Time and Date (Manual Adjustment)
While the radio-controlled clock automatically sets the time, manual adjustment may be necessary if the signal is weak or unavailable.
- Bişkojk û bigire DANÎN button to enter time/date setting mode.
- Bi kar tînin +/- buttons to adjust the flashing value (e.g., hour, minute, year, month, day).
- Rojnamevanî DANÎN again to confirm the value and move to the next setting.
- Repeat until all settings are configured.
- Exit setup mode by pressing DANÎN or waiting for the unit to time out.
4.4 Weather Forecast Interpretation
The weather station predicts weather conditions based on changes in atmospheric pressure. The animated icons represent:
- Ro
- Partly Cloudy
- Ewrîn
- Baranî
- Snowy (if applicable)
These forecasts are based on local barometric pressure trends and are generally accurate for a 12-24 hour period within a limited radius. They should not replace official weather alerts.
5. Maintenance
5.1 Paqijkirin
- Yekîneya Nîşandanê: Bi nermî paqij bike, damp qumaş. Ji paqijker an çareserkerên aşınker dûr bisekinin.
- Sensorê Derve: Periodically check the rain collector for debris (leaves, insects) and clean as necessary. Ensure the wind cups and vane spin freely. Gently wipe the radiation shield to remove dust or dirt.
5.2 Guhertina Pîl
Replace batteries in both the main display unit and the outdoor sensor when the low battery indicator appears on the display. Always replace all batteries in a unit at the same time with new ones of the same type.
Not: When replacing outdoor sensor batteries, the main unit may temporarily lose connection. It should re-synchronize automatically within a few minutes.
6. Destpêkirin
| Pirsegirêk | Sedema gengaz | Çare |
|---|---|---|
| Agahiyên li ser derve nehatine nîşandan. |
|
|
| Dîrok/demjimêr şaş e. |
|
|
| Xwendinên nerast ên ba/baranê. |
|
|
7. Specifications
| Parametre | Hûrî |
|---|---|
| Hejmara Model | WS-4700 |
| Nîşan | Alecto |
| Pîvan (Yekîneya Sereke) | 13 x 5.4 x 27.8 cm |
| Pîvan | 986 gram |
| Çavkaniya Hêzê | AA Batteries (required for both units) |
| Mal | Pîlastîk |
| Têkilî | Wireless (sensor to display), Radio-controlled clock (time signal) |
| Reng | Black (main unit), White (outdoor sensor) |
8. Garantî û Piştgirî
Alecto products are designed for reliability and performance. For warranty information, please refer to the warranty card included with your purchase or visit the official Alecto website.
If you encounter any issues or have questions regarding your Alecto WS-4700 Professional Digital Weather Station, please contact Alecto customer support. Contact details can typically be found on the Alecto webmalper an jî di pakkirina hilberê we de.
Çêker: Hesdo
Welatê Orjînal: çîn